Make sure your IP address is set in the [setupips] variable in the config file. This can be done manually by editing /nidb/nidb.cfg or by going to Admin → Settings
Go to http://localhost/setup.php (Or within NiDB, go to Admin → Setup/upgrade)
Follow the instructions on the webpages to complete the upgrade
MySQL/MariaDB tweaks
Performance changes for large databases
These changes to MySQL/MariaDB can be helpful to improve database performance.
Variables
max_allowed_packet - Change value to 1073741824
slave_max_allowed_packet - Change to 1073741824
Pipelines & analysis
Optional software
List of extremely useful, but optional, software to help when using NiDB
phpMyAdmin
phpMyAdmin is not required to use NiDB, but is extremely useful to maintain the SQL database that NiDB uses.
Download latest version of phpMyAdmin from http://phpmyadmin.net/
Unzip the contents of .zip file into /var/www/html/phpMyAdmin
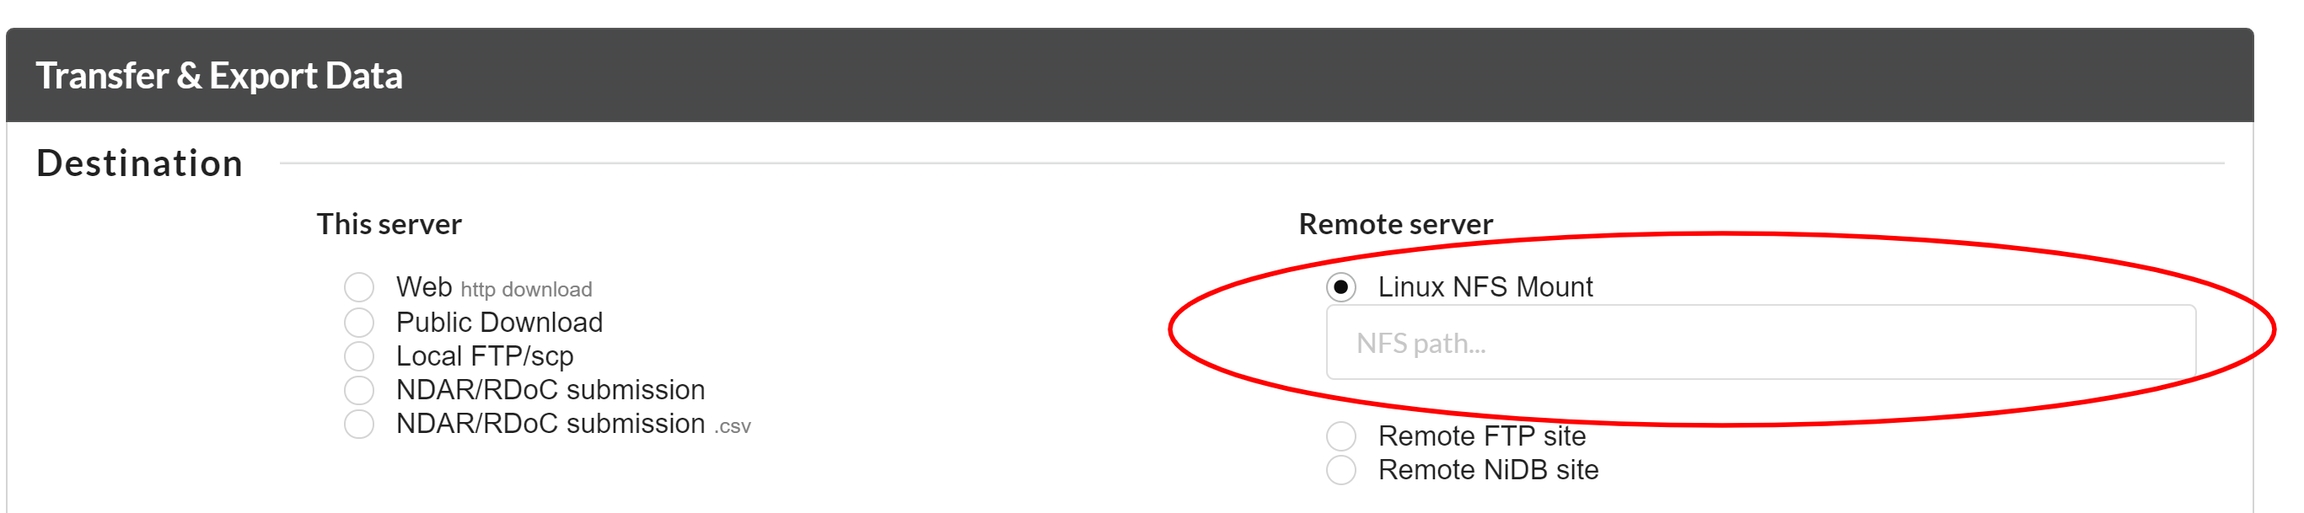
Imaging data is often large and is stored on a separate NFS mount on the NiDB server. For example if data is stored on /data1/nidb/data, change the config variables by going to Admin → NiDB Settings... → NiDB Settings. Find the Data Directories section and edit the appropriate data directories. Click Save Settings when done.
dcmrcv service
If you change the default /nidb/data/dicomincoming path, you must also edit the dcmrcv service. On RHEL compatible systems, perform the following as root
Working with Redcap
Tutorials regarding Redcap
Followings are three sections about Importing data and subjects from Redcap and creating reports using the data that is imported from Redcap.
How to migrate an existing NiDB installation to a new server
Sometimes you need to move your installation to a new server. Maybe you were testing in a virtual machine and want to move to a full server, or vice-versa. Maybe your server needs to be upgraded. Follow these steps to migrate an installation from one server to another.
Migration steps
On the
Data Storage Hierarchy
Data is stored in NiDB using a hierarchy. The root object is the subject. Each subject can be enrolled in multiple projects. Within each of those projects, the subject can have multiple imaging studies with different modalities. And within each imaging study, there are multiple series. Additionally measures and drugs are attached at the enrollment level. And analyses are attached to imaging studies.
Below is an example subject, enrolled in multiple projects, with imaging studies, and analyses.
Administration
The admin modules can be accessed by clicking on the Admin menu item. Your account must have administration permissions to see this menu.
Data (Front-end) Administration
Settings that the end-user will see.
MR scan quality control
MR scans quality parameters
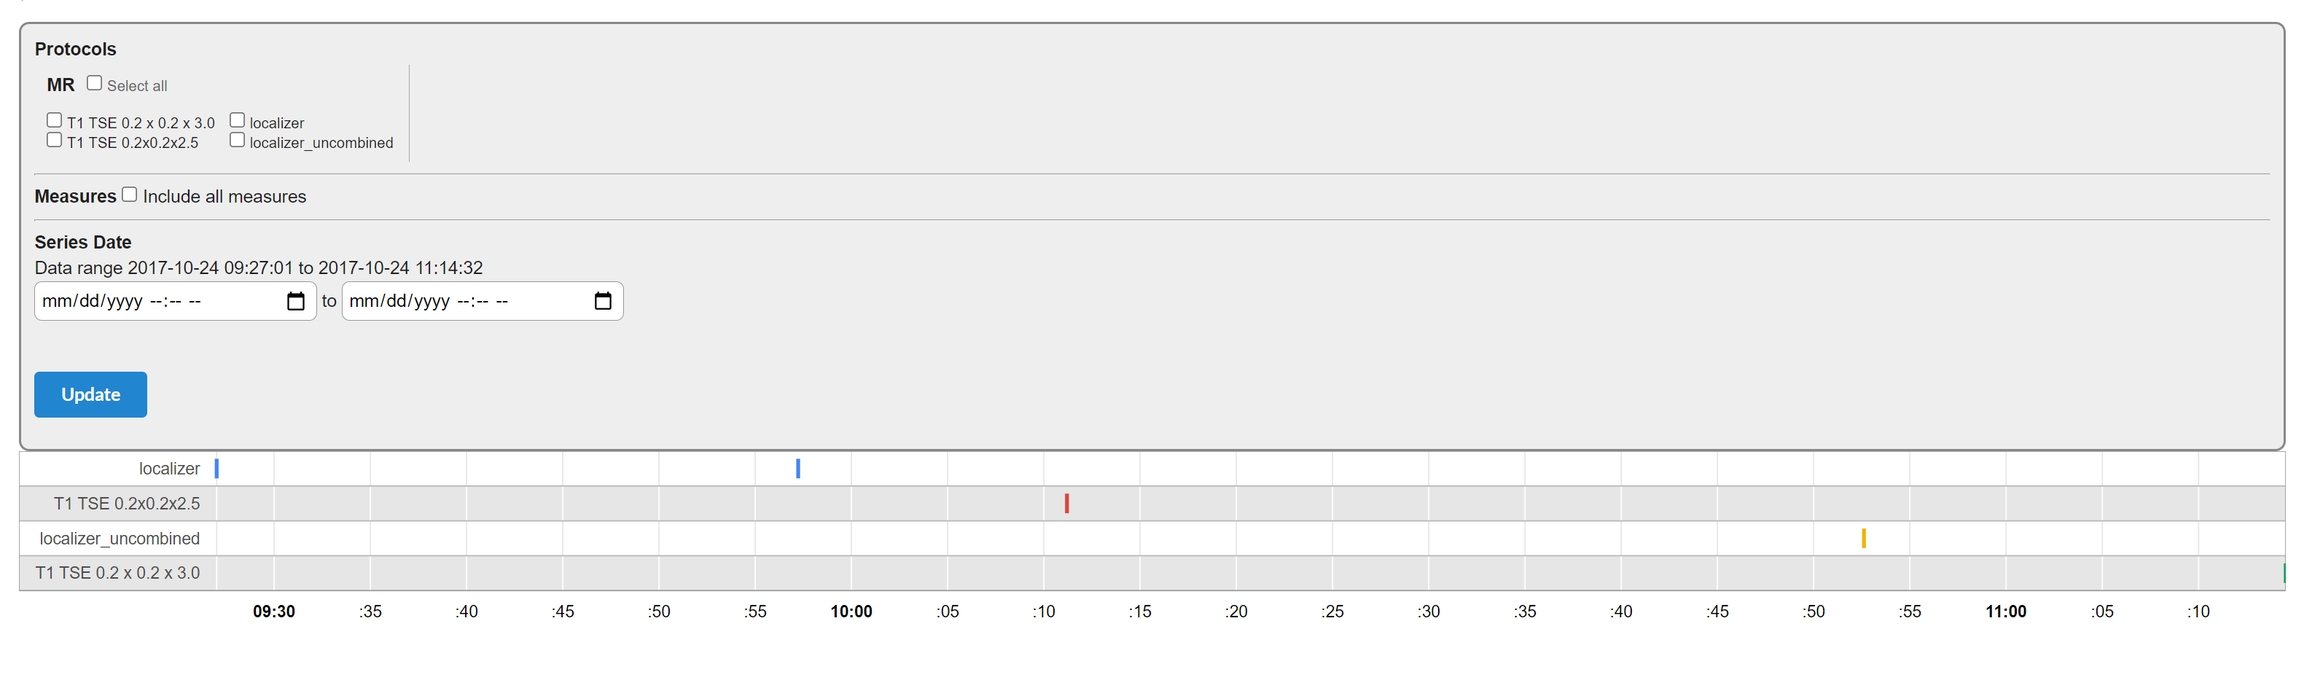
MR scan parameters defining the quality of a MR scan are displayed on this page. The information is available for each NiDB project. This MR scan quality information page can be accessed from project's main page by clicking on the "MR Scan QC" sub-menu as shown below.
The MR scan quality control page shows the following information for each MR scan stored in the corresponding project. These parameters includes:
Series Desc. : Description of the MR scan
Renaming series
Sometimes you need to rename a series. Maybe it was collected in error or was a bad series; you want to keep it, but rename it so the series isn't automatically picked up in pipeline processes or searches.
Renaming MR series
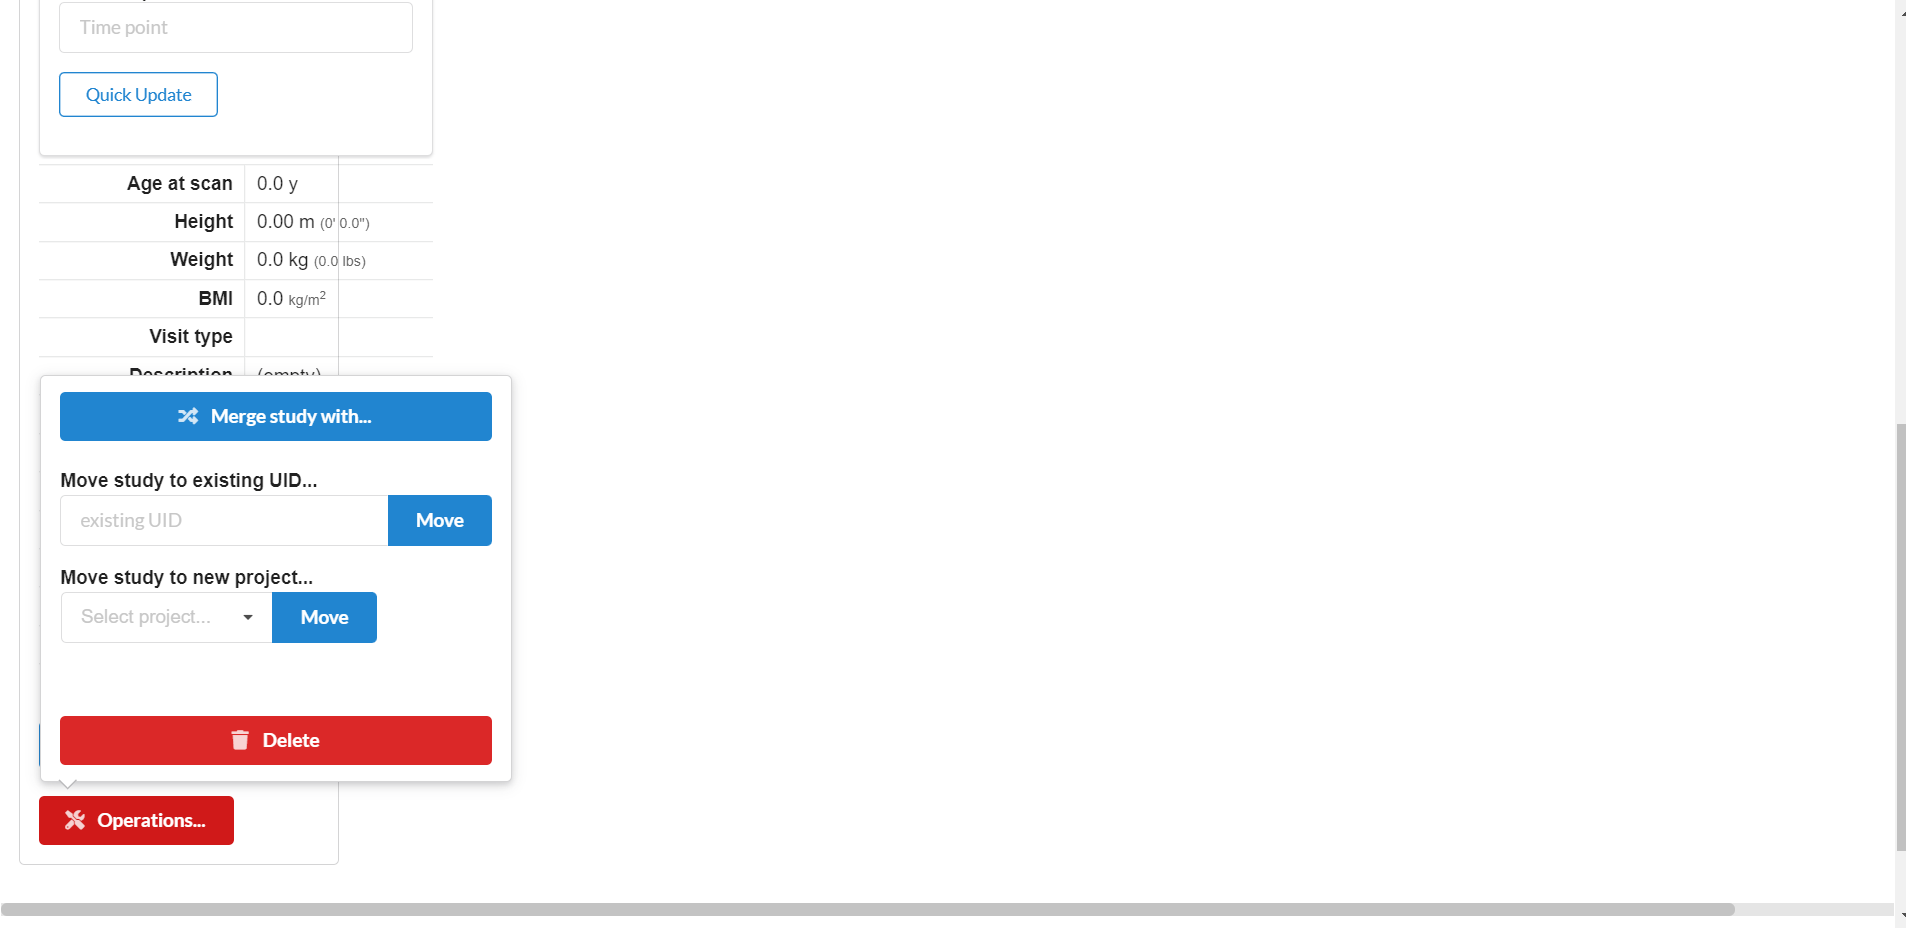
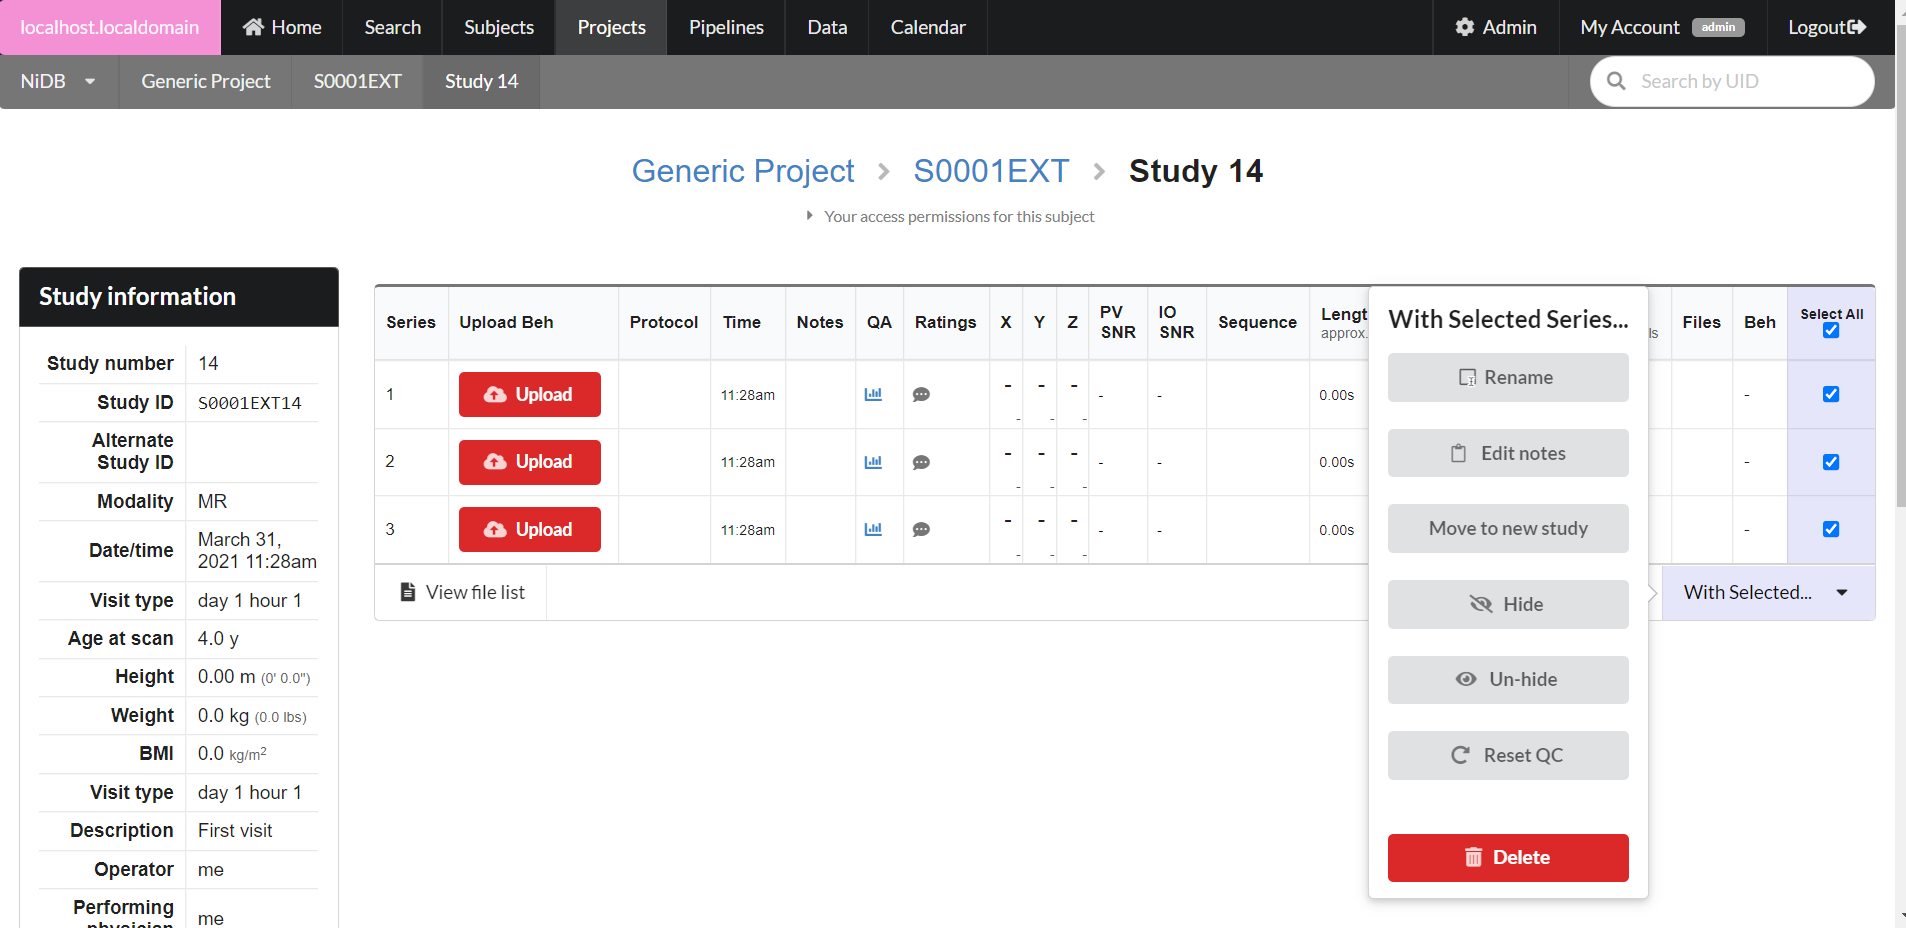
On the study page, find the series, or series(s), you want to rename. On the rightmost column, check the checkbox(es) for the series. Scroll down to the With Selected... menu.
Editing the config file
System-wide settings are stored in the config file. The default location is /nidb/nidb.cfg.
The NiDB Settings page allows you to edit the configuration file directly. When the page is saved, the config file is updated. But the config file can be edited manually, which is useful when the website is unavailable or you need to edit settings through the command line. To edit the file by hand, start vim from a terminal. (if vim is not be installed on your system, run sudo yum install vim)
This will start vim in the terminal. Within vim:
Building Python Wrapper
How to build a Python wrapper for the squirrel library
Copy the exported nidb-backup.sql file from the old server to the new server.
Copy the archive data from the old server to the new server. The default archive directory is /nidb/data/archive. Copy additional data from the other /nidb/data directories.
Example copy command rsync /nidb/data/archive/* user@newhost:/nidb/data/archive/
On the new server, install NiDB as a new installation
On the new server, import the new database
mysql -uroot -ppassword nidb < nidb-backup.sql
Verify that the database table row counts are the same in the new server and old server using phpMyAdmin.
Verify that the /nidb/data directory sizes match between the old server and new server.
Example command du -sb /nidb/data/
Finish upgrade on the new server, by going to http://localhost/setup.php . Follow the instructions to continue the upgrade.
The squirrel data format allows sharing of all information necessary to recreate an experiment and its results, from raw to analyzed data, and experiment parameters to analysis pipelines.
The squirrel format specification is implemented in NiDB. A DICOM-to-squirrel converter, and squirrel validator are available.
cd /etc/systemd/system
vim dcmrcv.service ## edit this file to reflect the new dicomincoming path
systemctl daemon-reload
systemctl restart dcmrcv
systemctl status dcmrcv ## check if the path was changed
Use the arrow keys to navigate to the variable you want to edit
Press the [insert] key
Edit as normal
When done editing, press [esc] key
Type :wq which will save the file and quit vim
Special Config Variables
Some variables can only be changed by editing the config file directly and cannot be changed from the NiDB settings page.
offline - Set to 1 if the website should be unavailable to users, 0 for normal access. Default is 0
debug - Set to 1 if the website should print out every SQL statement, and other debug information. Default is 0
hideerrors - Set to 1 if the website should hide SQL errors from the user. 0 otherwise. Default is 0
Params good? : Green if parameters are within range. Yellow if criteria is not defined and Red if parameters are out of specified range
Files on disk? : Green if files are found on the specifies location on the disc. Red if the files are found on the specified location.
Num Files : Actual number of files
Avg Rating : Average ratings
Basic QC : Red if parameters are out of specification, yellow if limit is not defined and green for within range
Disp (X,Y,Z) : X, Y and Z displacement value
Mot(X,Y,Z) : Motion in X, Y and Z direction.
Rot(P,R,Y) : Rotation pitch, roll and yaw values.
SNR : Signal to noise ratio
FD : Frame-wise Displacement
DVARS : Root mean square of temporal change of the voxel-wise signal at each time point. (D is for temporal derivative of timecourses, VARS refers to RMS variance over voxels.)
The QC scan quality control table can be download as ".csv" file by clicking "Save As CSV" button at the end of the MR QC table.
From the menu, select
Rename
Rename the series(s) and click Rename.
The series(s) will now be renamed.
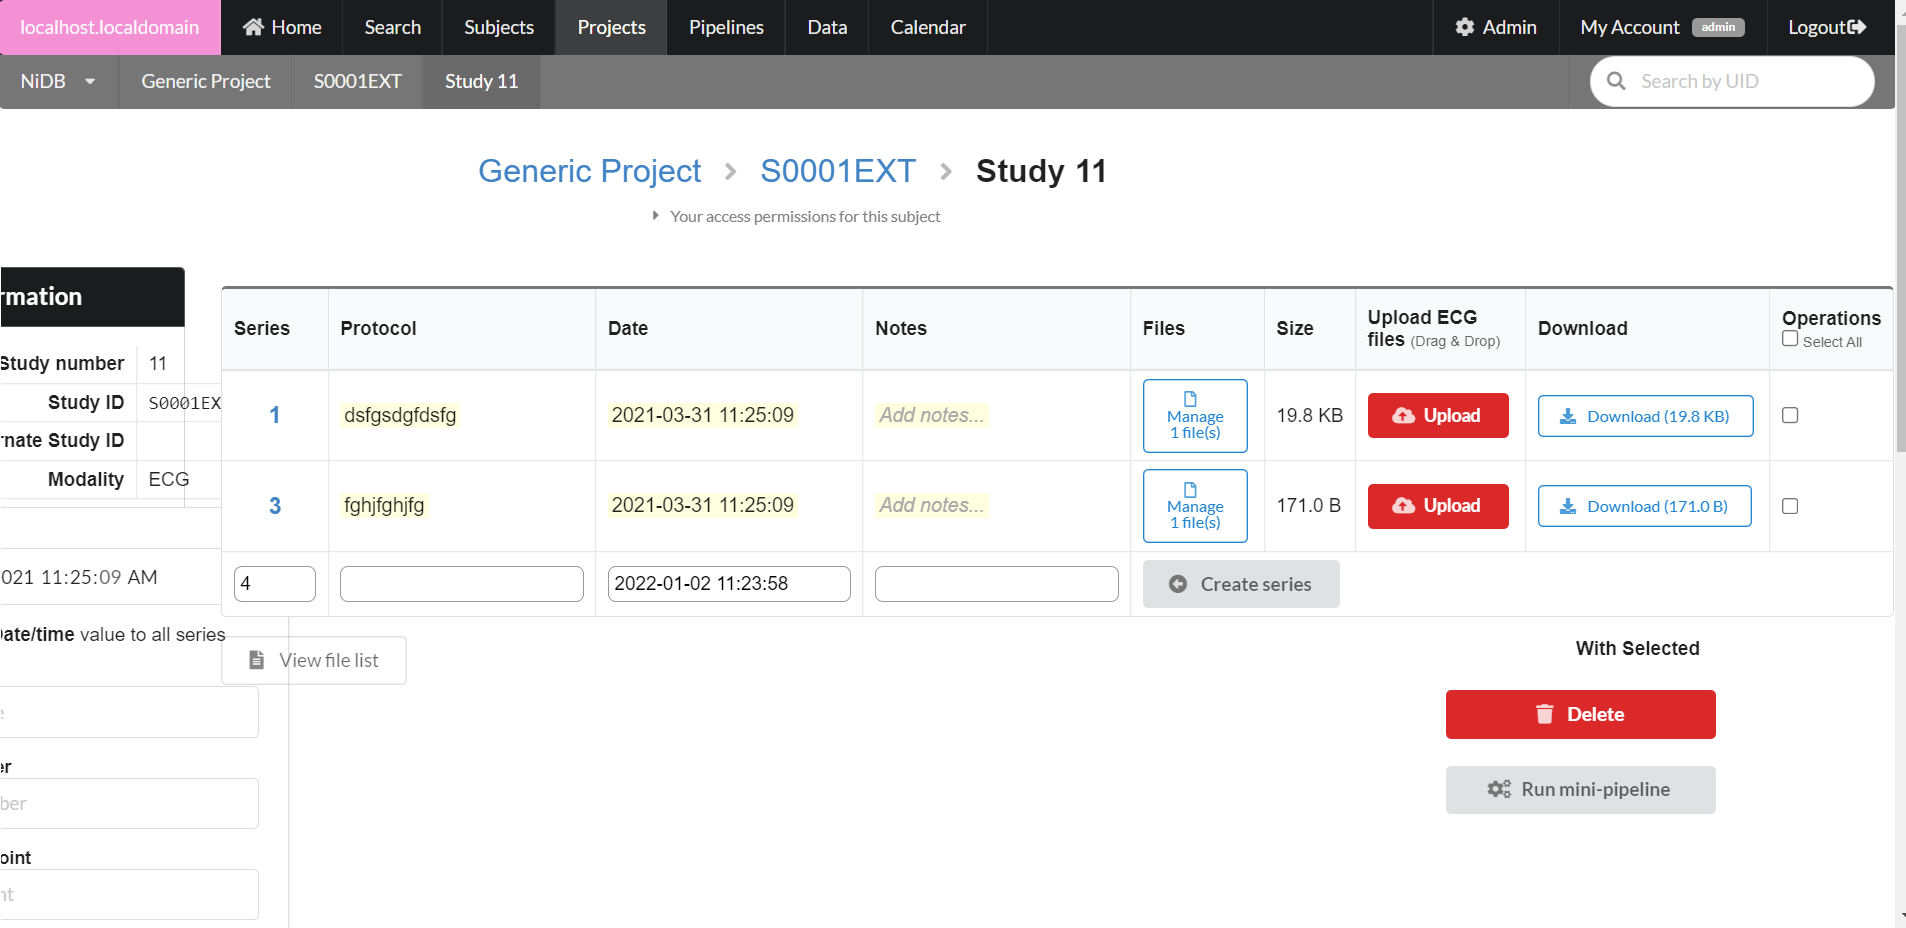
Renaming non-MR series
Click the protocol name for the series, and an edit box will appear. Edit the protocol (series name) and press enter.
General data storage hierarchy
Quick Install
Prerequisites
Hardware - There are no minimum specifications. If the hardware can run RHEL 8, then it can run NiDB.
RHEL 8 compatible - NiDB runs only on RHEL8 compatible (CentOS 8, Rocky Linux 8, AlmaLinux 8).
FSL - Install FSL from https://fsl.fmrib.ox.ac.uk/fsl/fslwiki/FslInstallation After installation, note the location of FSL, usually /usr/local/fsl/bin. Or try these commands to install FSL.
wget https://fsl.fmrib.ox.ac.uk/fsldownloads/fslinstaller.py # this may work
firejail - firejail is used to run user-defined scripts in a sandboxed environment. Install firejail from https://firejail.wordpress.com/
rpm -i firejail-x.y.z.rpm
OS packages - yum install epel-release for repo for ImageMagick
Secure the MariaDB installation by running sudo mysql_secure_installation and using the following responses
Finish Setup - Use Firefox to view http://localhost/setup.php . Follow instructions on the page to configure the server
The setup page must be accessed from localhost -or- the config file must be manually edited to include the IP address of the computer you are using the access setup.php.
Edit /nidb/nidb.cfg
DICOM Anonymization
DICOM Anonymization Levels
DICOM files store lots of protected health information (PHI) and personally identifiable information (PII) by default. This is great for radiologists, but bad for researchers. Any PHI/PII left in your DICOM files when sharing them with collaborators could be a big issue for you. Your IRB might shut down your project, shoot you into space, who knows. Make sure your data is anonymized, and anonymized in the way that your IRB wants.
Always anonymize your data before sharing!
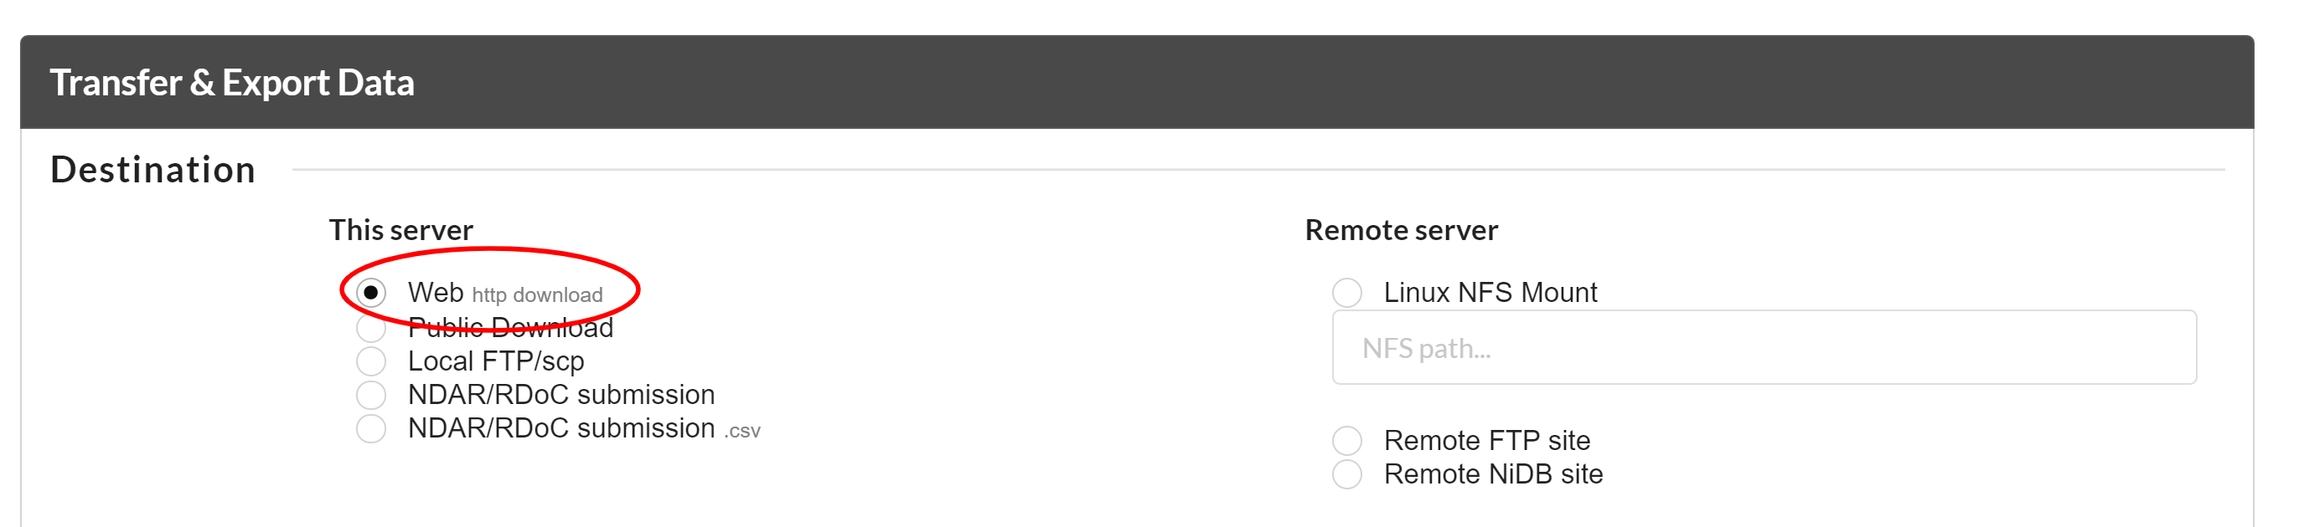
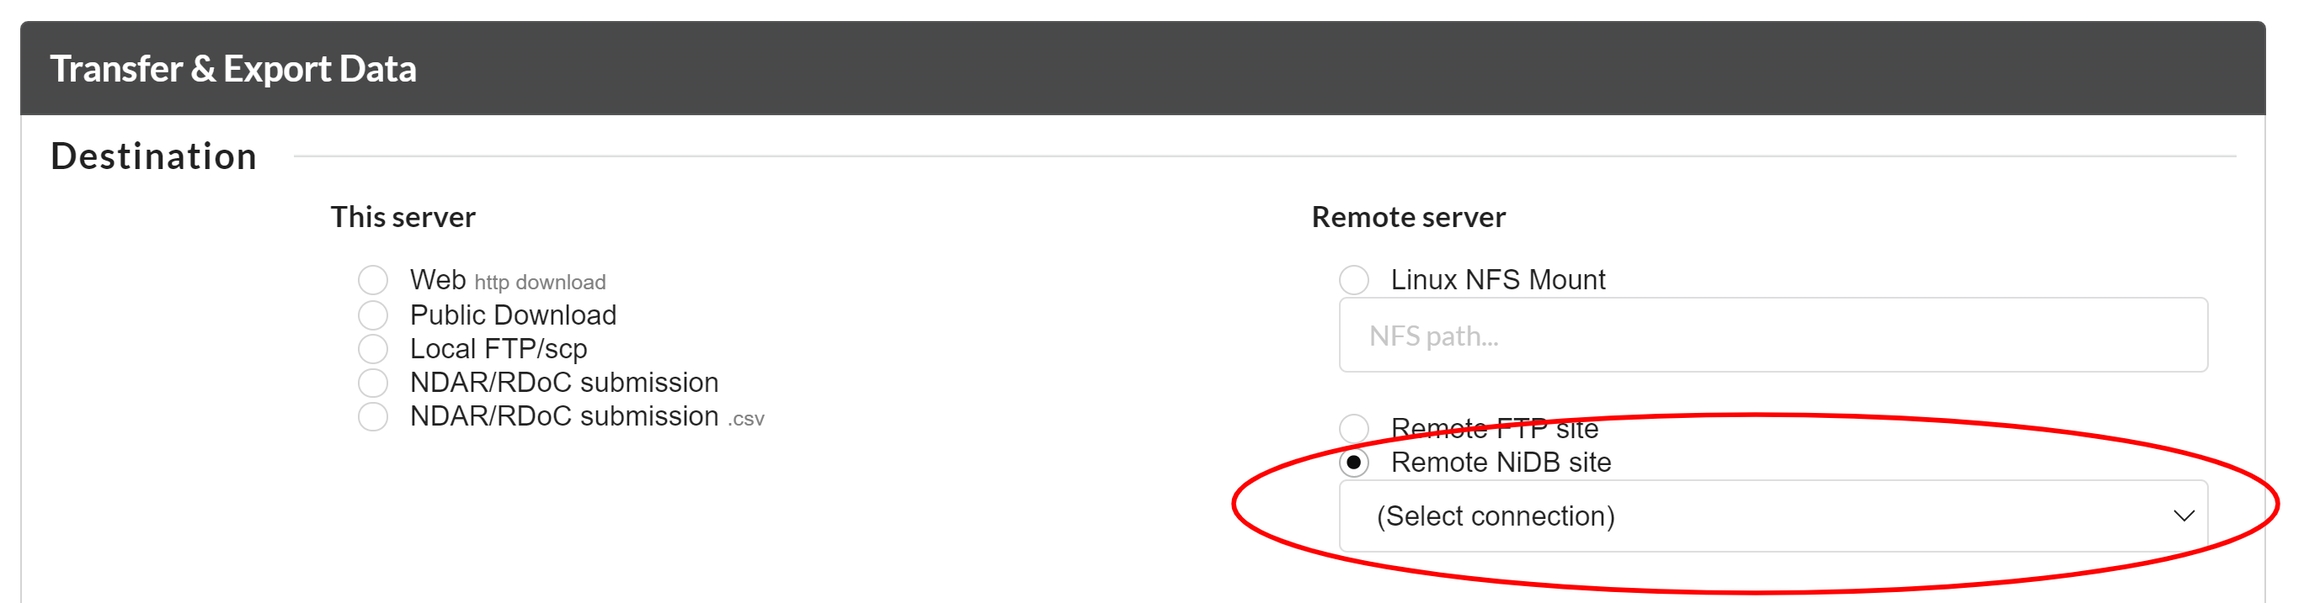
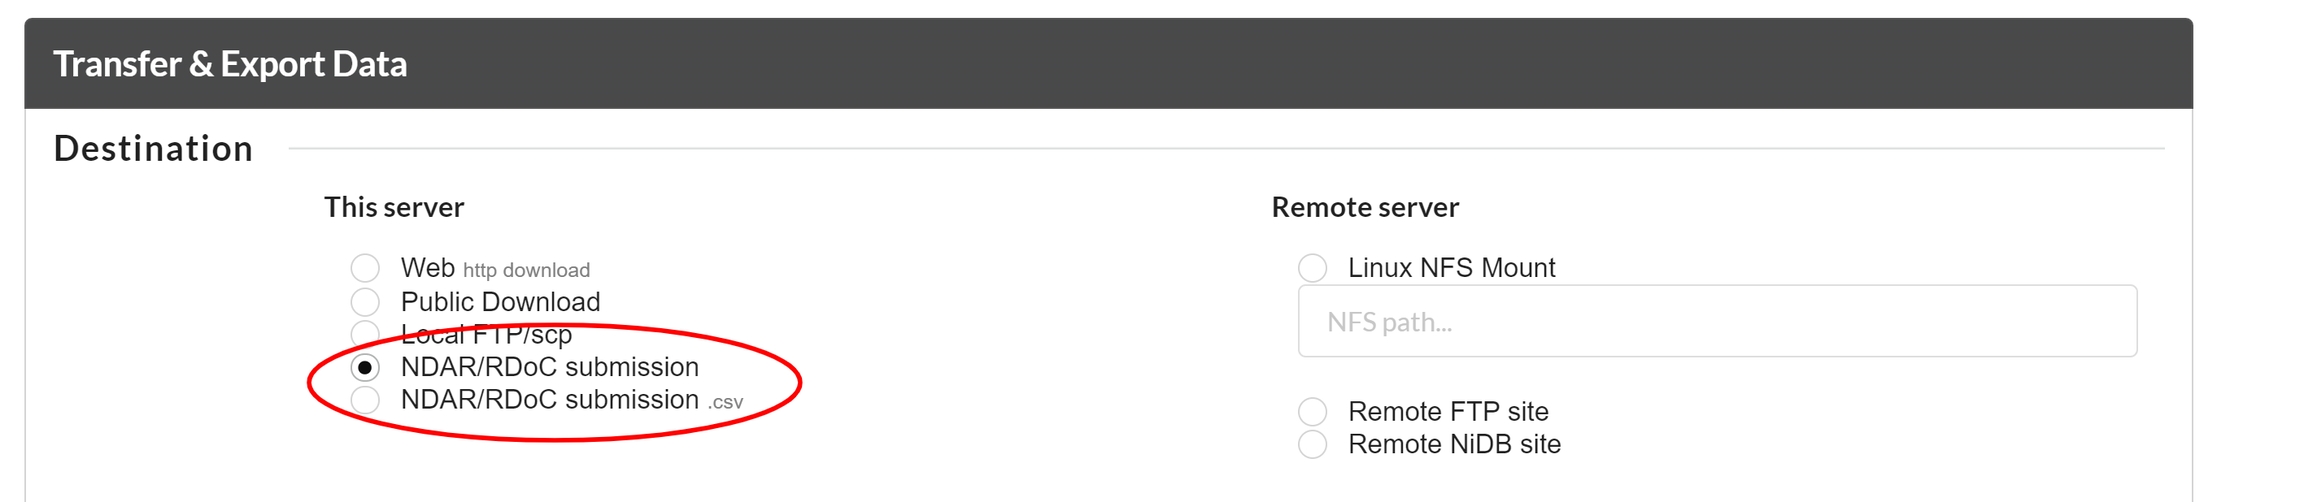
NiDB offers 3 ways to export, and otherwise handle, DICOM data which are described below
Original - This means there is no anonymization at all. All DICOM tags in the original file will be retained. No tags are added, removed, or changed.
Anonymize - This is the default anonymization method, where most obvious PHI/PII is removed, such as name, DOB, etc. However, dates and locations are retained. The following tags are anonymized
0008,0090 ReferringPhysiciansName
0008,1050 PerformingPhysiciansName
0008,1070 OperatorsName
Anonymize Full - This method removes all PHI/PII, but also removes identifiers that are used by NiDB to accurately archive data by subject/study/series. If most of the tags used to uniquely identify data are removed... it's hard to group the DICOM files into series. So be aware that full anonymization might make it hard to archive the data later on.
0008,0090 ReferringPhysiciansName
0008,1050 PerformingPhysiciansName
0008,1070 OperatorsName
Deleting all the data
This tutorial describes how to completely erase all data from an NiDB installation
Why would anyone want to do this?
There exists the possibility that you may need to completely erase all data from an NiDB installation. Maybe you were importing a bunch of test data and now you want to wipe it clean without reinstalling NiDB. Whatever your reason, you want to make an existing installation clean.
This procedure is not part of NiDB and there are no scripts or automated ways to do this because of the possibility of accidents. You may want to completely empty your refrigerator and toss all food in the trash, but you don't want a button available on the side of the fridge to do it.
How to Clean the System
Database
Truncate all tables except the following
instance
modalities
modules
Filesystem
Clear the contents of the following directories. Only delete the files in the directories, do not delete the directories.
There is no need to clear the log files or lock files or any other directories.
NiDB should now be ready to import new data.
Reports based on data imported from Redcap
Tutorial on how to create a report using Redcap data
Data that we imported from a Redcap project into a NiDB project can be used to create reports. These reports can be generated based on Redcap data or combining it with the data available in NiDB. The later is covered in the tutorial on Analysis Builder. The following is an example of creating a report based on the data imported from Redcap.
Example Report
The following are the steps to create a report based on data imported form redcap.
Steps
From a project's main page click Analysis Builder. The above interface is used to produce reports in Analysis Builder.
Select the variables to generate the report.
As we are generating report based on the data that is imported from Redcap, the following variables cudit1, cudit2, cudit_3
A complex report with more parameters involve can also be created. An Example of such report is available in the tutorial about Analysis Builder.
params
Separate JSON file - params.json
Series collection parameters are stored in a separate JSON file called params.json stored in the series directory. The JSON object is an array of key-value pairs. This can be used to store data collection parameters.
All DICOM tags are acceptable parameters. See this list for available DICOM tags https://exiftool.org/TagNames/DICOM.html. Variable keys can be either the hexadecimal format (ID) or string format (Name). For example 0018:1030 or ProtocolName. The params object contains any number of key/value pairs.
JSON variables
Variable
Description
Example
Directory structure
Files associated with this section are stored in the following directory. subjectID, studyNum, seriesNum are the actual subject ID, study number, and series number. For example /data/S1234ABC/1/1.
It's not supposed to happen... but it can. Here's how to fix it.
Why is my data missing??
Sometimes you go to download data from a subject, and it's not there. I don't mean the series are missing from the NiDB website, but the data is actually missing from the disk.
This can happen for a lot of reasons, usually because studies are moved from one subject to another before they are completely archived. Also for the following reasons
Creating new projects
You must be an an NiDB administrator to create projects.
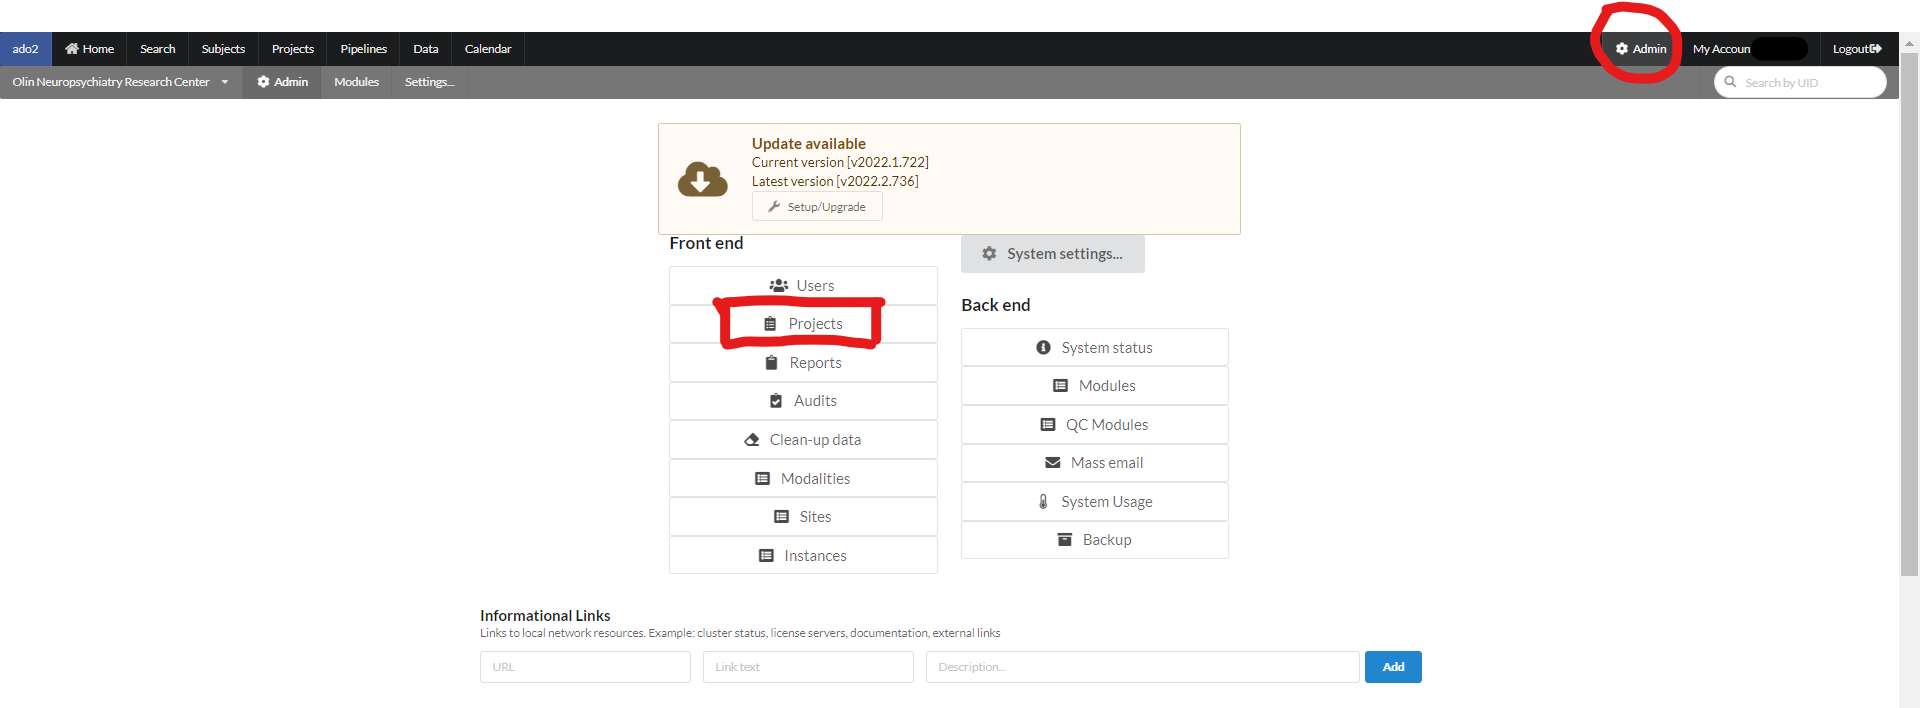
Navigate to the project administration section of NiDB. Admin --> Front-end --> Projects. Click the Create Project button. This will show the new project form.
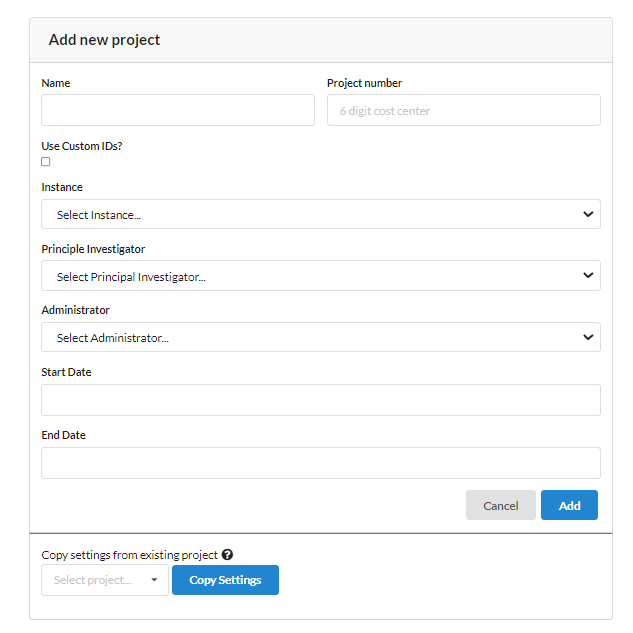
Fill out the information about the project. There isn't a lot of information required to create a project. Details such as templates, users, etc are created later. Descriptions of the fields:
squirrel utilities
The squirrel command line program
The squirrel command line program allows converstion of DICOM to squirrel, BIDS to squirrel, modification of existing squirrel packages, and listing of information from packages.
Installing squirrel utilities
Download squirrel from
squirrel vs BIDS
Understanding the differences between package formats
BIDS and squirrel are both file formats designed to store neuroimaging data. They are similar, but different in implementation. If you are familiar with BIDS, squirrel will be easy to understand.
squirrel vs BIDS objects
squirrel
BIDS
Notes
data
JSON object
This data object contains information about the subjects, and potential future data.
JSON variables
🟡 Computed (squirrel writer/reader should handle these variables)
Variable
experiments
JSON array
Experiments describe how data was collected from the participant. In other words, the methods used to get the data. This does not describe how to analyze the data once it’s collected.
JSON variables
🔵 Primary key
🔴 Required
🟡 Computed (squirrel writer/reader should handle these variables)
Creating a Development VM
This describes how to create a Linux virtual machine to build NiDB
Install VMWare Workstation Player
VMWare Player can be downloaded from
0010,0010 PatientName
0010,0030 PatientBirthDate
0010,0010 PatientName
0010,0030 PatientBirthDate
0008,0080 InstitutionName
0008,0081 InstitutionAddress
0008,1010 StationName
0008,1030 StudyDescription
0008,0020 StudyDate
0008,0021 SeriesDate
0008,0022 AcquisitionDate
0008,0023 ContentDate
0008,0030 StudyTime
0008,0031 SeriesTime
0008,0032 AcquisitionTime
0008,0033 ContentTime
0010,0020 PatientID
0010,1030 PatientWeight
Download Linux ISO file
NiDB can be built on most RedHat compatiable Linux distributions. Download the Rocky 8 or 9 DVD ISO from https://rockylinux.org/download/
Create a VM in VMWare Workstation Player
Start VMWare Workstation Player, click Create a New Virtual Machine. Choose the ISO image that you downloaded. Click Next.
Select the Guest OS and version; in this example Linux and RHEL 9. Click Next.
Give your VM a meaningful name and location. Click Next.
Choose the disk size and format. 30GB is preferable and choose Store virtual disk as a single file. Click Next.
Click Customize Hardware... and change the VM hardware. If you have extra cores available on your host machine, 4 or more cores is preferable. Same with memory, if you have extra memorty available on your host machine, 8GB or more memory is preferable. When done, click Close.
Click Finish.
On the main VMWare interface, double click your new VM to start it.
Installing Linux
Install RHEL compatible with the Server with GUI install option. Disable SELinux. Make sure to enable the network and assign a hostname. Also helpful to create a user and assign them root permissions.
Permissions within NiDB are based on project. This probably corresponds an IRB approved project, such that certain personnel should have access to the project.
To give permissions to other users, you must have NiDB Admin permissions.
To add (or remove) a user's permissions to a project
Go to Admin-->User
Click on the username of the user you want to change
If you want to give the user global admin permissions within NiDB, check the NiDB Admin box at the top of the page. This allows the user to assign permissions to other users, and allows users to delete subjects, studies, and series, for the projects they have permissions for
To give permissions to specific projects, check the boxes next to the project name.
Project admin allows them to enroll subjects into that project
View/Edit data/PHI are not clearly separated in their functionality. Just select all of these to allow the user access to the project.
To remove permissions to specific projects, uncheck the appropriate boxes
Click Update at the bottom of the page
... are selected which were mapped as an example in the tutorial
.
There are various setting that can be set to generate a report, more details on this in in the Tutorial on Analysis Builder. After the appropriate setting is selected, Press Update Summary button.
The report similar to the one shown in the figure below will be displayed.
Select the output format as .csv if the data is needed to store in a csv file format.
and add your IP address (comma separated list) to the
[setupips]
config variable. It should look something like
[setupips] 127.0.0.1, 192.168.0.1
depending on the IP(s)
users
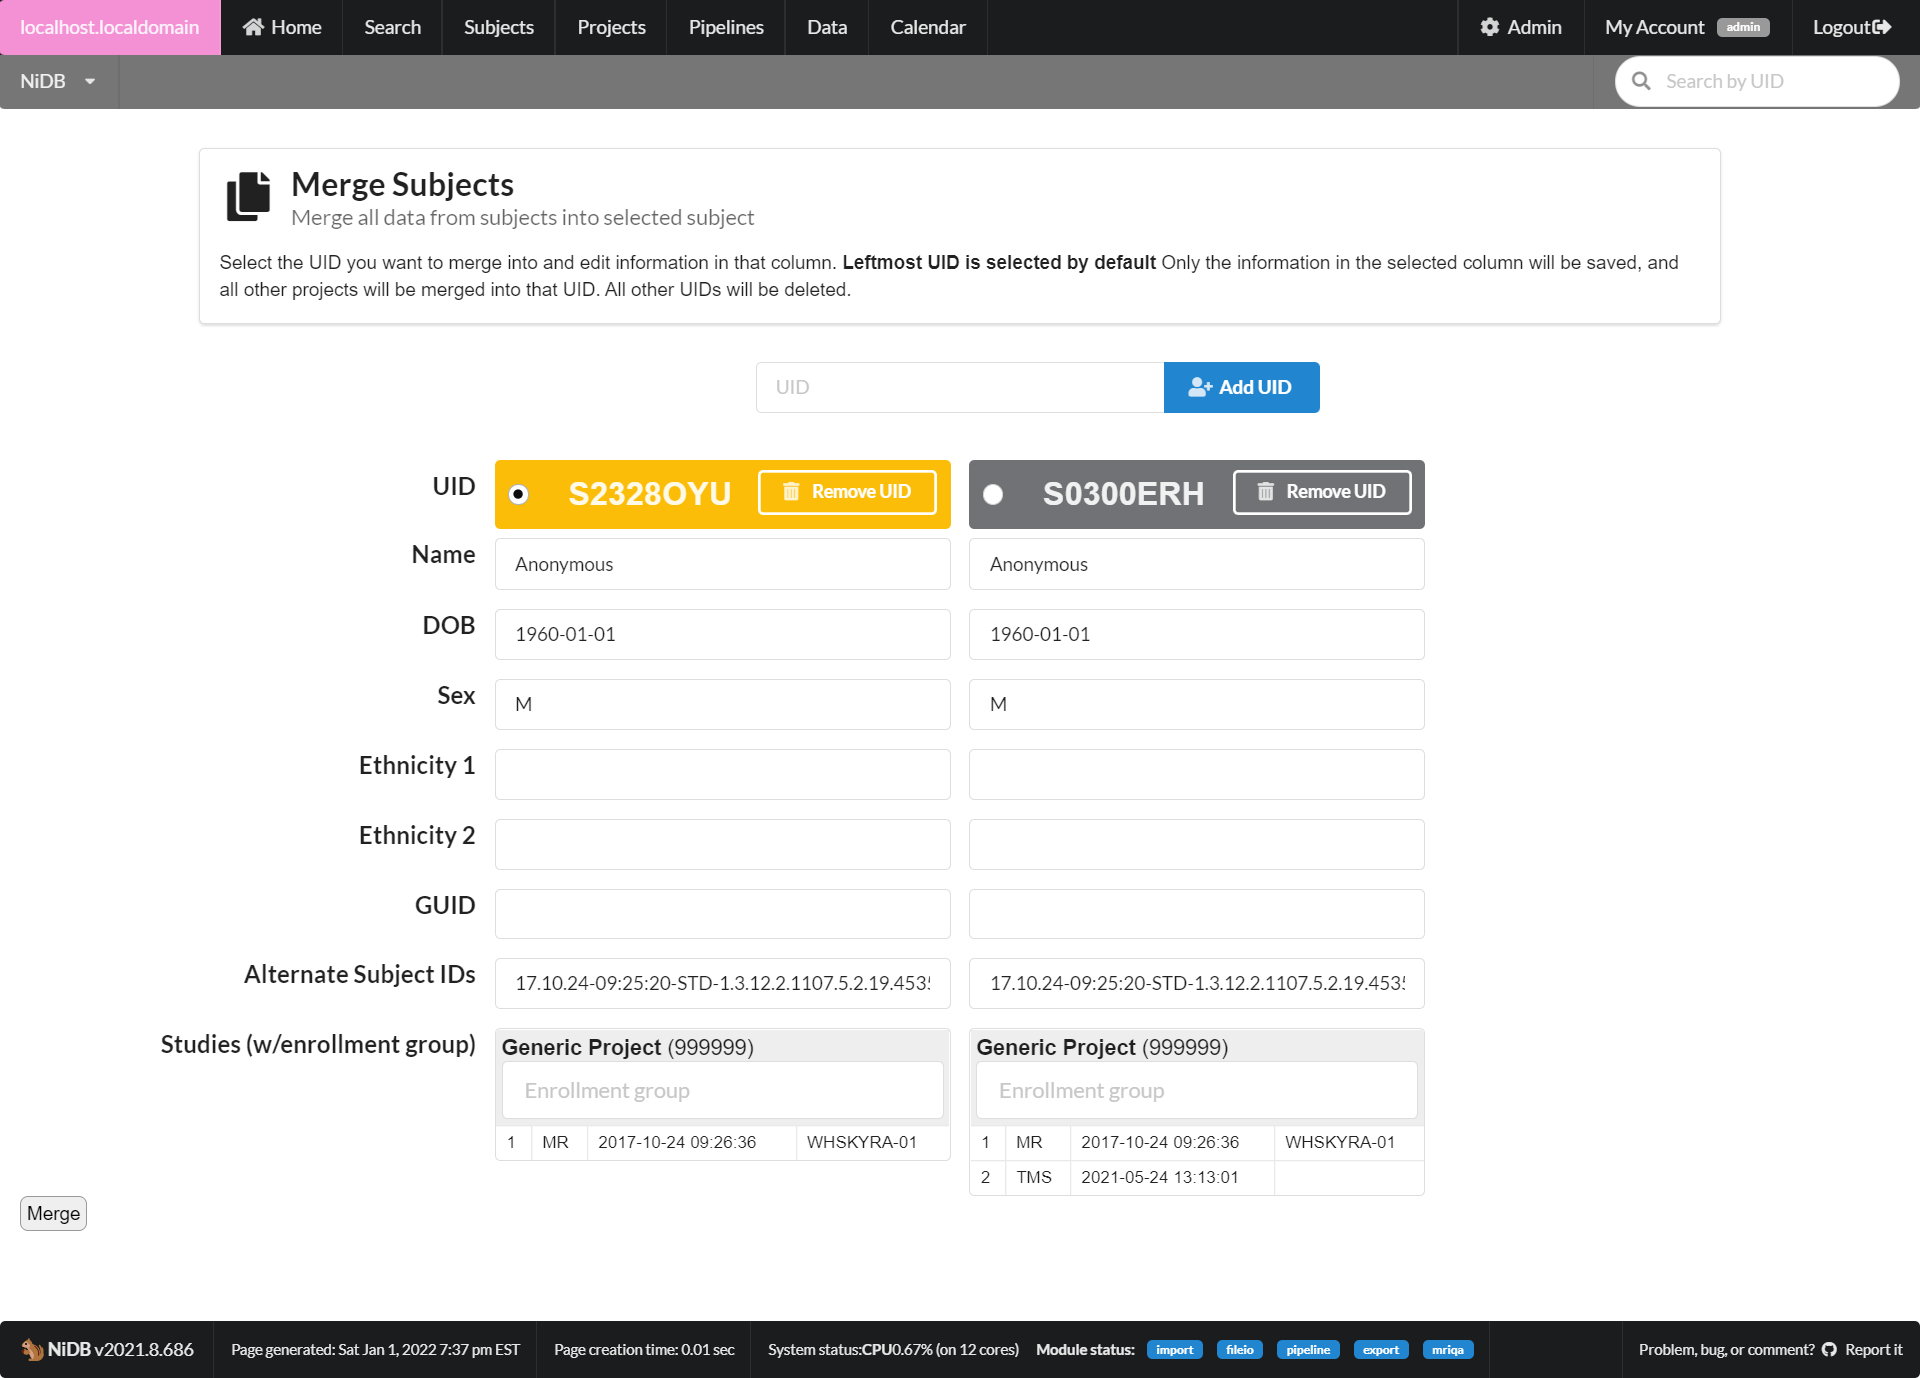
Subjects are merged, but data is not completely copied over on disk
Subject ID is incorrectly entered on the MR scanner console. This causes a new ID to be generated. If the study is later moved to the correct ID, some data might not be moved over on disk
A subject is deleted. But since data is never really deleted from NiDB, it's possible that a study was moved to that subject and not all data on disk is copied over
Example
Suppose we have subject S1234ABC. This subject has one study, and ten series in that study. We'd expect to see the following on the website for subject S1234BC study 2.
But, we go to export the data through the search page or through a pipeline, and not all of the series have data! If we look on the disk, we see there are series missing.
That's not good. This could also appear as though all series directories do exist, but if we dig deeper, we find that the dicom directory for each series is missing or empty. So, where's the data? We have to do some detective work.
Let's look around the subject's directory on the disk.
That's interesting, there appears to be another directory. Our study is 2, but there's also a study 1, and it doesn't show up on the NiDB website. Maybe our data is in there? Let's look.
That looks like our data! We can verify by doing a diff between directories that exist in both studies.
If this is the data we are looking for, we can copy all of the data from study 1 to study 2.
After the copying is done, you should be able to go back to the study page, and click the View file list button at the bottom and see all of expected series.
> cd /nidb/data/archive/S1234ABC
> diff 1/1/dicom 2/1/dicom
>
Too many open files error
If you encounter an error "too many open files", or you are unable to write squirrel packages, try increasing the open files limit within Linux
sudoaptinstallp7zip# p7zip required by squirrelsudodpkg-isquirrel_xxxx.xx.xxx.deb
Enter current password for root (enter for none):
Change the root password? [Y/n] n
Remove anonymous users? [Y/n] Y
Disallow root login remotely? [Y/n] Y
Remove test database and access to it? [Y/n] Y
Reload privilege tables now? [Y/n] Y
> cd /nidb/data/archive/S1234ABC/2
> ls
1
2
3
4
5
>
> cd /nidb/data/archive/S1234ABC
> ls
1
2
> cd /nidb/data/archive/S1234ABC/1
> ls
1
2
3
4
5
6
7
8
9
10
> cd /nidb/data/archive/S1234ABC
> cp -ruv 1/* 2/
# increase open file limit (temporarily for the current session)
ulimit -n 2048
# increase open file limit (permanently)
# append these lines to /etc/security/limits.conf
* soft nofile 2048
* hard nofile 2048
# Default DICOM to squirrel conversion
squirrel dicom2squirrel /path/to/dicoms outPackgeName.sqrl
# Specify the output format
squirrel dicom2squirrel /path/to/dicoms outPackge.sqrl --dataformat niti4gz
# Specify the package directory format
squirrel dicom2squirrel /path/to/dicoms outPackage.sqrl --dirformat seq
# add a subject to a package
squirrel modify /path/to/package.sqrl --add subject --datapath /path/to/new/data --objectdata 'SubjectID=S1234ABC&DateOfBorth=199-12-31&Sex=M&Gender=M'
# remove a study (remove study 1 from subject S1234ABC)
squirrel modify /path/to/package.sqrl --remove study --subjectid S1234ABC --objectid 1
#list package information
[user@hostname]$ squirrel info ~/testing.sqrl
Squirrel Package: /home/nidb/testing.sqrl
DataFormat: orig
Date: Thu May 23 16:16:16 2024
Description: Dataset description
DirectoryFormat (subject, study, series): orig, orig, orig
FileMode: ExistingPackage
Files:
314 files
19181701506 bytes (unzipped)
PackageName: Squirrel package
SquirrelBuild: 2024.5.218
SquirrelVersion: 1.0
Objects:
├── 8 subjects
│ ├── 8 measures
│ ├── 0 drugs
│ ├── 11 studies
│ ├──── 314 series
│ └──── 0 analyses
├── 0 experiments
├── 0 pipelines
├── 0 group analyses
└── 0 data dictionary
# list subjects
[user@hostname]$ squirrel info ~/testing.sqrl --object subject
Subjects: sub-ASDS3050KAE sub-ASDS6316BWH sub-ASDS6634GJK sub-ASDS7478SKA sub-ASDS8498GQDCBT sub-HCS8276XPS sub-S4328FSC sub-S7508DDH
# list studies for a specific subject
[user@hostname]$ squirrel info ~/testing.sqrl --object study --subjectid sub-ASDS3050KAE
Studies: 1 2
#list all subjects as CSV format
[user@hostname]$ squirrel info ~/testing.sqrl --object subject --csv
ID, AlternateIDs, DateOfBirth, Ethnicity1, Ethnicity2, GUID, Gender, Sex
"sub-ASDS3050KAE","","","","","","U","U"
"sub-ASDS6316BWH","","","","","","U","U"
"sub-ASDS6634GJK","","","","","","U","U"
"sub-ASDS7478SKA","","","","","","U","U"
"sub-ASDS8498GQDCBT","","","","","","U","U"
"sub-HCS8276XPS","","","","","","U","U"
"sub-S4328FSC","","","","","","",""
"sub-S7508DDH","","","","","","",""
Field
Description
Name
Name displayed throughout NiDB.
Project number
This can be any string of letters or numbers. This is used to uniquely identify the project and is used to automatically archive DICOM series into the correct project. If you don't have an IRB approval or cost-center number, enter a string of the format P1234ABC, where 1234 and ABC are random characters.
Use custom IDs
By default, NiDB IDs (S1234ABC format) are used. If you want to use your own IDs (for example 401, 402, 403, etc) check this box. The NiDB UIDs will still be assigned, but your custom ID will be displayed in place of the UID in most places in the system.
Once you've fill out the information, click Add and the project will be created. No users will have permissions to access this project. Follow the Adding Users to Projects to add user permissions.
Mapping series within BIDS can be tricky. There is limited mapping between squirrel and BIDS for this object.
Type
Default
Description
GroupAnalysisCount
number
🟡
Number of group analyses.
SubjectCount
number
🟡
Number of subjects in the package.
JSON array
Directory structure
Files associated with this section are stored in the following directory, but actual binary data should be stored in the subjects or group-analysis sub directories.
/data
Variable
Type
Default
Description
ExperimentName
string
🔴🔵
Unique name of the experiment.
FileCount
number
Directory structure
Files associated with this section are stored in the following directory. Where ExperimentName is the unique name of the experiment.
/experiments/<ExperimentName>
{Key:Value}
A unique key, sometimes derived from the DICOM header
Protocol, T1w
FieldStrength, 3.0
HIPAA Compliance
NiDB's HIPAA compliance
NiDB attempts to ensure HIPAA compliance, but is not completely compliant with all aspects of data privacy.
HIPAA Identifiers
There are 18 types of personally identifiable information (from Health and Human Services website). Data that can be stored in NiDB is highlighted.
Names
All geographic subdivisions smaller than a state, including street address, city, county, precinct, ZIP code, and their equivalent geocodes, except for the initial three digits of the ZIP code if, according to the current publicly available data from the Bureau of the Census:
The geographic unit formed by combining all ZIP codes with the same three initial digits contains more than 20,000 people; and
The initial three digits of a ZIP code for all such geographic units containing 20,000 or fewer people is changed to 000
All elements of dates (except year) for dates that are directly related to an individual, including birth date, admission date, discharge date, death date, and all ages over 89 and all elements of dates (including year) indicative of such age, except that such ages and elements may be aggregated into a single category of age 90 or older
Telephone numbers
Vehicle identifiers and serial numbers, including license plate numbers
Fax numbers
Device identifiers and serial numbers
Email addresses
Web Universal Resource Locators (URLs)
Social security numbers
Internet Protocol (IP) addresses
Medical record numbers
Biometric identifiers, including finger and voice prints
Health plan beneficiary numbers
Full-face photographs and any comparable images
Account numbers
Any other unique identifying number, characteristic, or code, except as permitted by paragraph (c) of this section [Paragraph (c) is presented below in the section “Re-identification”]; and
Certificate/license numbers
PHI on NiDB
The following pieces of information are stored on NiDB. Not all are required.
Field
Required?
Ways to reduce PHI exposure
Upgrade
Detailed upgrade instructions
Upgrade NiDB steps
Install NiDB .rpm
Get the most recent .rpm from github. The latest version may be different than the example below. You can also download the latest release .rpm from
Complete setup on Website
Visit and follow the pages.
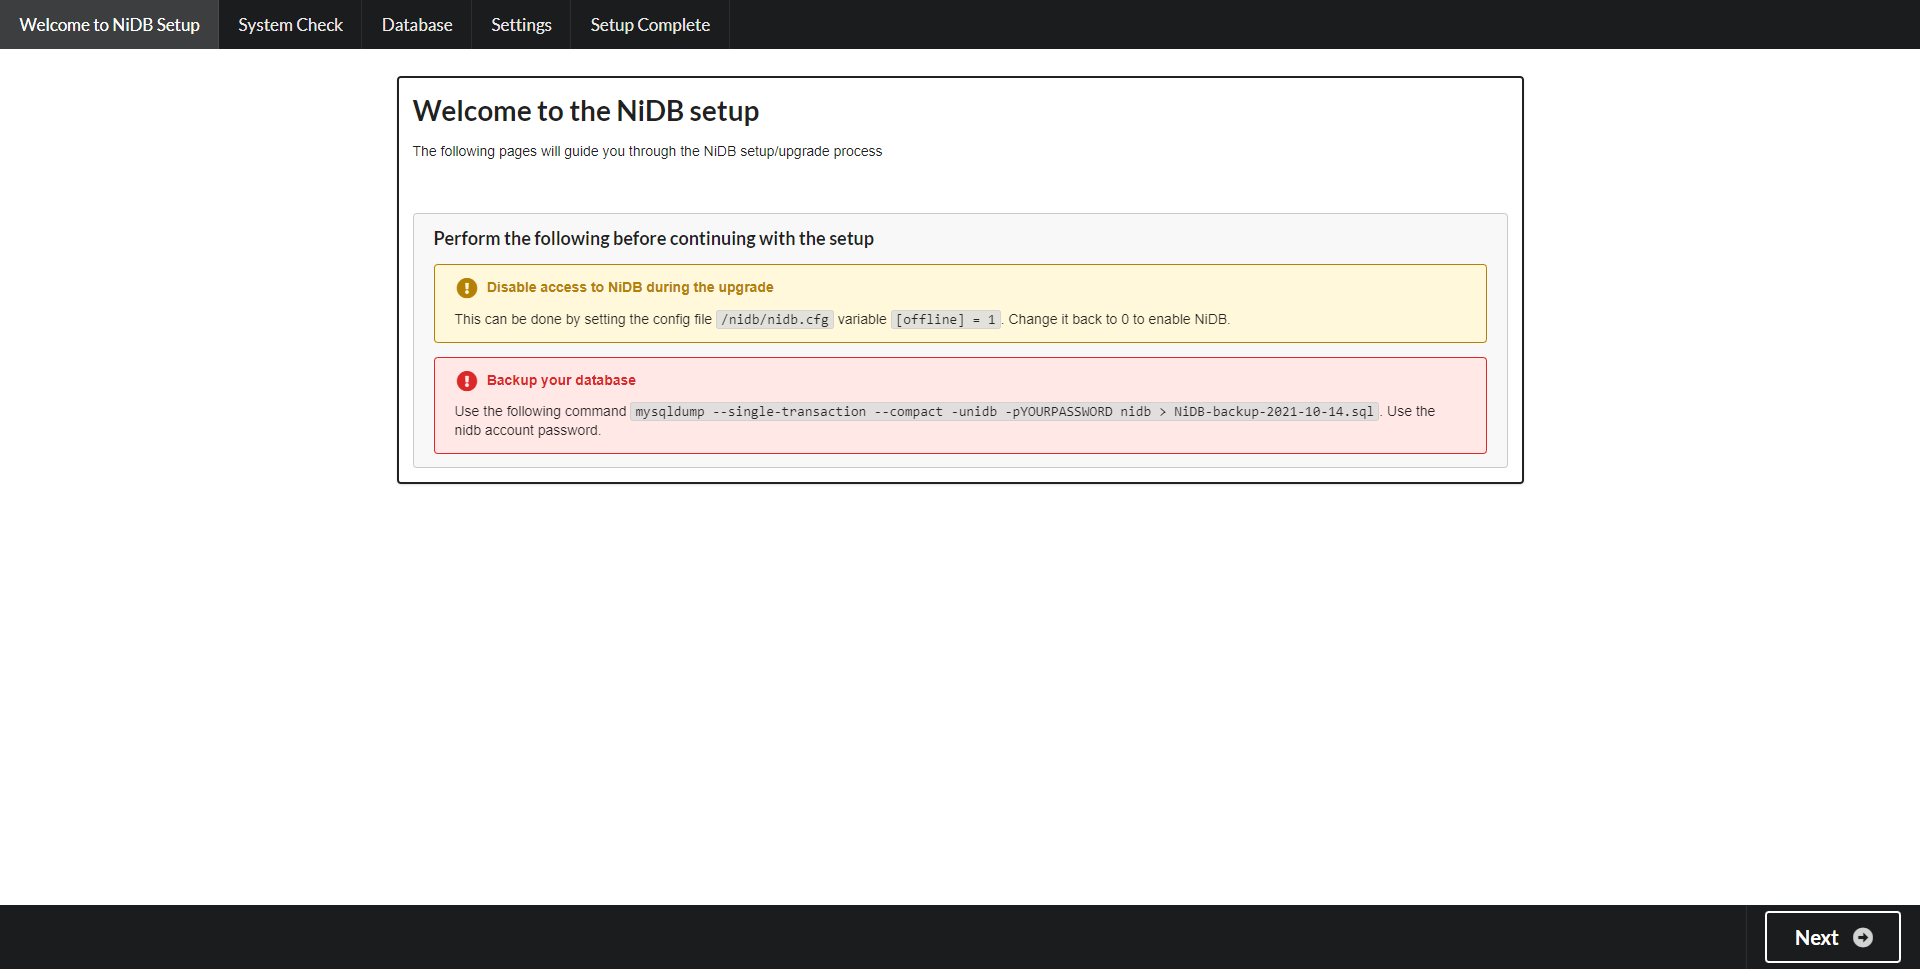
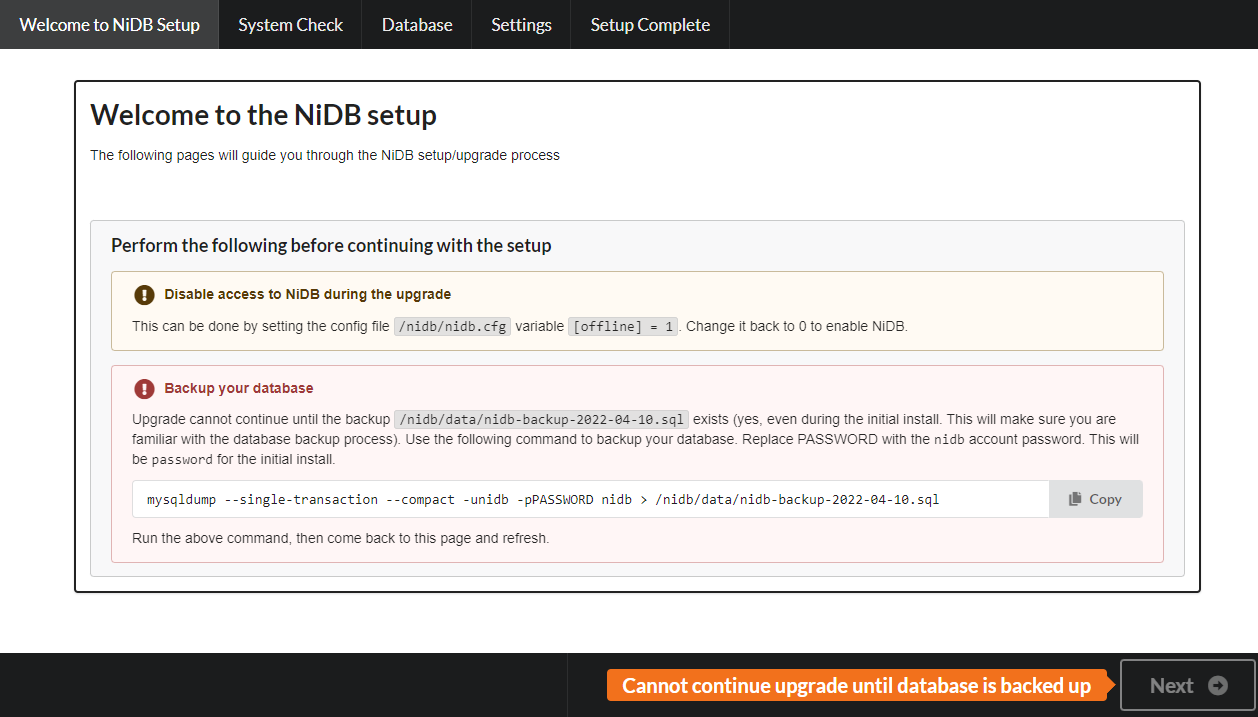
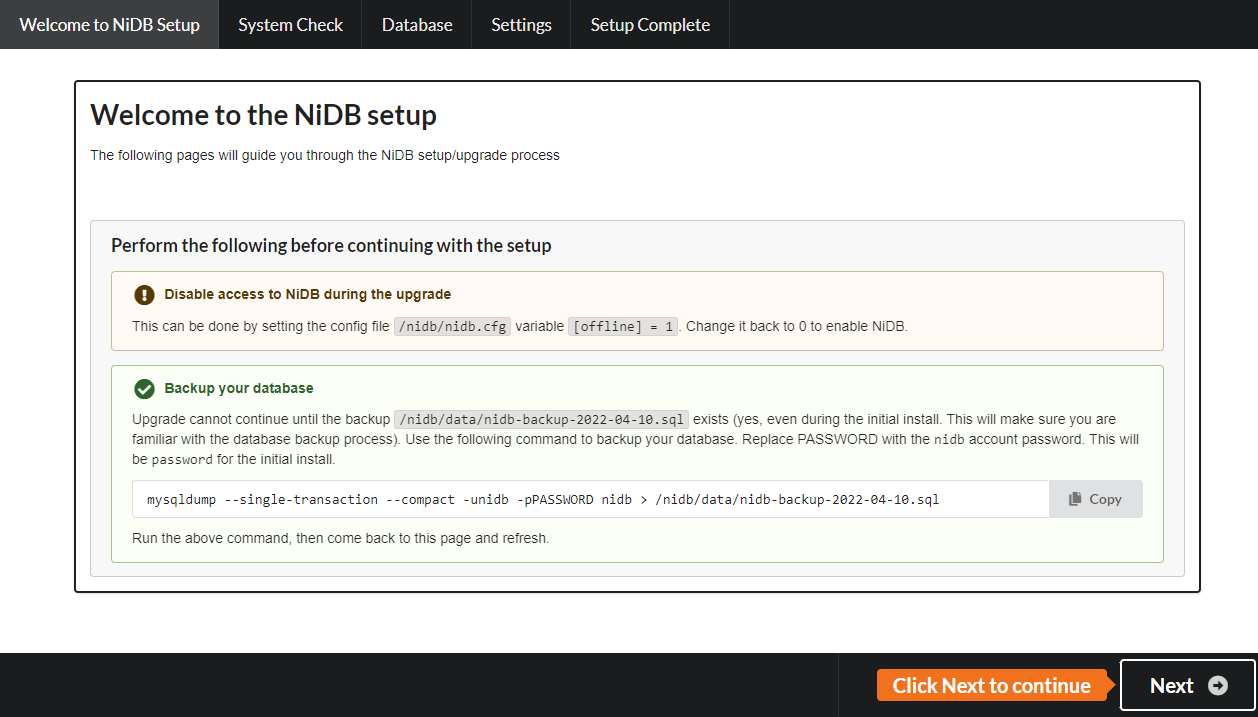
Entry page - Turning off access to the website and disabling all modules can help prevent errors during the upgrade. Always remember to backup the database! Click Next to continue.
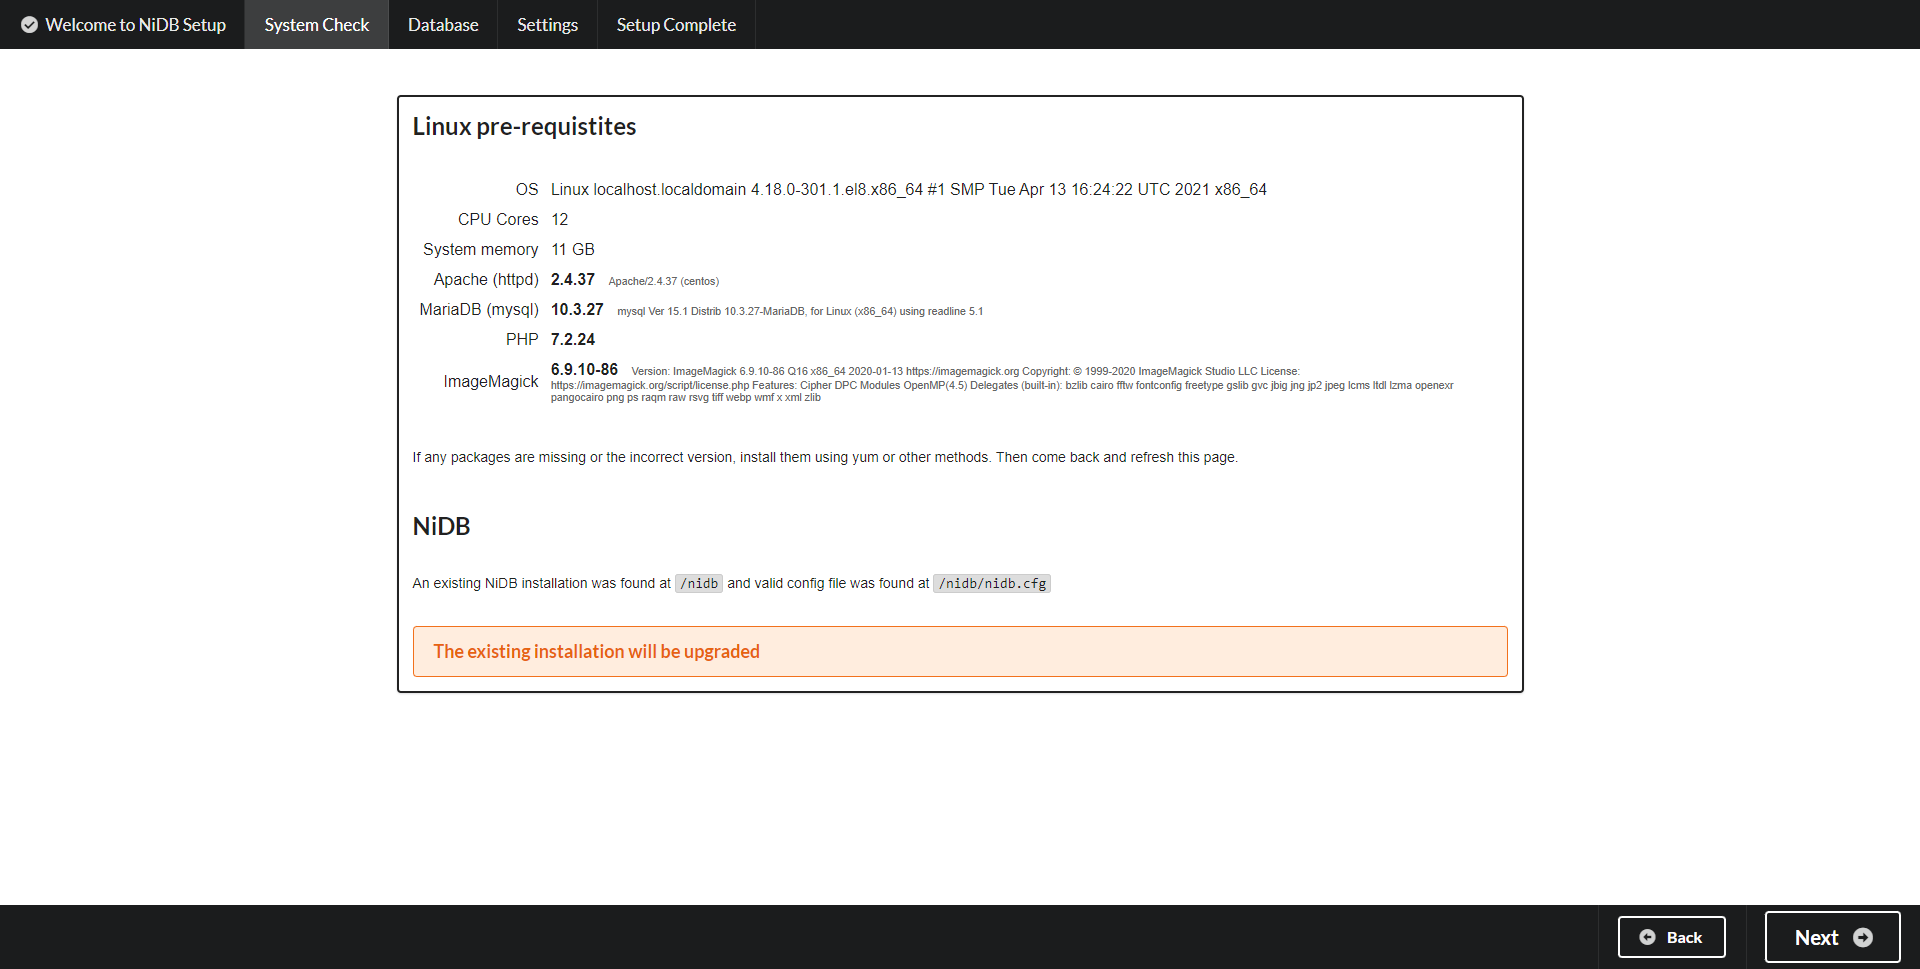
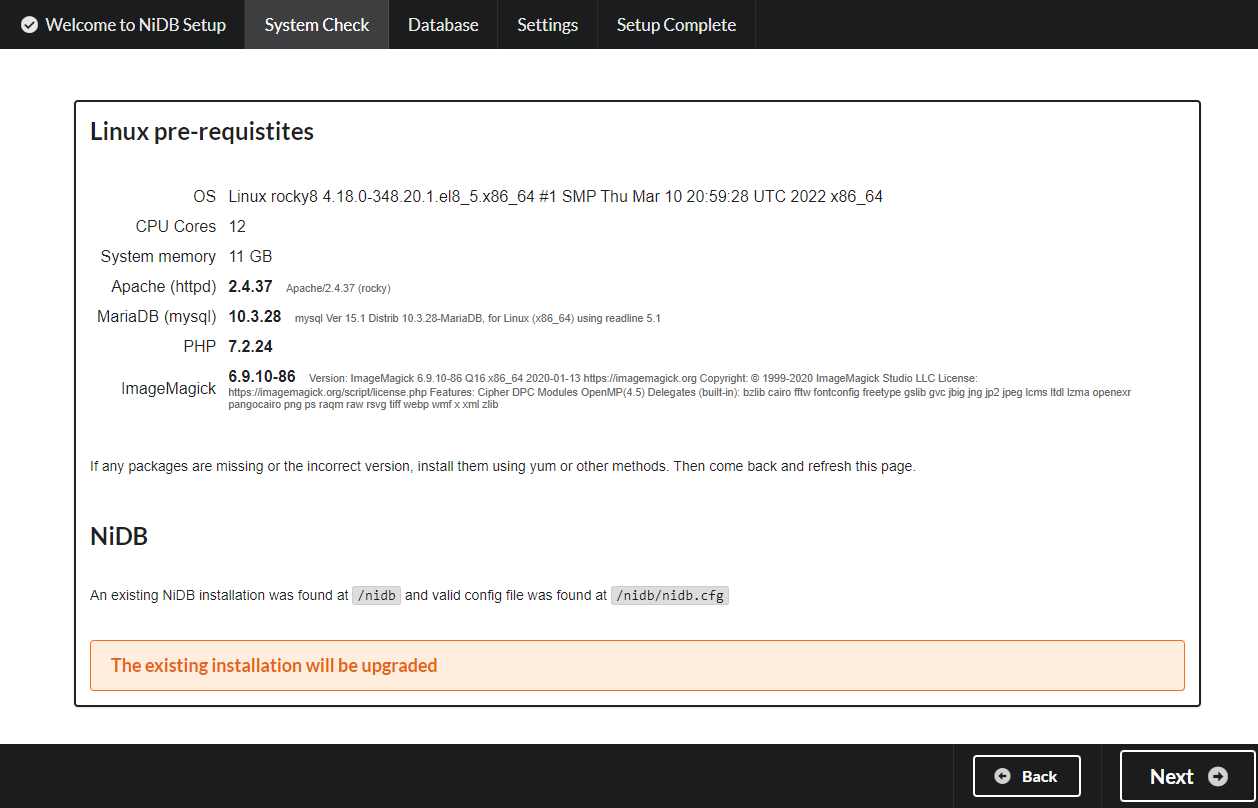
Pre-requisites - This page will check for CentOS packages and display an error if a package is missing or the wrong version. If missing any packages, check the output from the NiDB rpm installation or manually install the missing packages. After packages are installed, then refresh this page. Once all pre-requisities are met, click Next to continue.
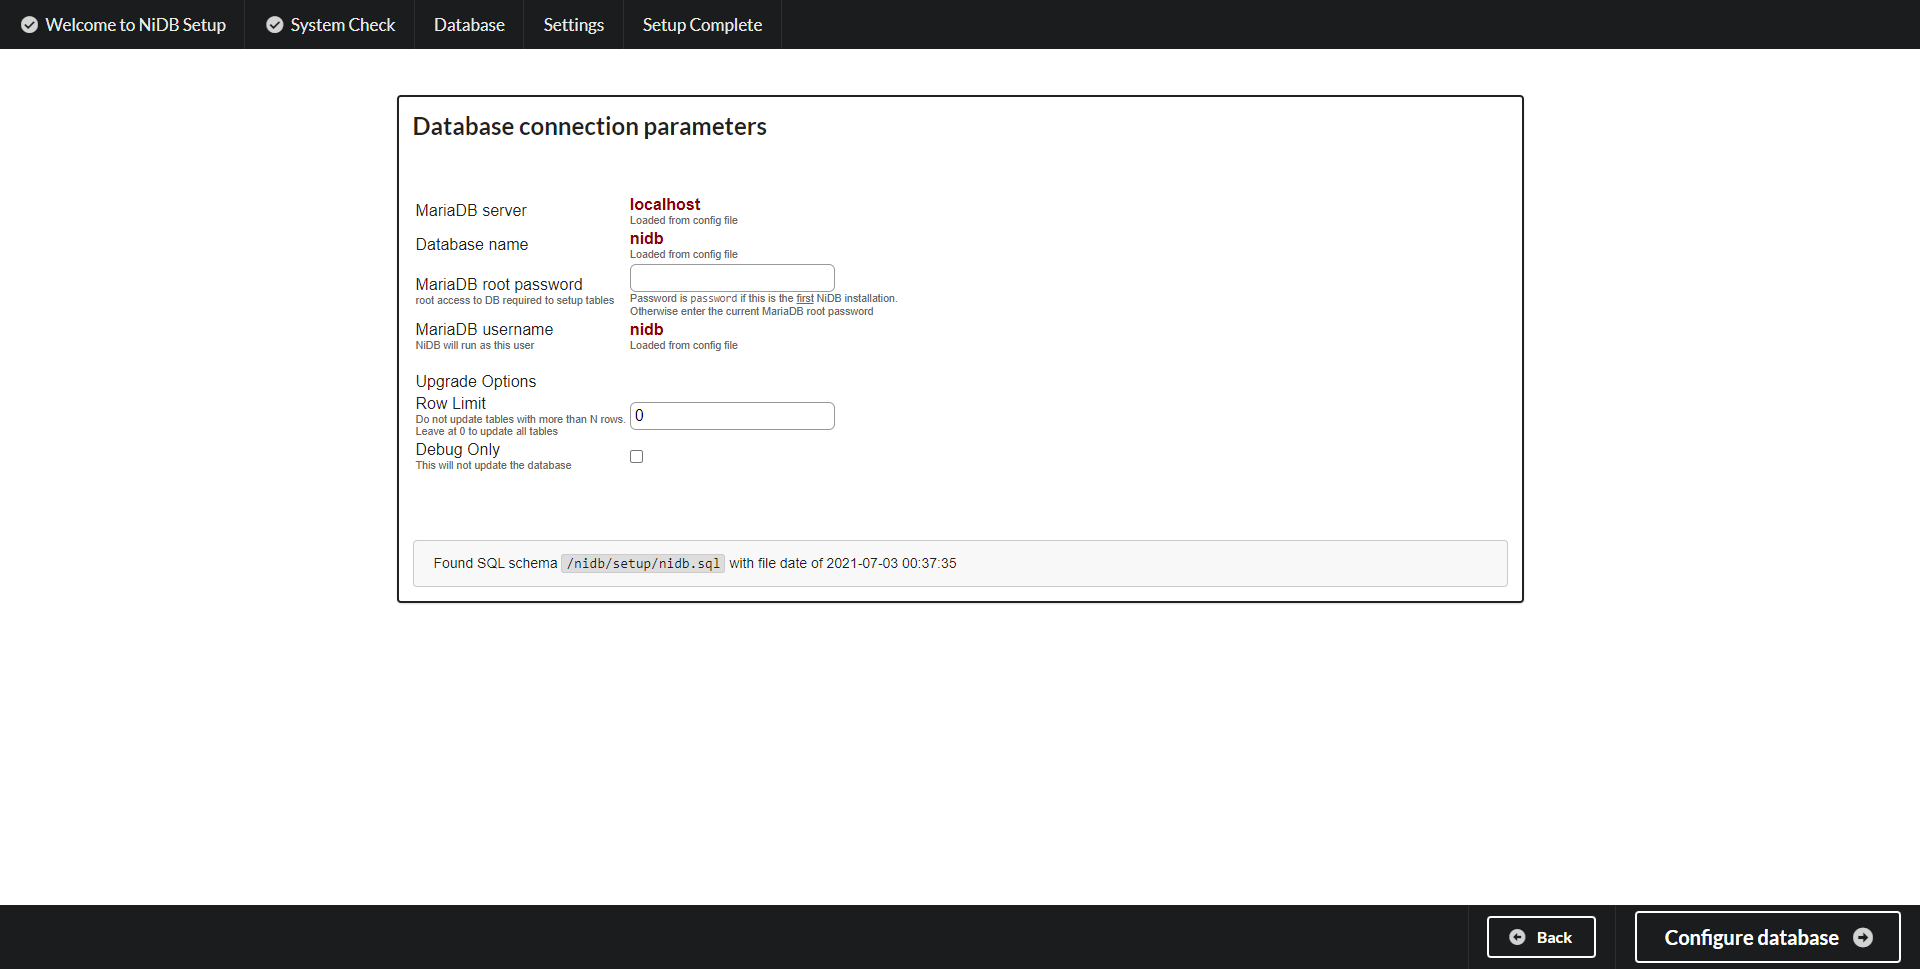
SQL database connection Enter the root SQL password in this screen. If you want to check what tables will be updated, without updating them, select the Debug checkbox. If you encounter issues upgrading large tables, you can choose to limit the size of the tables that are upgraded and you can then update those manually. This is not recommended however. Click Configure Database to continue.
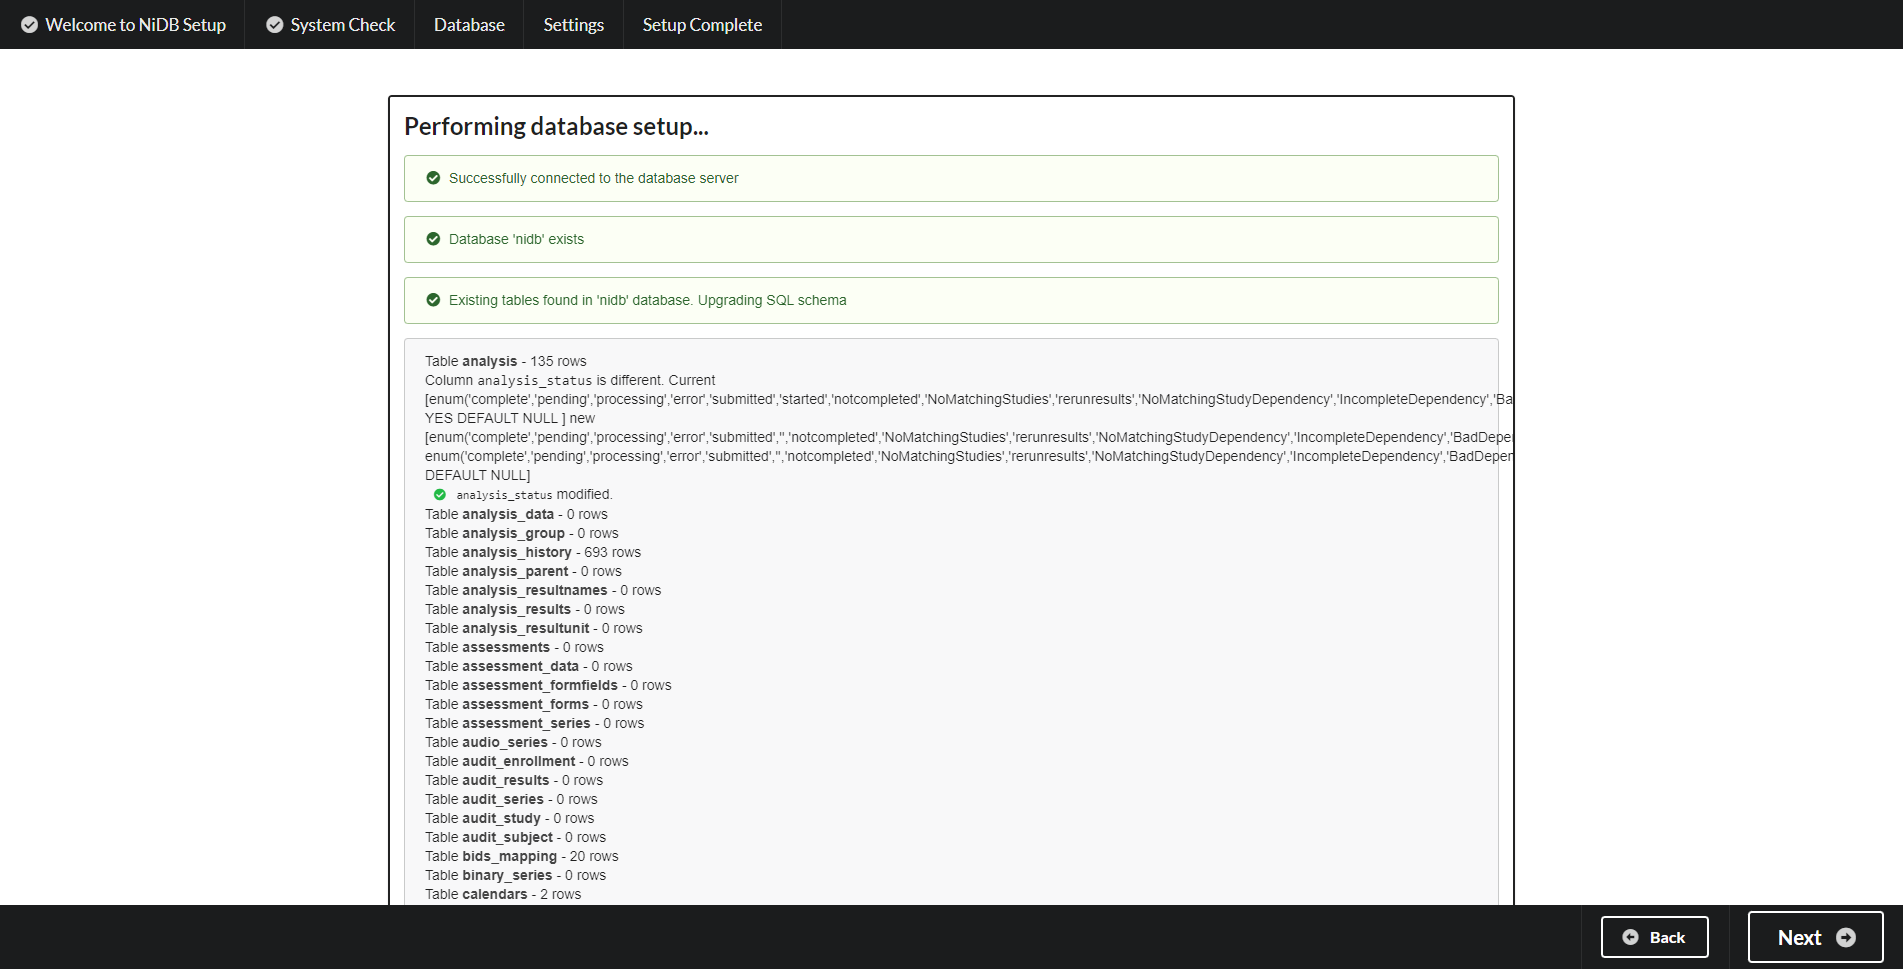
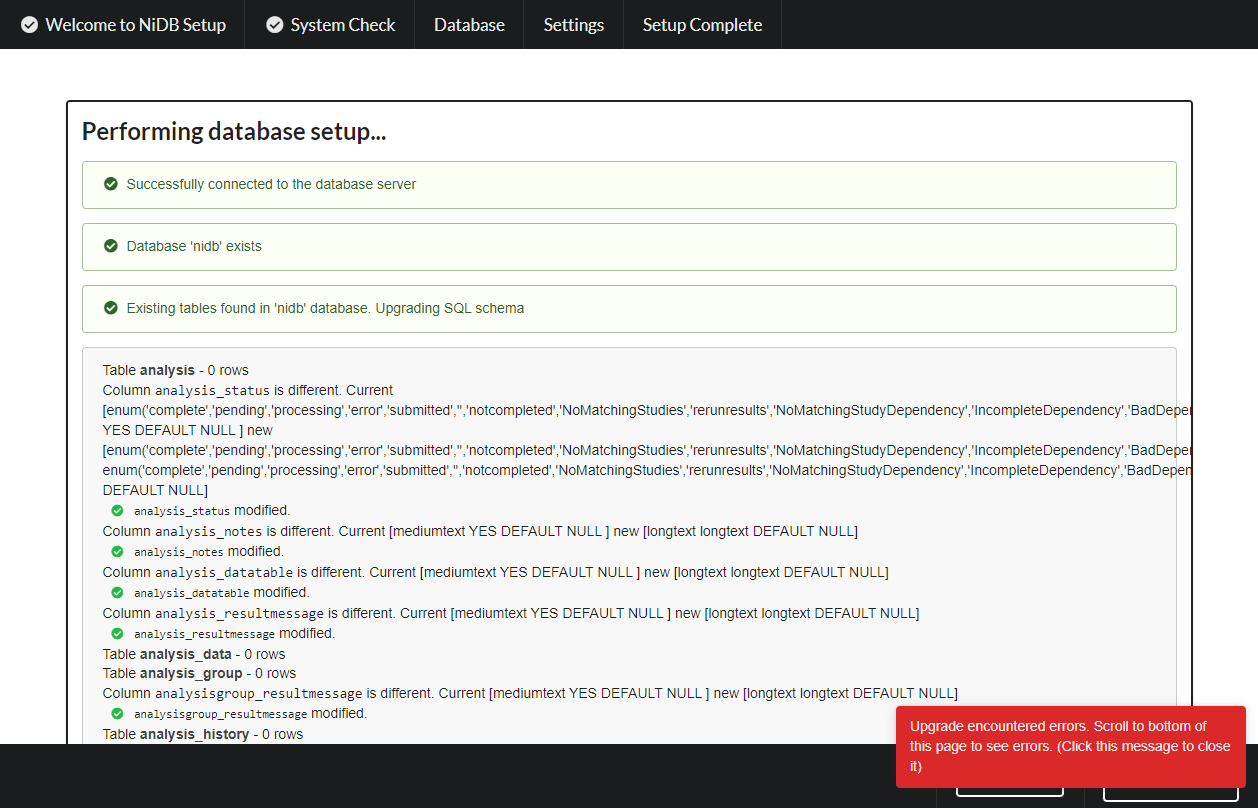
Schema upgrade The details of the schema upgrade will be displayed. Any errors will be indicated. Click Next to continue.
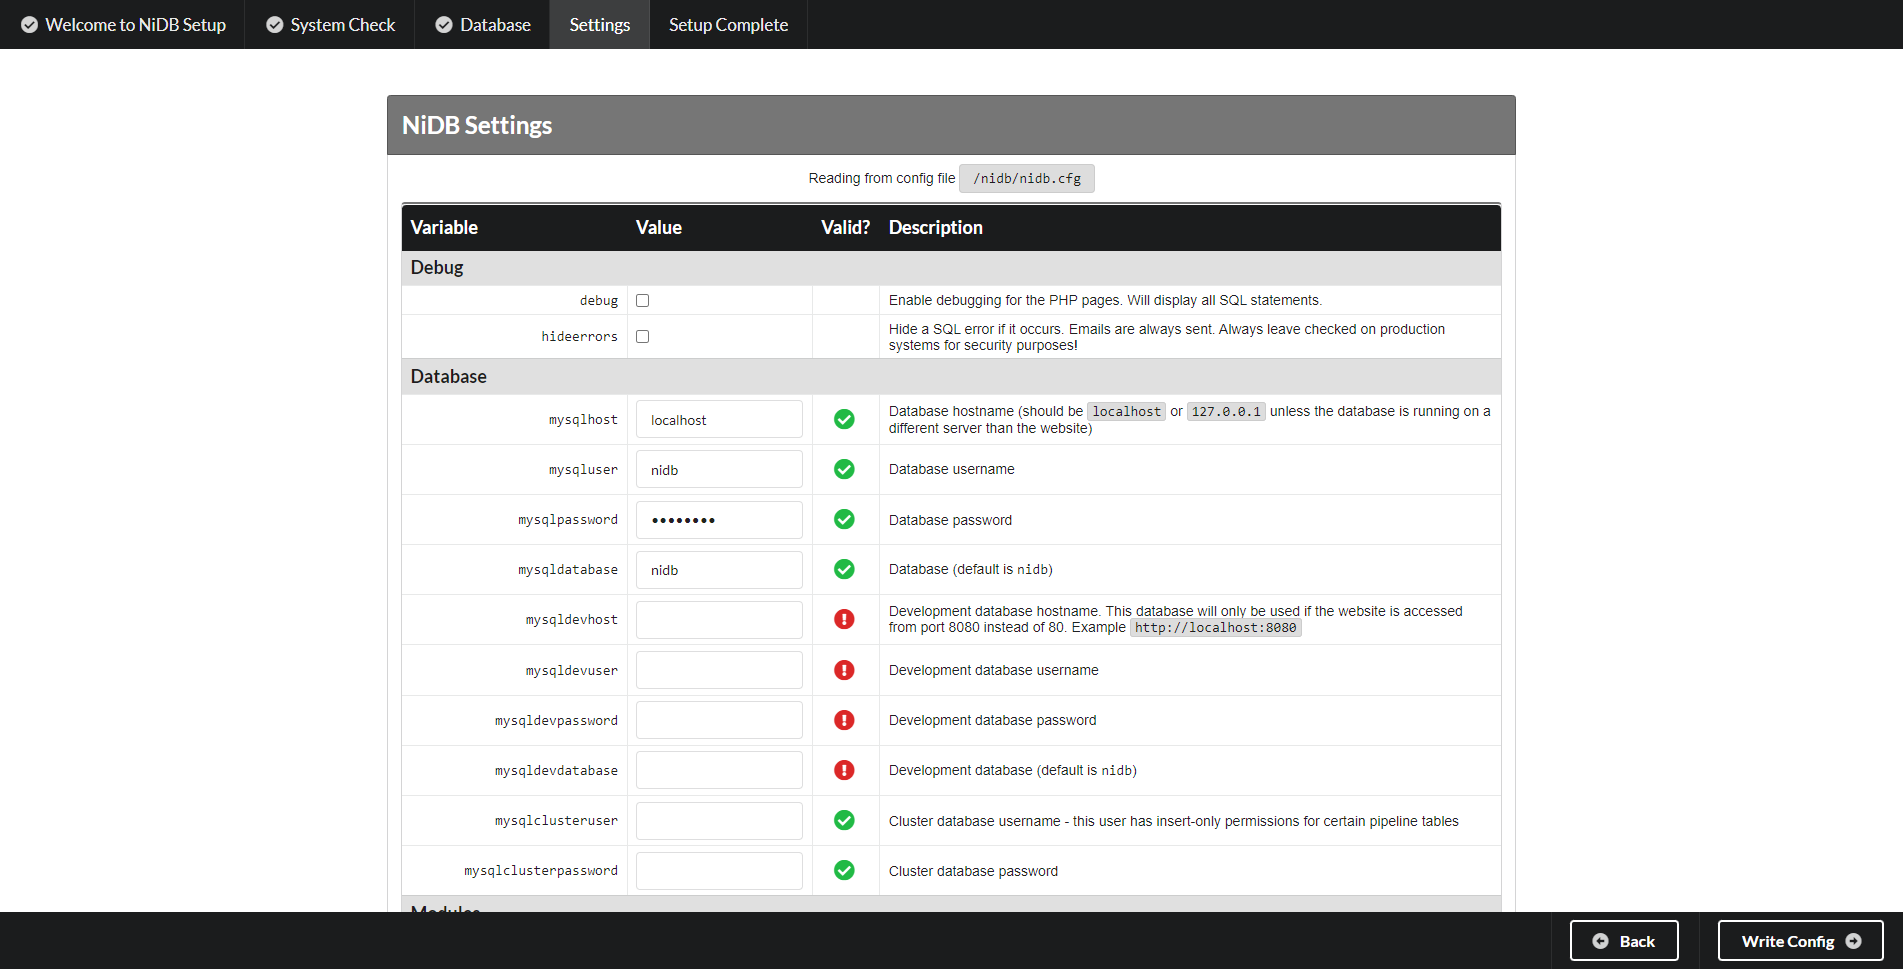
Configuration Any changes (paths, settings, options, etc) can be changed here. Click Write Config to continue.
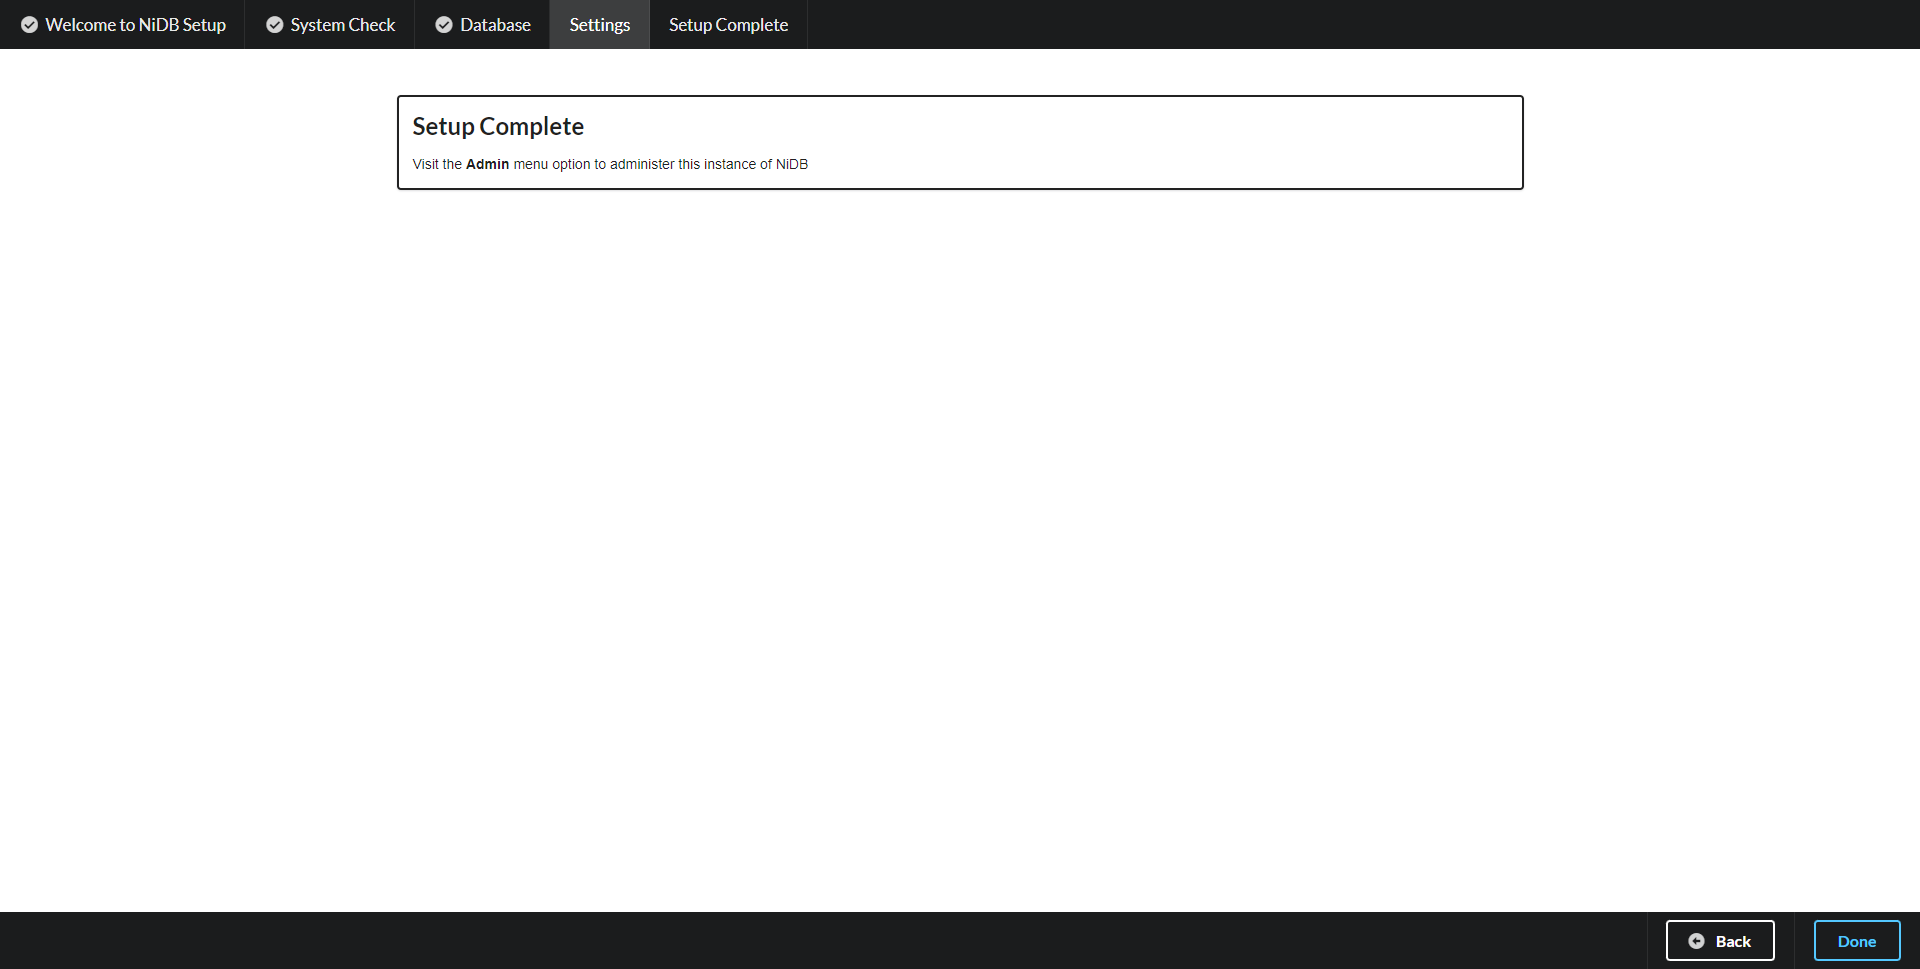
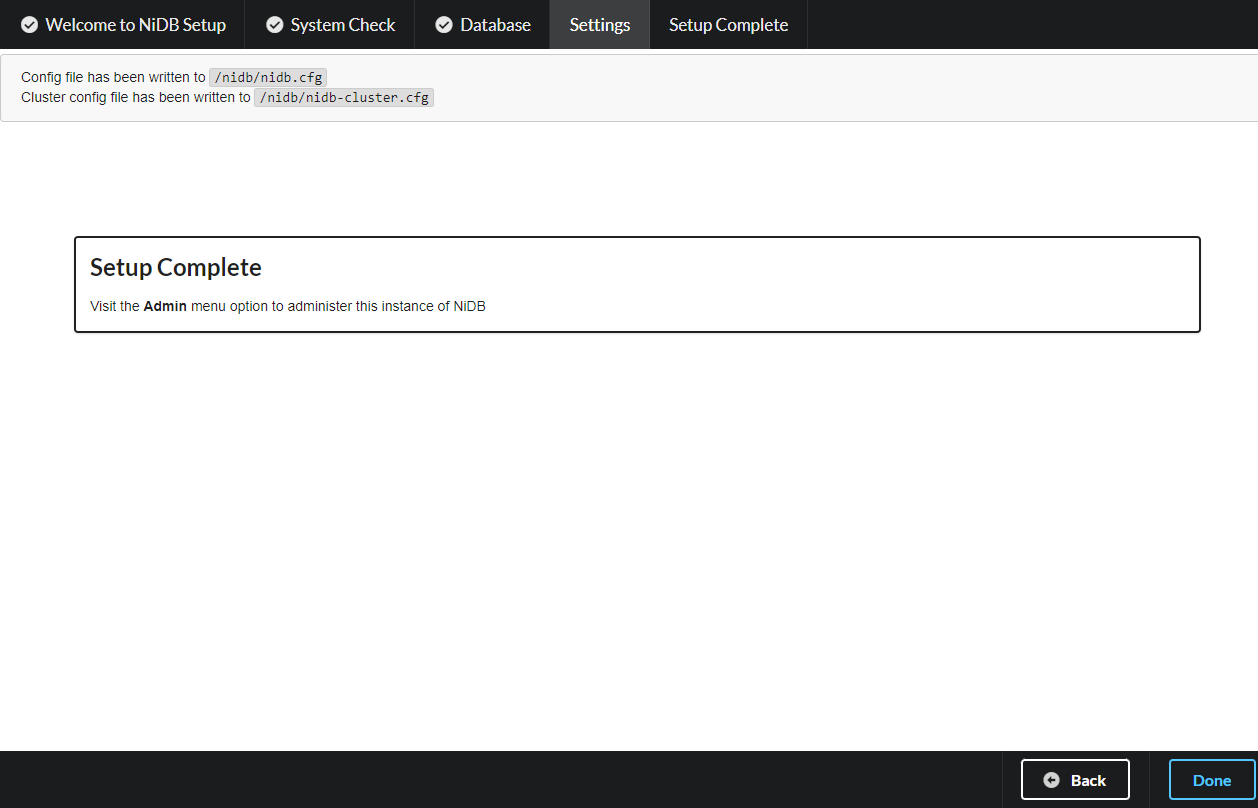
All finished! Click Done to complete the upgrade.
Upgrade issues
Schema upgrade errors
The database schema upgrade may not display a SQL error if it occurs, but the errors are stored in the error_log table in the database. Find the latest error(s) and the description will help diagnose the issue.
Row length errors
In phpMyAdmin, select the table in question. Under the operations tab, check the table type. If it is Innodb, change this to Aria, and click Go.
Primary key errors
If the primary key error references a TEXT column (if a TEXT column has a primary key) then delete the key for that column. This can be done in phpMyAdmin.
Importing Subjects from Redcap
Tutorial on how to import subjects form Redcap
NiDB supports to import subjects from an existing Redcap database. This is especially a very helpful option when a large number of subjects required to be created in NiDB, and information on these subjects is available in Redcap. This option can be used for any existing NiDB project, or a newly created project as a part of new or extended study. This option can save a lot of time and effort making the process efficient and accurate.
Following are the steps to import subjects from a Redcap project.
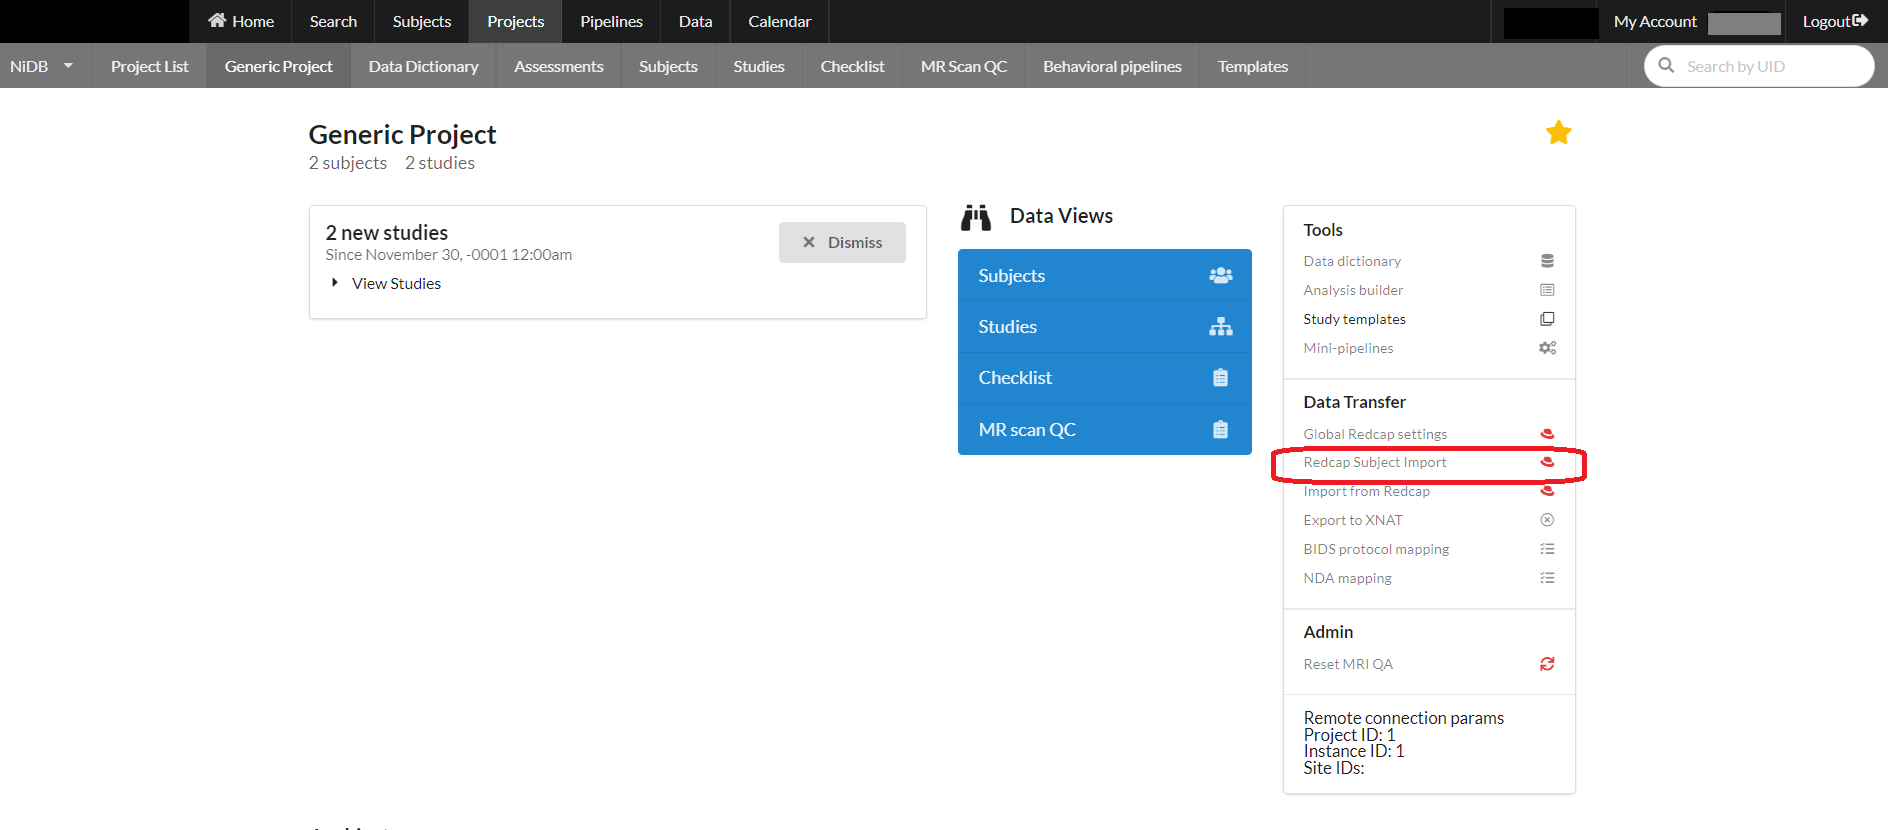
Step 1
Subjects can be imported from redcap into a NiDB project. Click Redcap Subject Import from Data Transfer section on the main page of the project as shown below:
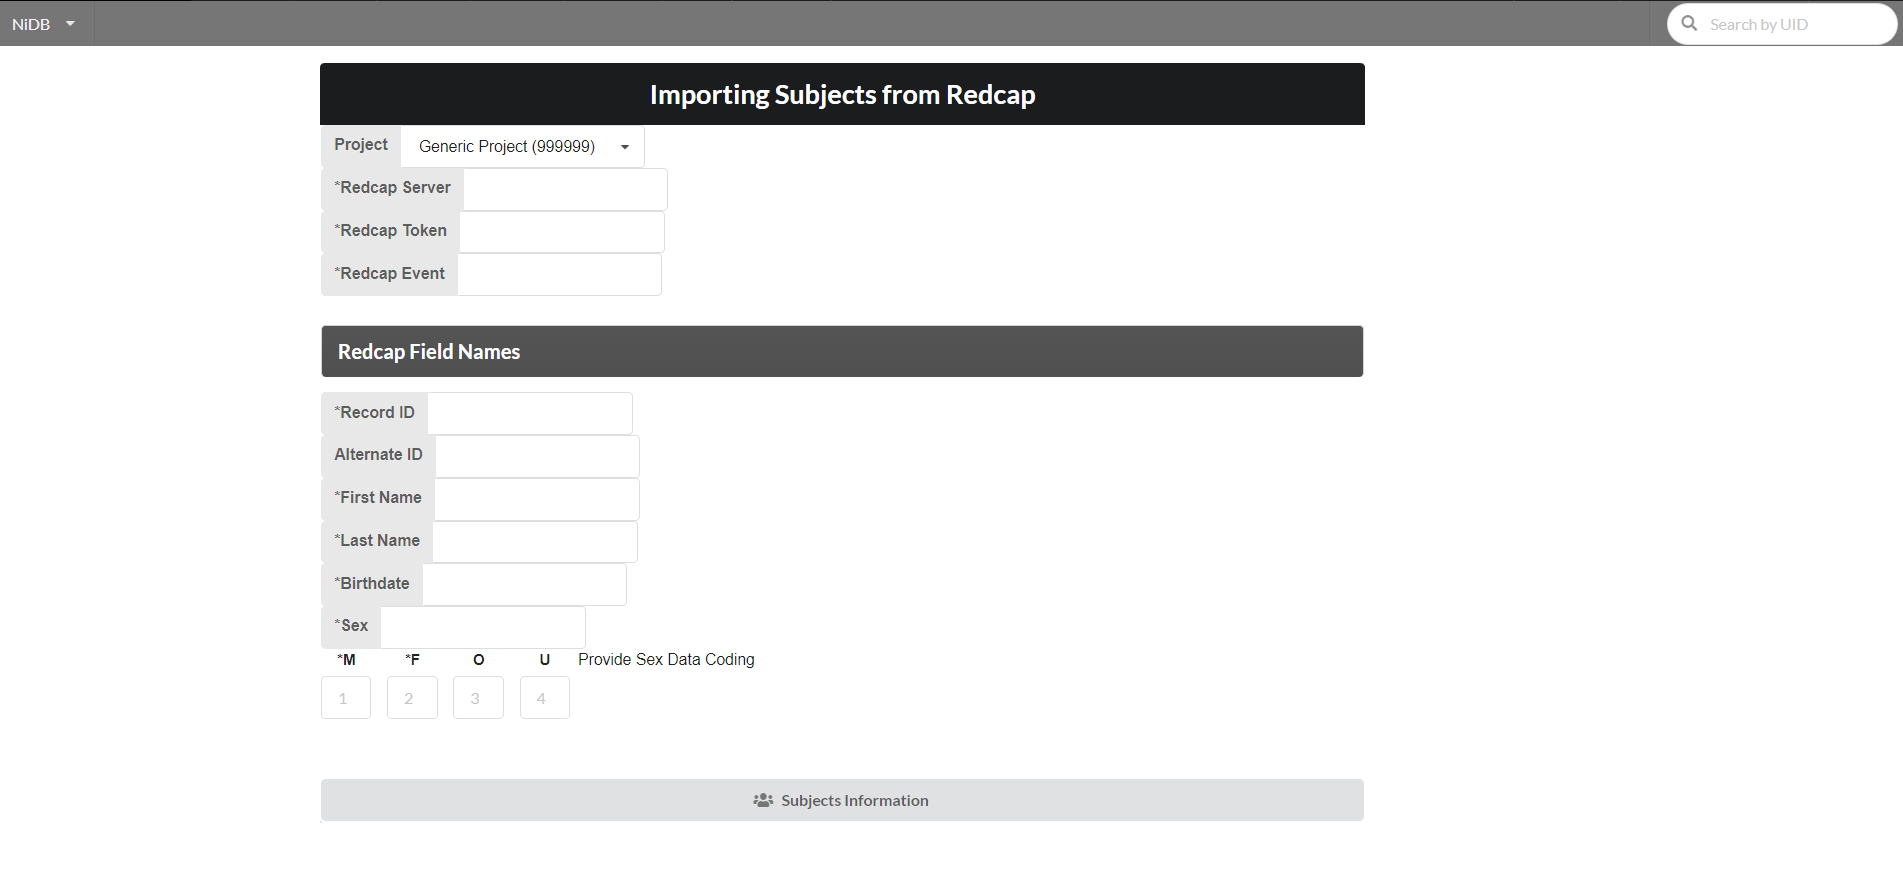
Step 2
Fill the following information for API connection to Redcap
Redcap Server: Name of the redcap server
Redcap Token: An API token provided by Redcap administrator.
Redcap Event: The name of the redcap event that stores the subject's information.
Step 3
Provide the following redcap field names.
Record ID (Required): Actual Redcap field name for Redcap record id.
Alternate ID (Optional): Name of the redcap field holding subject id other than record id, if any:
First Name (Required): Redcap field name containing the first name information. This is not the actual first name of a subject.
Step 4
After providing the required information regarding the Redcap fields click Subjects Information button.
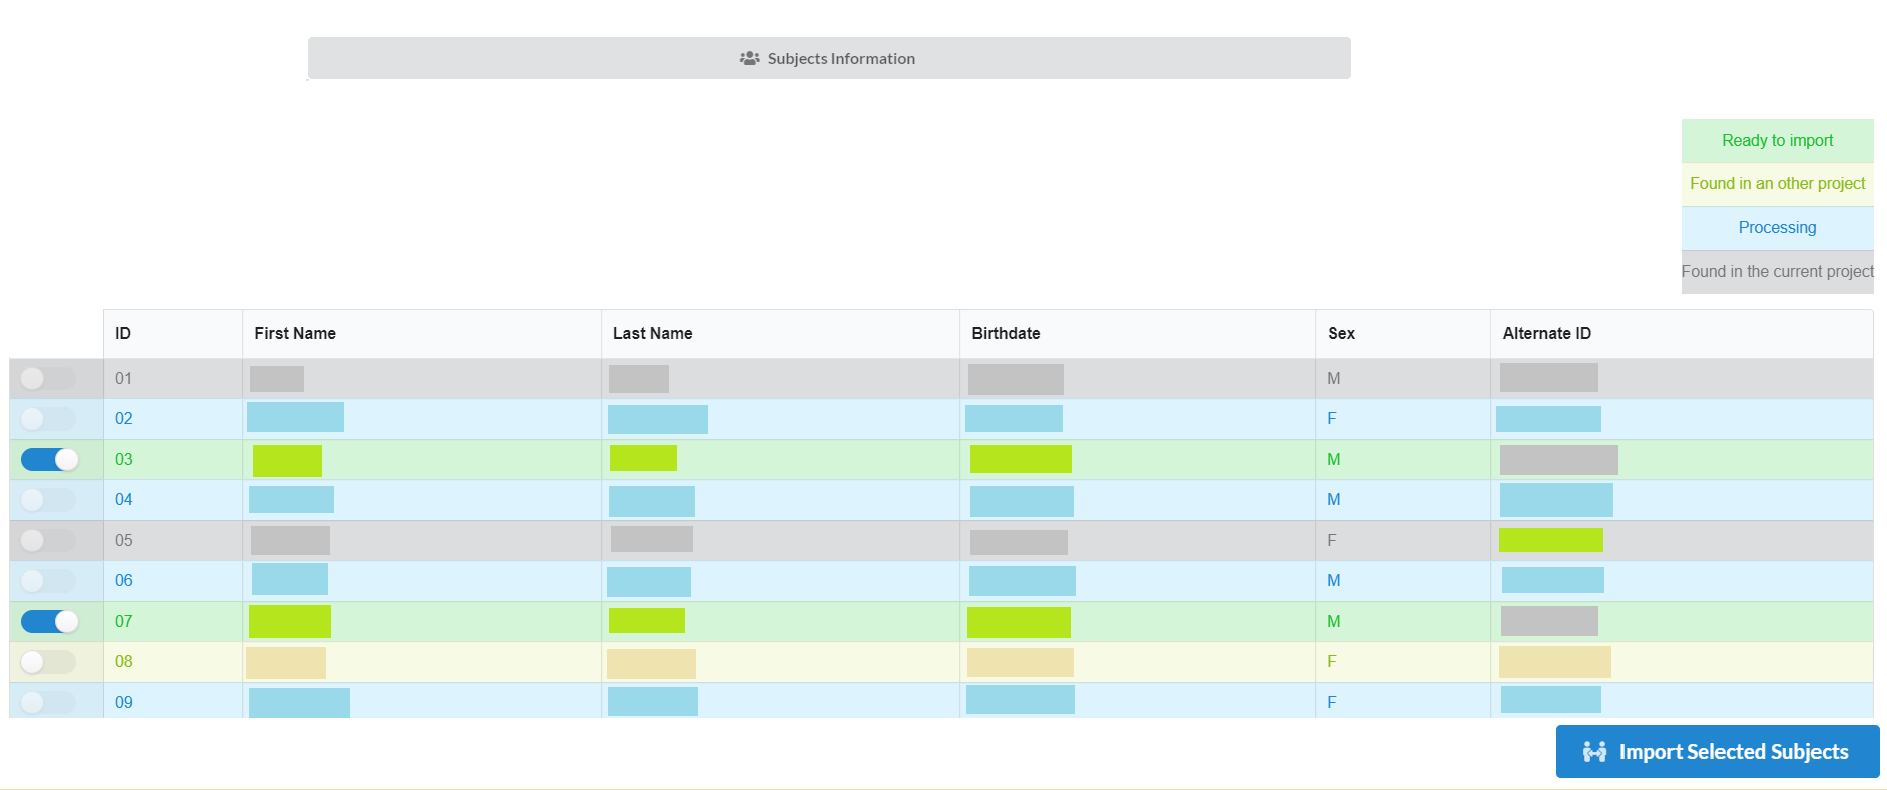
If all the above information is correct, then the list of the subjects from redcap will be shown as follows:
Step 5
There can be four types of subjects in the list. Those are:
Ready to Import: are the one those are in redcap and can be imported.
Found in an other project: these are present in another project under inthe NiDB database. They can also be imported, but need to be selected to get import.
Processing: these are already in the process of being imported and cannot be selected to import.
After selecting the desired subjects to import, click Import Selected Subjects to start the import process.
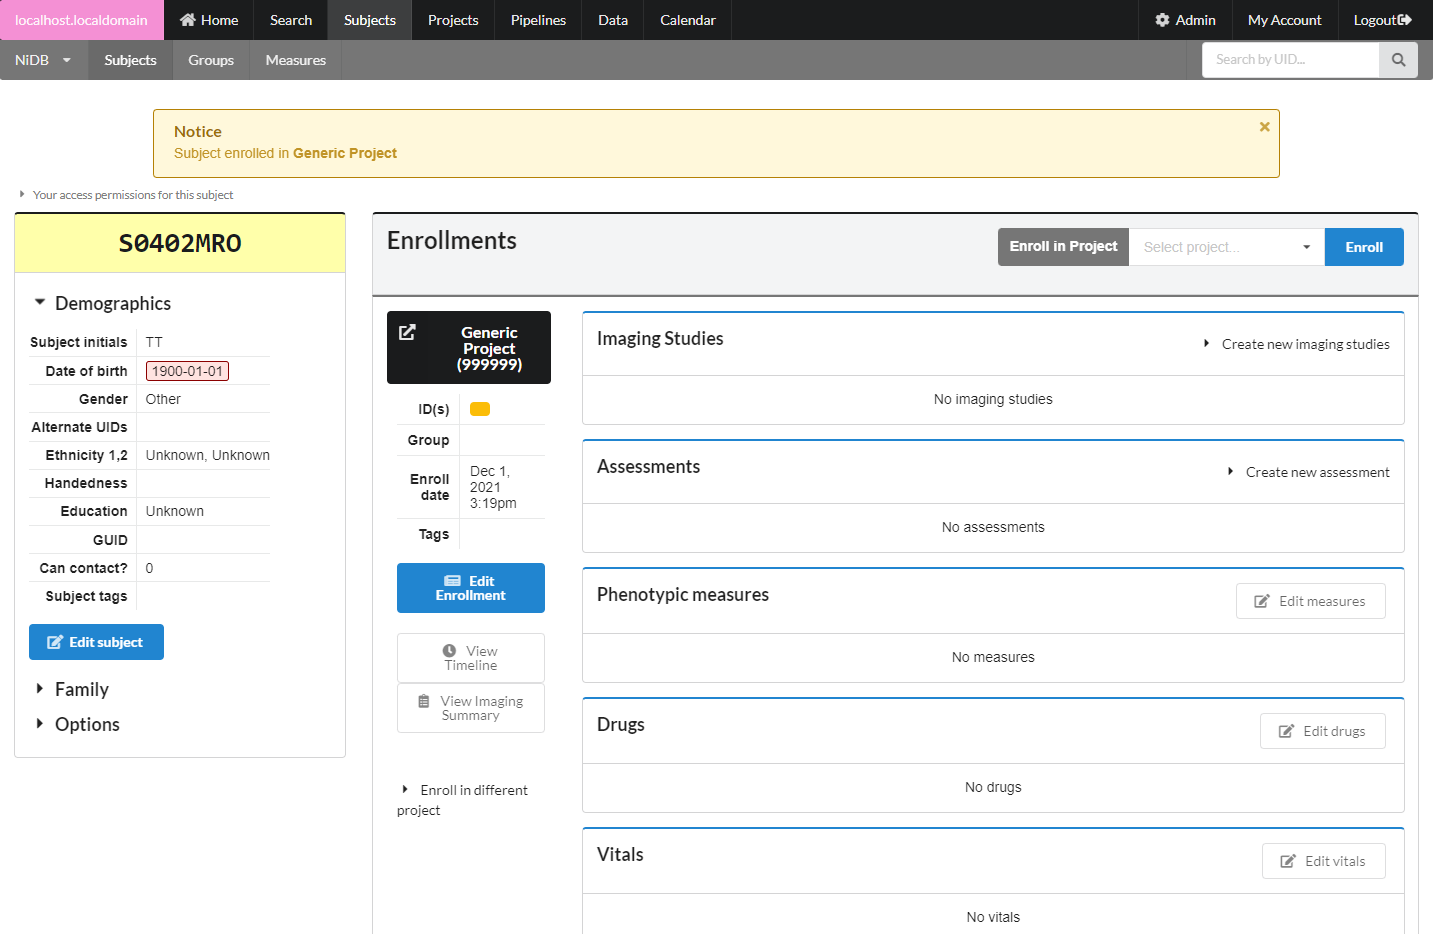
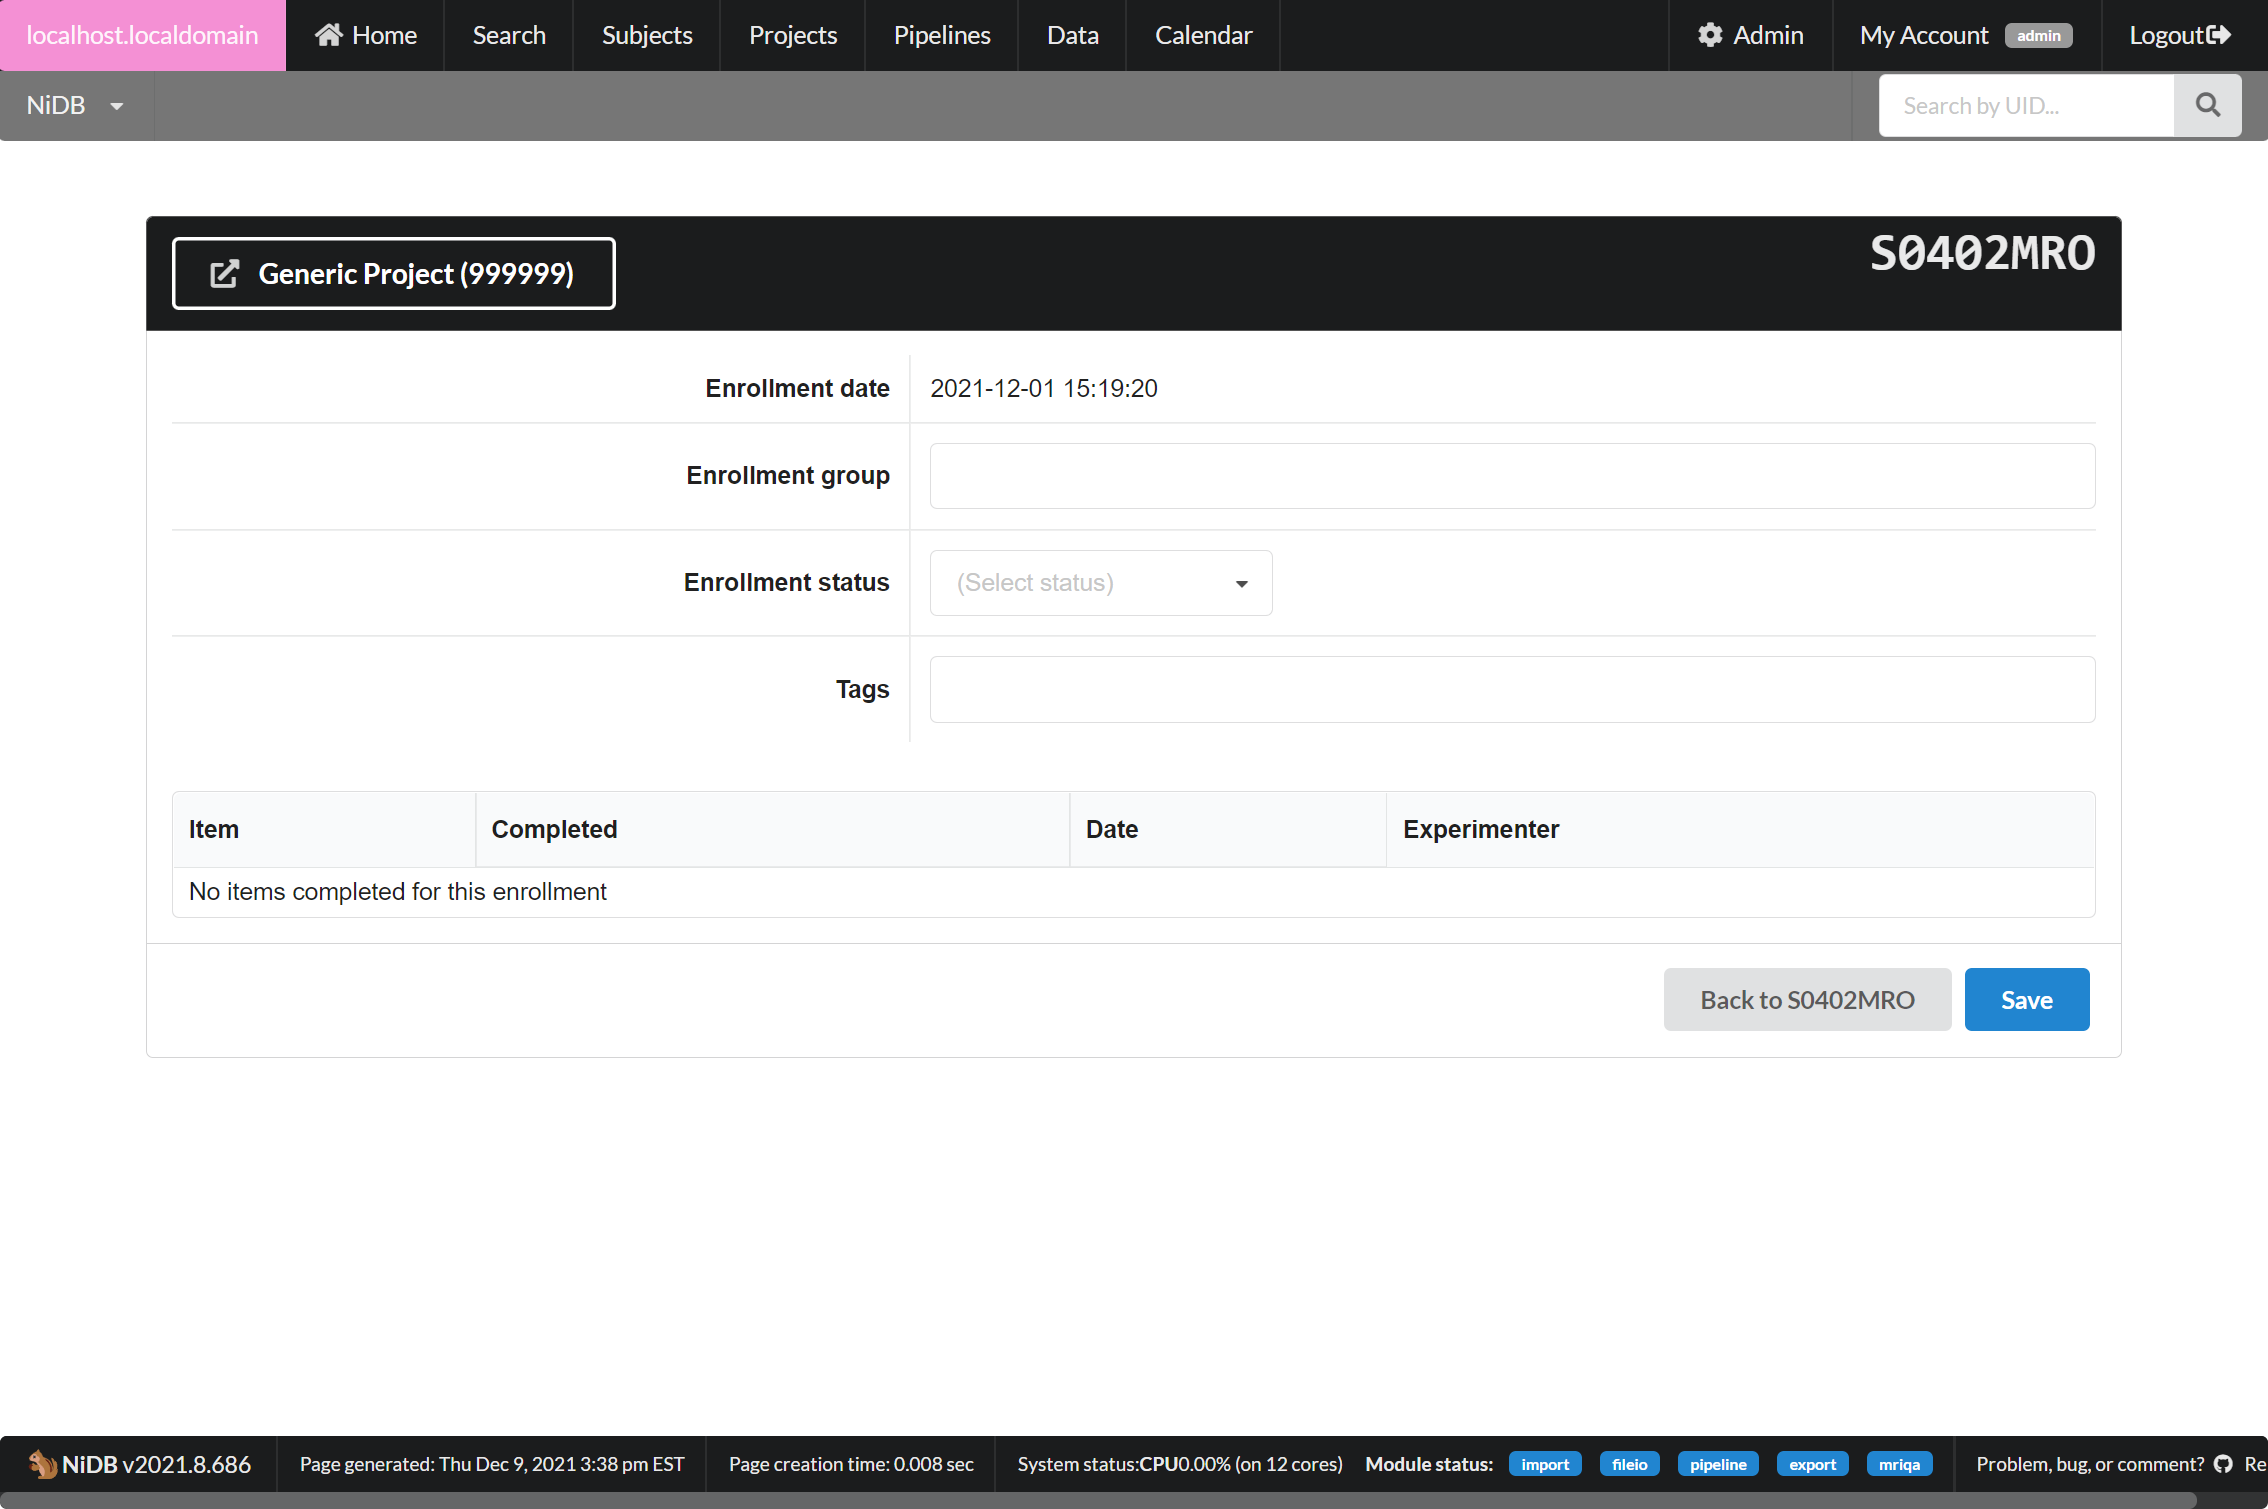
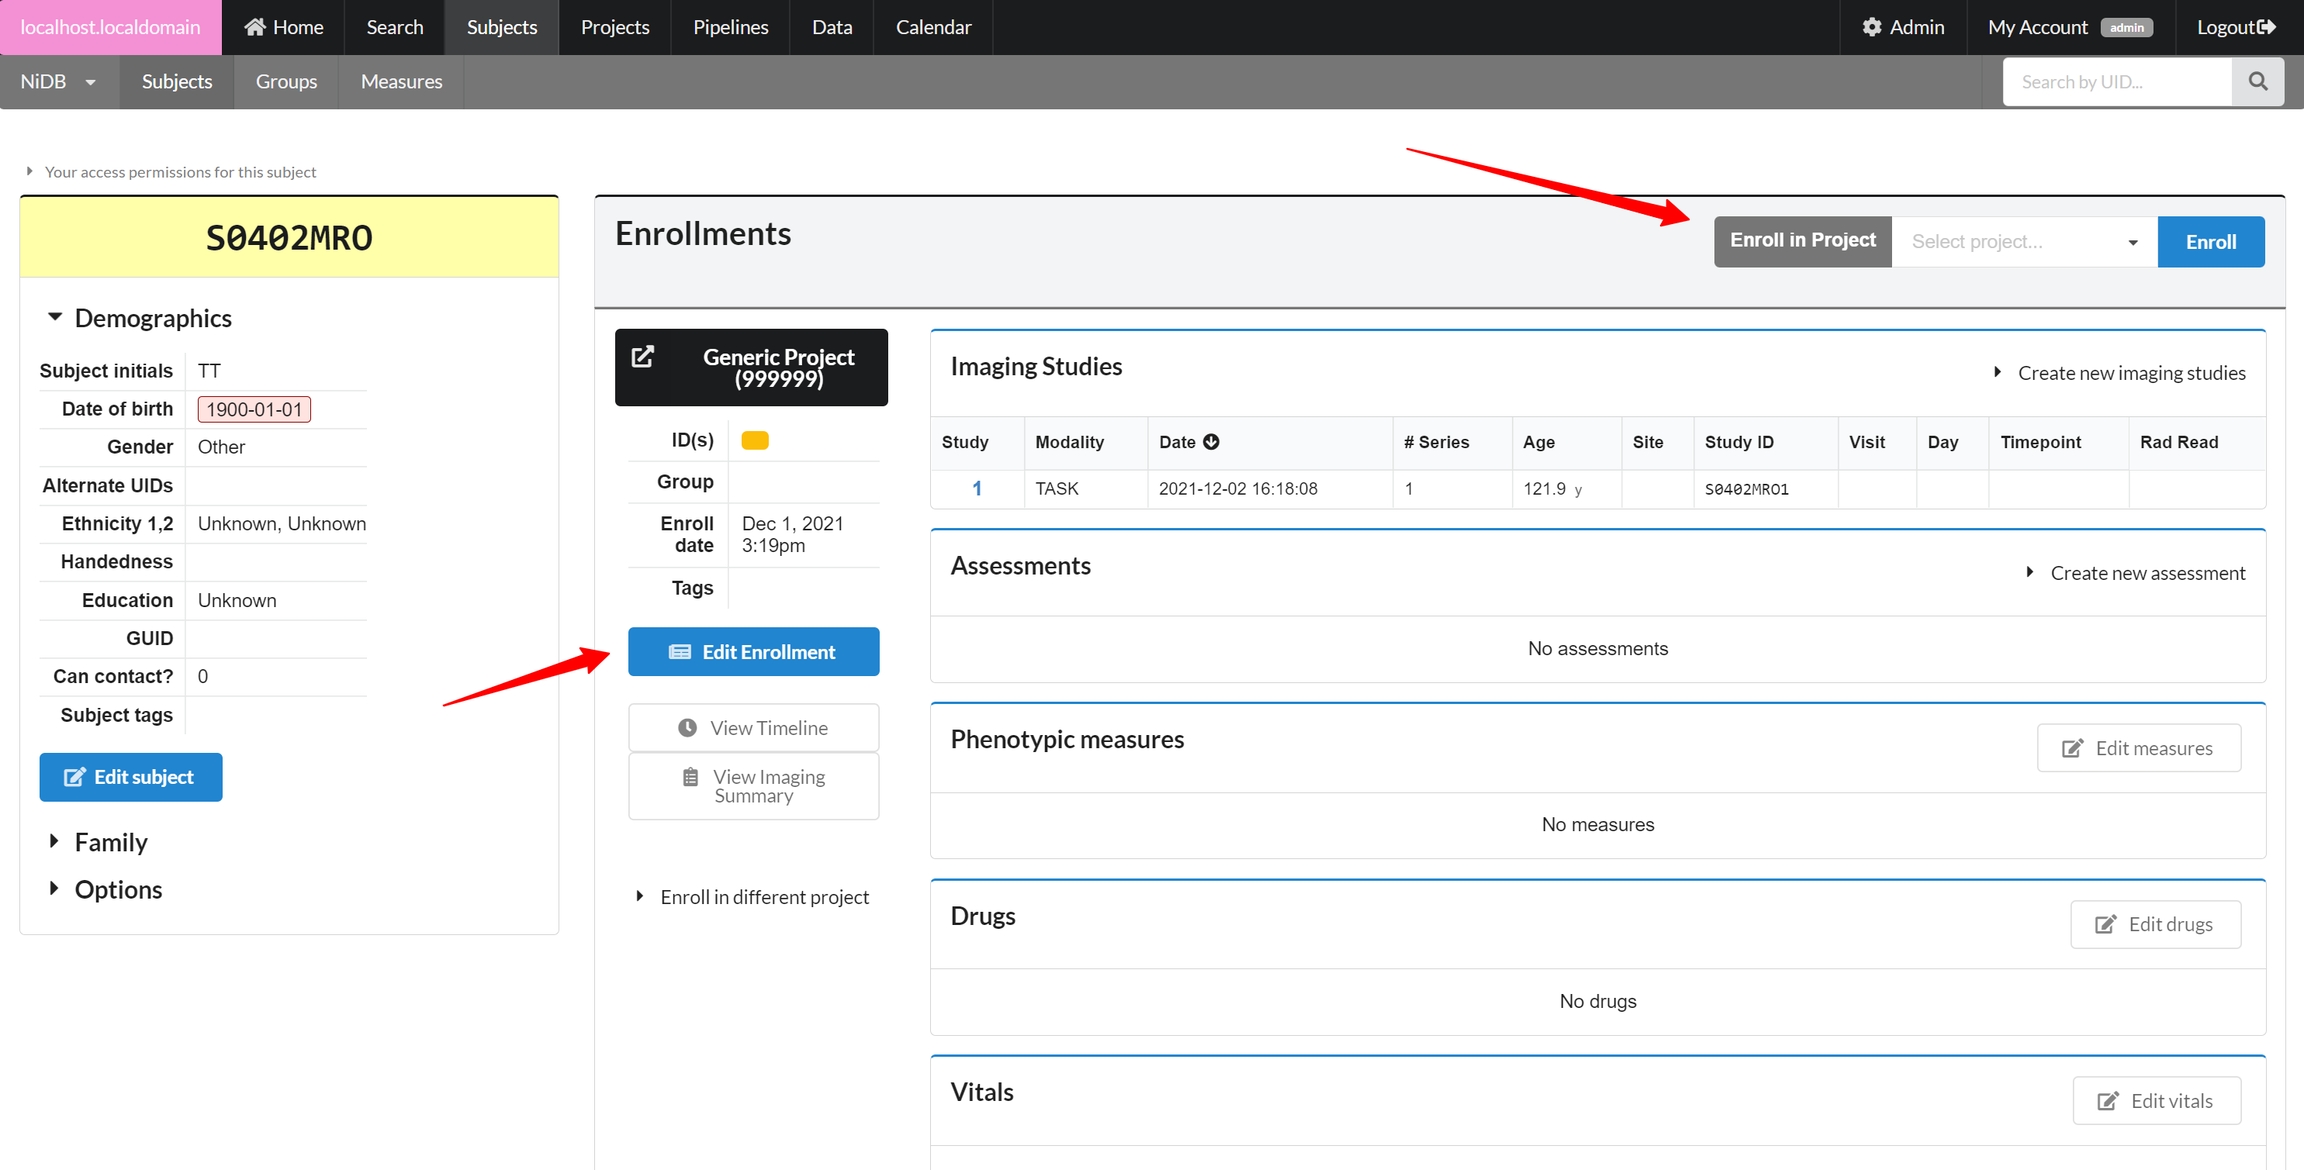
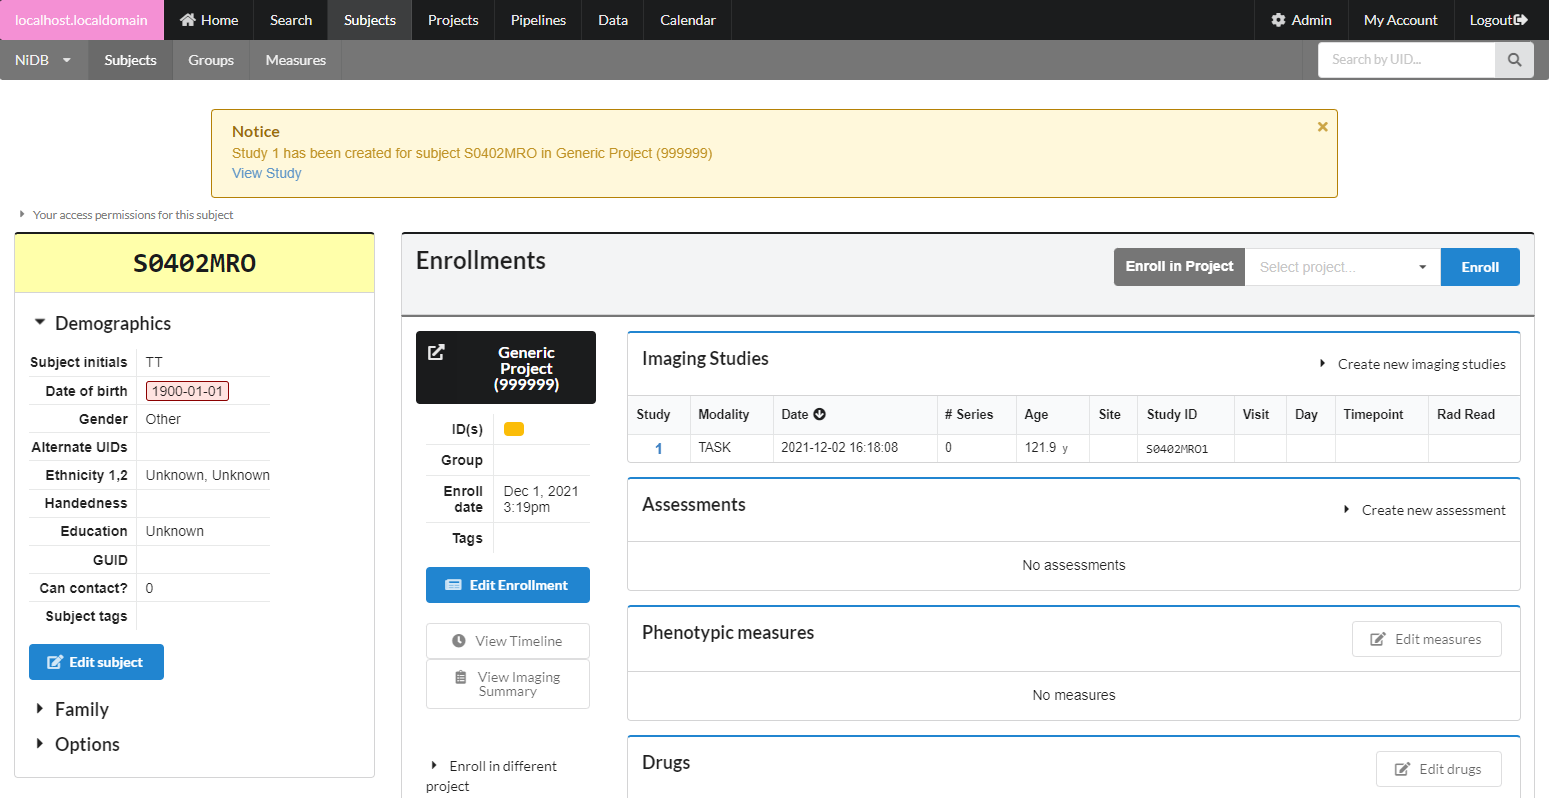
Enroll in Project
In the enrollments section, select the project you want to enroll in, and click Enroll. The subject will now be enrolled in the project. Permissions within NiDB are determined by the project, which is in theory associated with an IRB approved protocol. If a subject is not enrolled in a project, the default is to have no permissions to view or edit the subject. Now that the subject is part of a project, you will have permissions to edit the subject's details. Once enrolled, you can edit the enrollment details and create studies.
Working with subject IDs
This tutorial describes how to find subjects by ID, and how to map multiple IDs.
Why do subjects have more than one ID?
A few possible reasons
Subject can be enrolled in more than one project, and assigned a different ID for each enrollment
Subjects are assigned more than one ID within a project
Data are imported from other databases. The subjects retain the original ID and assigned a new ID
Imaging studies are assigned unique IDs, regardless of subject
Subject IDs
In this example, a subject is enrolled in 3 projects, where each project has a different ID scheme.
Project 1 has an ID range of 400 to 499
Project 2 a range of A100 to A200 and B100 to 200
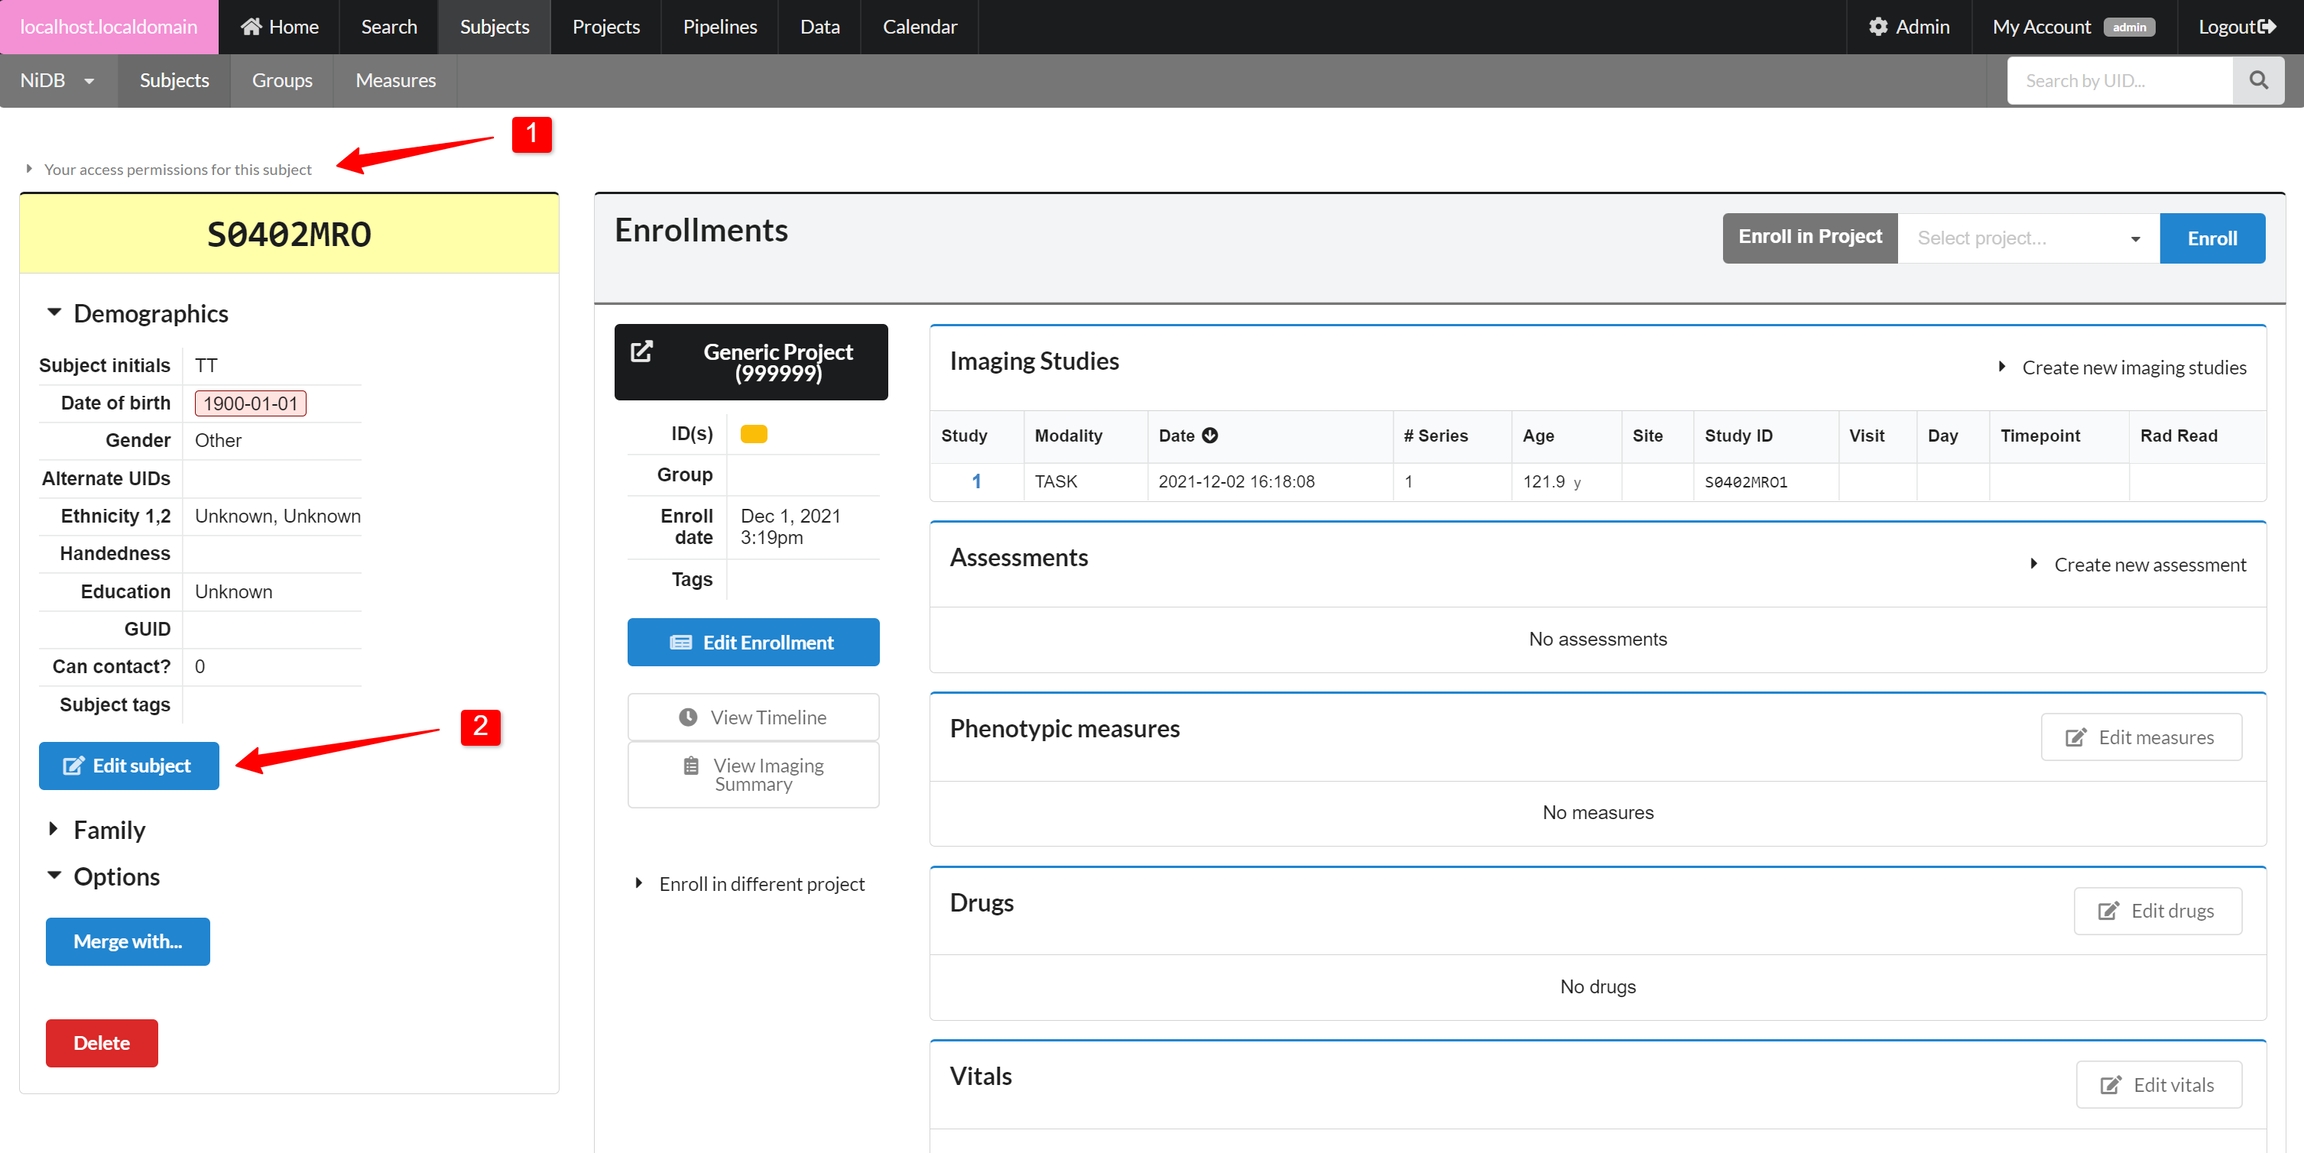
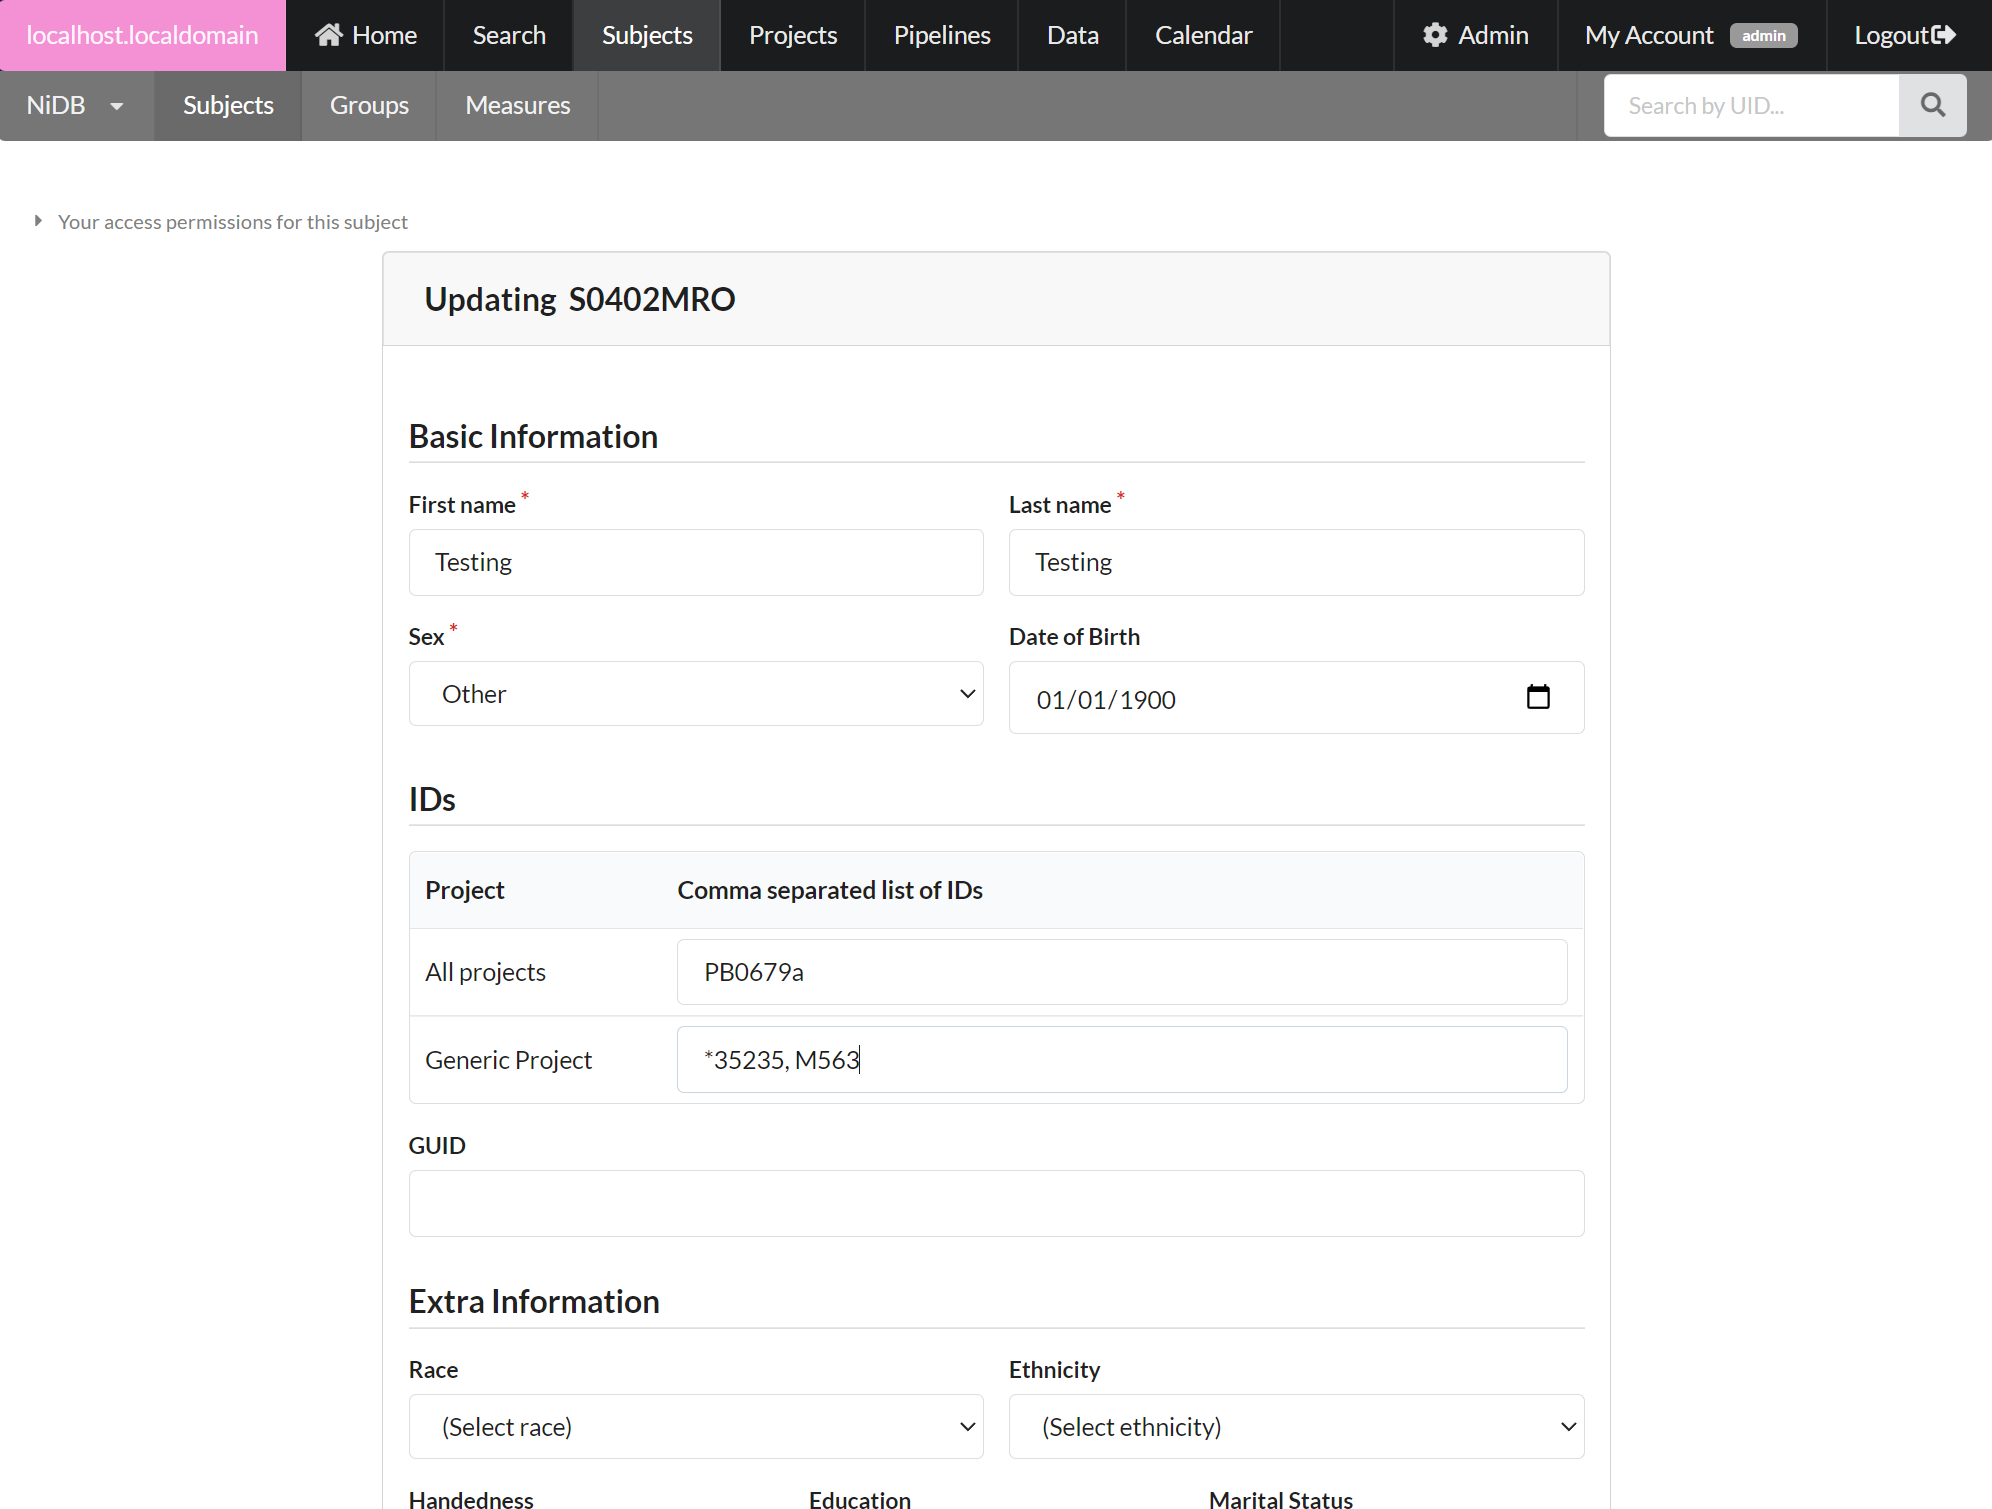
These IDs can be managed within the subject demographics page. On the left hand side of the Subject's page, edit the subject by clicking the Edit Subject button.
Then scroll down part way on the page and you'll see the ID section, where you can enter all IDs, for all projects/enrollments for this subject. This is a list of Alternate Subject IDs. The asterisk * indicates this is the Primary Alternate Subject ID.
In this example, the Testing project has more than one ID. This can happen if a subject is assigned more than one ID, for example the subject was collected under 2 different IDs and merged, or collected at a different site with different ID scheme, or there is more than one ID format for the project.
Study IDs
Some imaging centers give a unique ID every time the participant comes in (yes, this can be a nightmare to organize later on). Imagine subject comes in on 3 different occasions and receives a different subject ID each time. If you are able to associate these IDs back with the same subject, you can treat these as the Study IDs. The default study is the study number appended to the UID, for example S1234ABC1. In NiDB, all other study IDs are considered Alternate Study IDs.
Mapping subject IDs
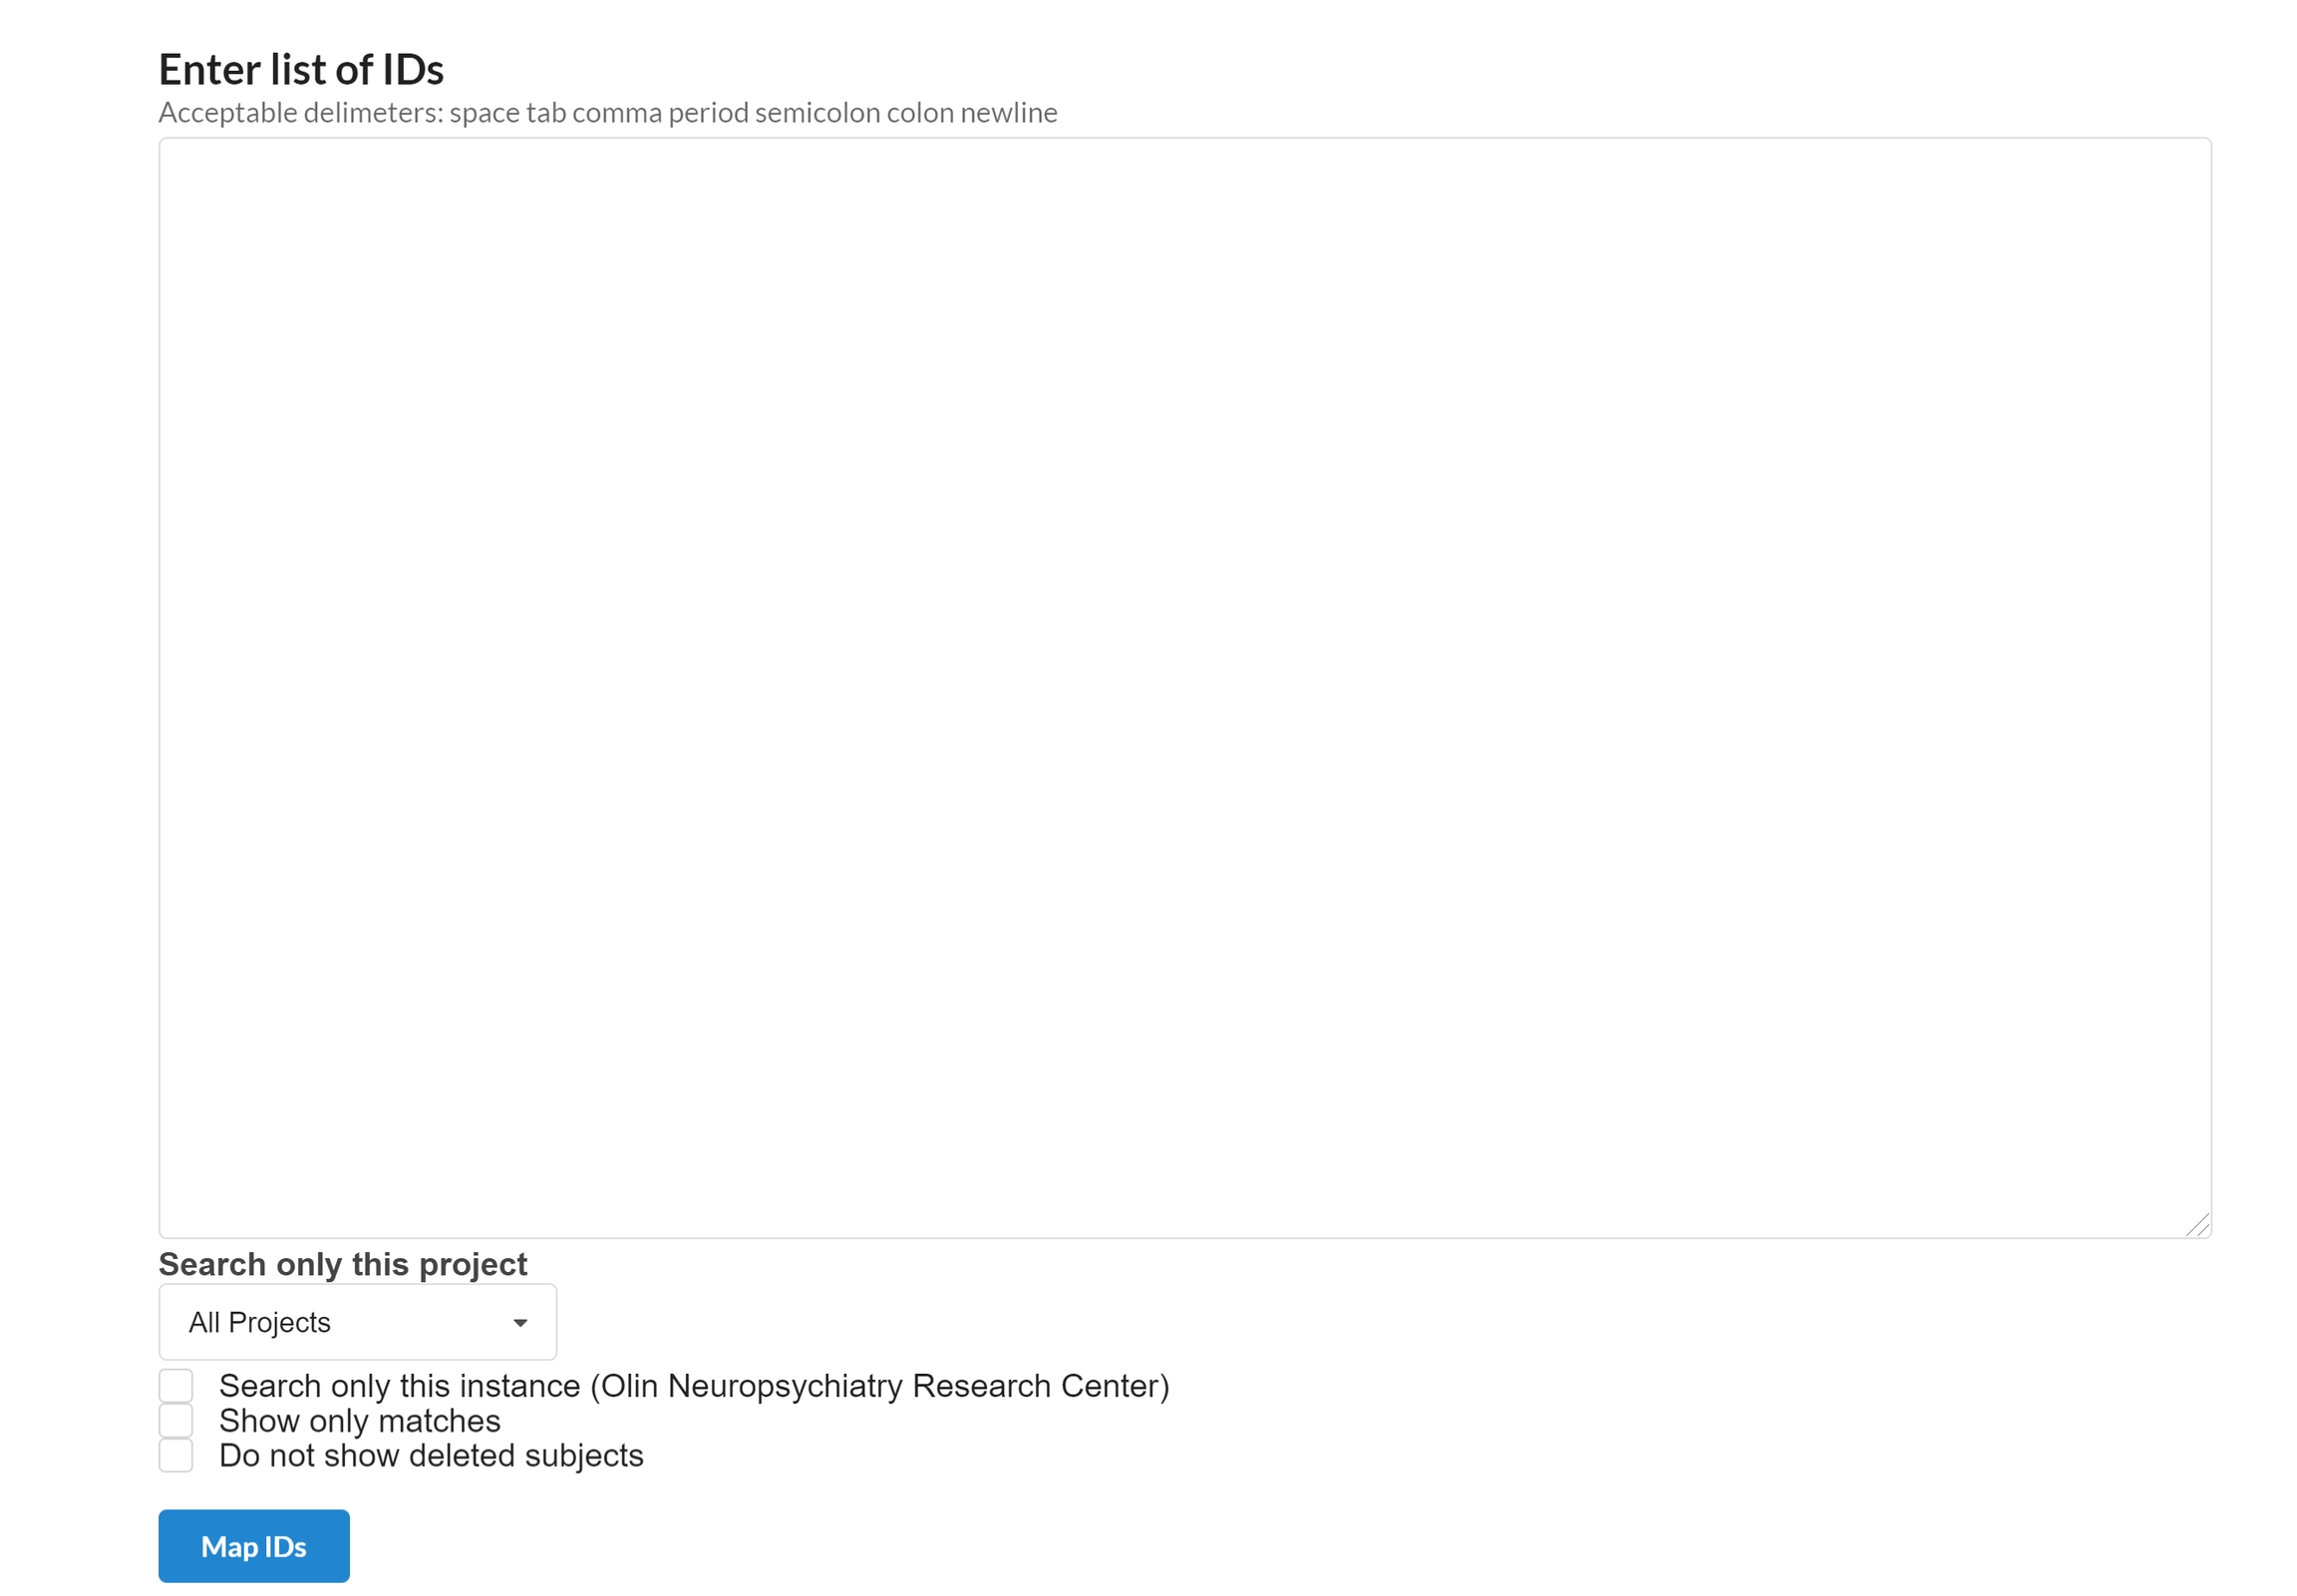
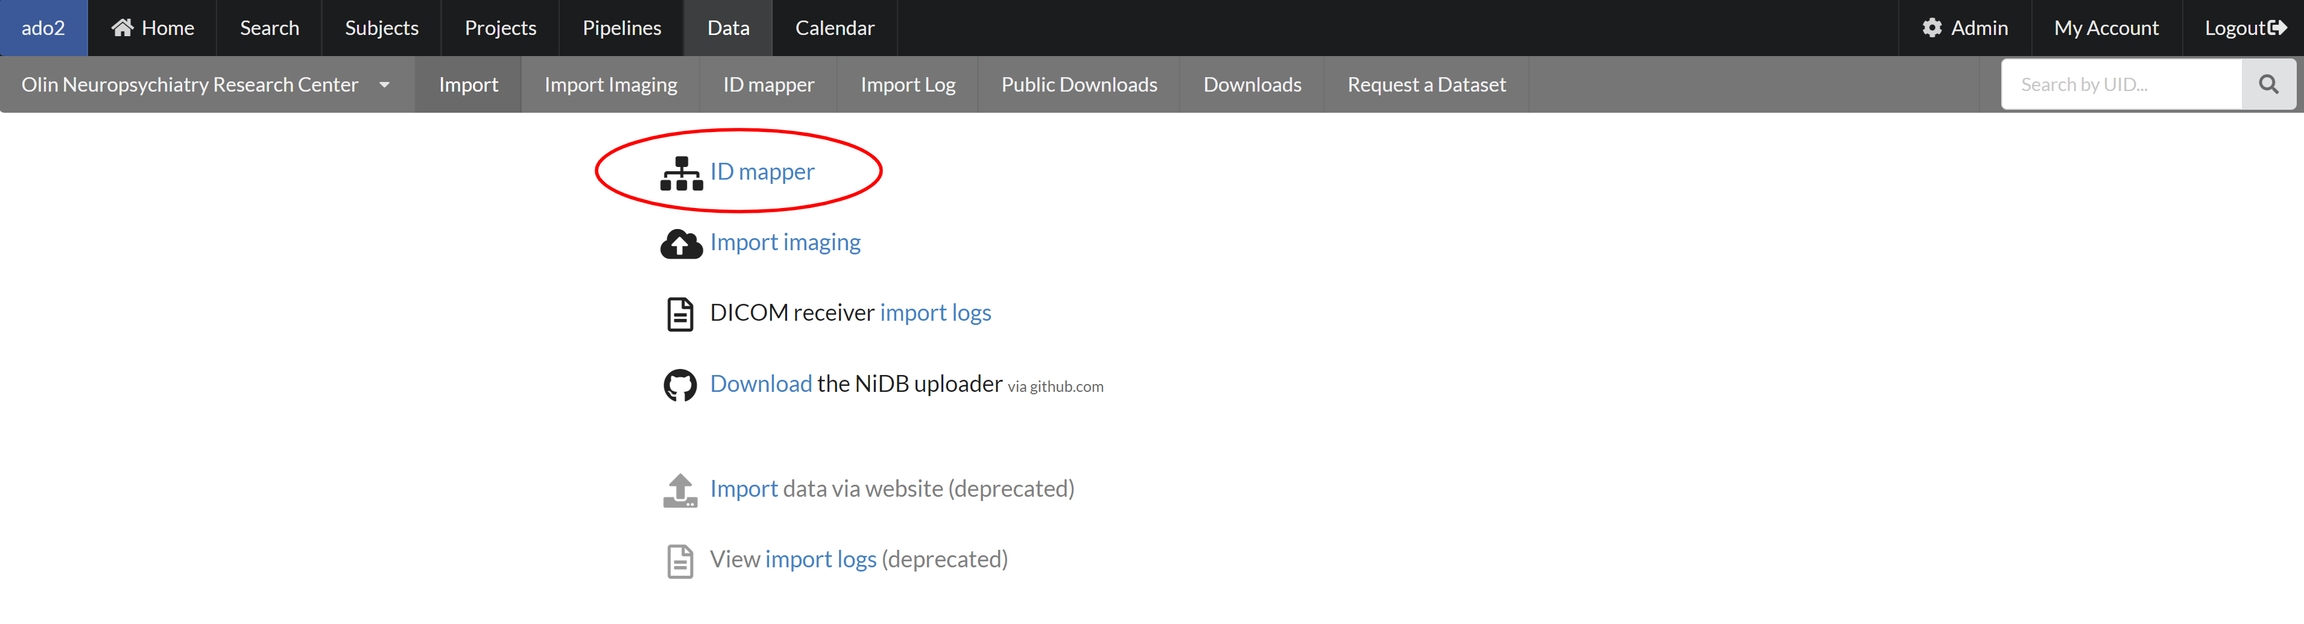
The simplest way to find a subject by any ID is to use the ID mapper. Go to Data --> ID Mapper. Enter your ID(s) in textbox and click Map IDs. There are some options available to filter by project, instance, only matches, and only active subjects.
The next page will show any matching subjects.
The first column Foreign ID is the ID you searched for. If that ID is found anywhere in the system, there will be details about it in the Local columns to the right.
Deleted? - indicates if this subject has been deleted or not. Deleted subjects are not actually deleted from the system, they are just marked inactive
Alt Subject ID - If the foreign ID was found under this field, it will show up in this column.
Alt Study ID - If the foreign ID was found under this field, it will be show in this column.
UID - If a subject was found, the UID will be displayed in this column
Enrollment - There may be more than one row found for each foreign ID, and more than one ID for the enrollment in each row. The enrollment will be displayed in this column.
Click on the UID to see your subject.
User Permissions
NiDB users can have many different permissions, from complete system administration to read-only access. Most users will fall into the project-based permissions. Below are the description of each permission. Protected health information (PHI) and personally identifiable information (PII) are both referred to as PHI below.
Permission
Description
How to grant
Read-only PHI
View lists of subjects/studies in project
View subject PHI
Analysis Builder
Tutorial on how to create reports using Analysis Builder
Reports in Analysis Builder
Analysis builder is a report generating tool in NiDB. In Analysis builder, a report can be build using variables extracted from various types of imaging data, pipelines and biological or cognitive measures. This tool works different than the search tool where you can search stored data (Imaging or Other) and download it. In this tool you can search the variables those are generated and stored or imported in the NiDB (For example: You can query the variables generated from a task using MRI / EEG data OR variables imported from Redcap). Analysis builder can be invoked from a project's main page by selecting the option Analysis Builder on the right from Tools section. Following is the main interface of the Analysis Builder
The interface for Analysis Builder is self explanatory. The main sections consists of selecting a project from the dropdown list, selecting the desired variables, drugs / dose information, choosing the various report parameters like grouping, value replacing a blank or missing entry, and finally the output format of the report.
In the next section the steps to create two reports are listed showing how various options can be employed to create a desired report.
Building Reports
Analysis builder is designed to create reports based on variables that can be selected from different types of measures, and modalities shown in the Analysis Builder interface screen above. This includes modalities like MR, EEG, cognitive and biological measurements.
Simple Report
Following are the steps to create a simple report where data is not grouped and there is no drug / dose variable is used. The following figure shows the selection of variables and settings to generate this report.
Steps - Simple Report
To generate a report, select a project from the dropdown menu at the top of the screen.
Select the variables for any one or combination of modalities and measures. We chose four cognitive variables those are imported from Redcap.
Choose if you want to group data on the base of date, or measure. We are not selecting this option for the simple report.
Repeated Measures Report
This is a report that involve the variables which are repetitive in nature. Also we want the variables to display with respect to the drug administered time. Analysis Builder will automatically create variables that holds the time since dose information.
For this type of report, usually time repeated measure are reported, but other measures may be added if desired.
Steps - Repeated Measure Report
Select a project from the dropdown list of projects on the top of Analysis Builder interface.
Choose the variables to display in this report. As mentioned above this is a repetitive measures report, so the variables that are repetitive in nature; collected multiple times in a day and on multiple days are selected. These include measure from MRI and biological data. Also these variables are collected before or after administration of drug.
To include the drug / dose information on this report, select the drug related variable as shown in the above figure in green rectangle. Different drug dose was administrated on three different days, and all three days were selected.
There are many reports that can be generated using Analysis Builder based on the data stored in a project. More exploration on the Analysis Builder with different options is recommended.
Package root
JSON object
The package root contains all data and files for the package. The JSON root contains all JSON objects for the package.
JSON variables
🟡 Computed (squirrel writer/reader should handles these variables)
Variable
Type
Default
Description
Directory structure
Files associated with this object are stored in the following directory.
/
group-analysis
JSON array
This object is an array of group analyses. A group analysis is considered an analysis involving more than one subject.
JSON variables
🔵 Primary key
🔴 Required
🟡 Computed (squirrel writer/reader should handle these variables)
Variable
Type
Default
Description
Directory structure
Files associated with this section are stored in the following directory, where <GroupAnalysisName> is the name of the analysis.
/group-analysis/<GroupAnalysisName>/
Front end (user facing)
Front end settings are what the users see. Projects, users, etc.
Users
Accessing the users page
Back end
Back end are all settings and configuration that keep NiDB running
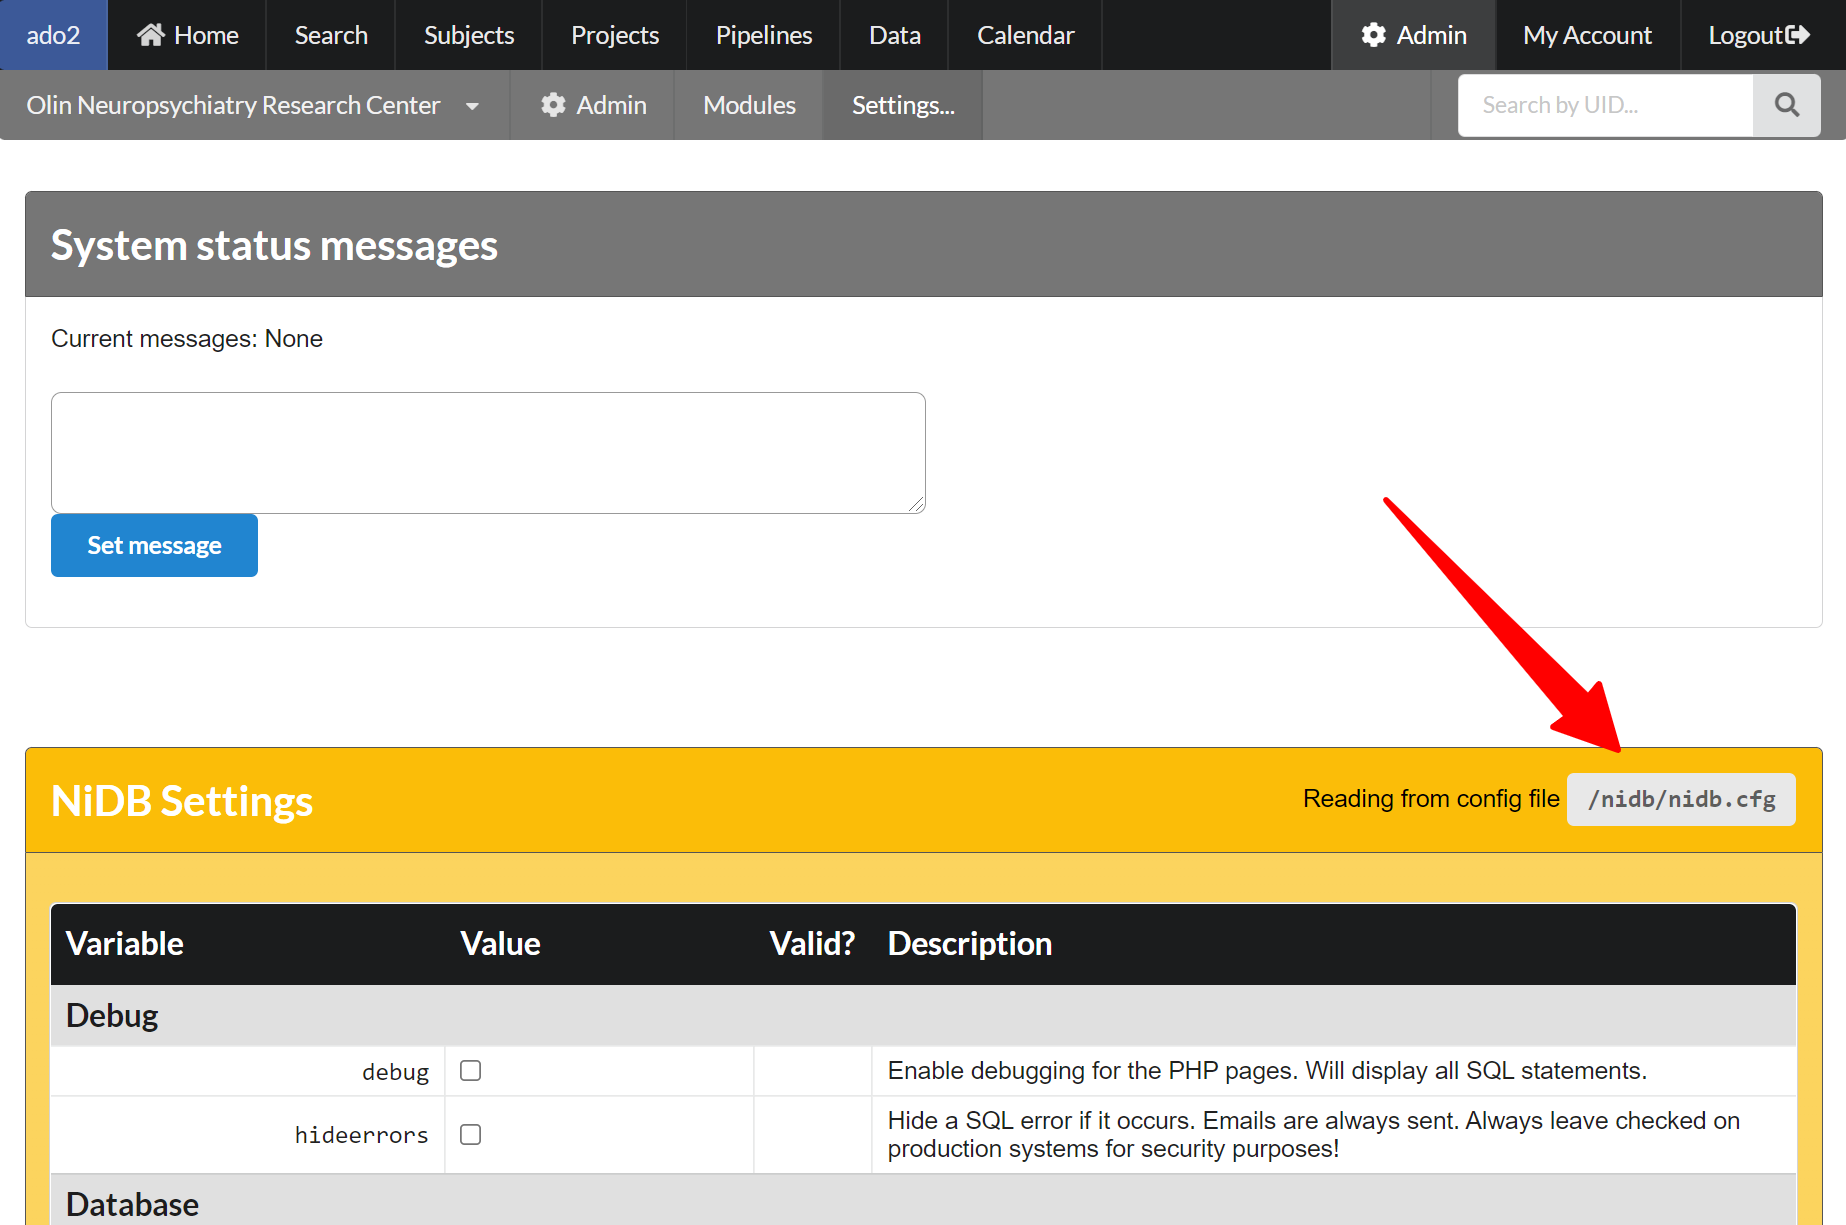
Settings
Config variables
The NiDB Settings page contains all configuration variables for the system. These variables can be edited on the Settings page, or by editing the
nidb command line
Command line usage of nidb
Overview
All modules in NiDB system are run from the nidb command line program. Modules are automated by being started from cron.
nidb can be run manually to test modules and get debugging information. It can also be used when running on a cluster to insert results back into the database. Running nidb without command line parameters will display the usage.
observations
JSON array
Observations are collected from a participant in response to an experiment.
JSON variables
🔵 Primary key
🔴 Required
data-dictionary
JSON object
The data-dictionary object stores information describing mappings or any other descriptive information about the data. This can also contain any information that doesn't fit elsewhere in the squirrel package, such as project descriptions.
Examples include mapping numeric values (1,2,3,...) to descriptions (F, M, O, ...)
JSON variables
🔵 Primary key
🔴
How to change passwords
Default Usernames and Passwords
System
Username
Default Password
Pipelines
Various pipeline tutorials
The pipeline system is an automated system to analyze imaging data stored within NiDB. Pipelines can be chained together in parent/child configurations with multiple parents and multiple children. Organizing the pipelines can take some planning, but complex pipeline systems can be created using NiDB.
Pipelines are run on the study level. Every analysis is based on a single imaging study (S1234ABC1)
Your pipeline may pull data from multiple studies, but each analysis will only be associated with one imaging study. Think of it as the "IRB of record"; data may come from many studies, but only one study is the study of record. Therefor all results, statuses, and pipeline logs are associated with just one imaging study.
Instance
NiDB can contain multiple instances, or "project groups"
Principle Investigator
The PI for the project. This selection is only used for display purposes and does not create any special permissions,
Administrator
The admin for the project. This selection is also only used for display purposes and does not create any special permissions.
Start date
IRB start-date of the project
End date
IRB end-date of the project
Copy Settings
This option can be used after a project is created. This would copy settings (templates, data dictionary, connections, mappings) from another project.
Code, pipelines, scripts to perform analysis on raw data.
experiment
task-*.jsontask-*.tsv
Details on the experiment.
root -> description
dataset_description.json
Details about the dataset.
root -> changes
CHANGES
Any information about changes from to this dataset from a previous version.
root -> readme
README
README.md
More details about the dataset.
subject -> demographics
participants.tsvparticipants.json
Details about subject demographics.
Email address
Not required
ID (unique ID)
Required. But this is not a medical record number
Dates (dates of service, date of birth)
Required. Age-at-study is calculated from date of birth and date of service.
Name (First and Last)
Required. Field cannot be blank, but does not need to be the actual participant's name.
Address (street, city, state, zip)
Not required
Phone number
Not required
Admin --> Users --> Project permissions
Read-only imaging
All permissions from Read only PHI
Search, view, download imaging
Admin --> Users --> Project permissions
Full PHI
All permissions of Read only PHI
Modify PHI
Create or import assessment (measures, vitals, drugs) data
Admin --> Users --> Project permissions
Full imaging
All permissions of Read only imaging
Download, upload, modify, delete imaging data
Create new imaging studies
Add, modify series notes
Add, modify series ratings
Admin --> Users --> Project permissions
Project admin
All permissions of Full imaging and Full PHI
Enroll subject in project
Move subjects between projects
Move imaging studies between projects
Modify series (rename, move to new study, hide/unhide, reset QC)
Admin --> Users --> Project permissions
NiDB admin
All project-based permissions of Project admin
Manage (add, edit, remove) projects and users
Can view the Admin page
Admin --> Users
Site admin
All non-project based permissions of NiDB admin
Manage system settings
View system status & usage
Manage NiDB modules
Manage QC modules
Mass email
Manage backup
View error logs
Set system messages
View reports
Manage audits
Manage sites
Manage instances
Manage modalities
Access to "Powerful tools" on Projects --> Studies page
Manage all file I/O
All permissions available to NiDB admin
Editing the users table in Mariadb and changing the user_issiteadmin column to 1 for that user
The output of a report can be control by various option like:
Select the output format of the report, showing it on the screen or saving it as csv file.
Hit the Update Summary button to generate the final report as shown on the right section of the screen below.
The time since dose variables shall be calculated and displayed if the option Include Time Since Dose is selected as shown above. All three dose day variables are also selected. The time will be displayed in minutes as per above selection.
To group the data based on drug days, check the Group by Event Date checkbox from Grouping Option.
After choosing the output parameters, hit the Update Summary button that generates a report as shown in the figure below.
Login to http://localhost/phpMyAdmin using the root MySQL account and password. Go to the User Accounts menu option. Then click Edit privileges for the root (or nidb) account that has a ‘%’ as the hostname. Then click Change password button at the top of the page. Enter a new password and click Go
Changed MariaDB passwords must also be updated in the config file. Use one of the following methods to edit the password
Edit /nidb/nidb.cfg to reflect the new password
Go to Admin --> Settings in the NiDB website to edit the config variables
How to change NiDB admin password
When logged in to NiDB as admin, go to My Account. Enter a new password in the password field(s). Click Save to change the password.
For example, to run the import module, run as the nidb user
This will output
As with all modules, detailed log files are written to /nidb/logs and are kept for 4 days.
Running from cluster
To run nidb from the cluster, for the purpose of inserting results into the database or for checkins while running pipelines, this would be run on the cluster node itself. Access to an nidb.cfg file is necessary to run nidb somewhere other than on the main database server. A second config file /nidb/nidb-cluster.cfg can be copied to the cluster location along with the nidb executable.
pipelinecheckin
To check-in when running a pipeline, use the following
The analysisid is the rowid of the analysis which is bring reported on. Status can include one of the following: started, startedrerun, startedsupplement, processing, completererun, completesupplement, complete. Message can be an string, enclosed in double quotes.
updateanalysis
This option counts the byte size of the analysis directory and number of files and updates the analysis details in the main database.
checkcompleteanalysis
This option checks if the 'complete files' list exists. These files are specified as part of the pipeline definition. If the files exist, the analysis is marked as successfuly complete.
resultinsert
Text, number, and images can be inserted using this command. Examples
> ./nidb
Neuroinformatics Database (NiDB)
Options:
-h, --help Displays help on commandline options.
--help-all Displays help including Qt specific options.
-v, --version Displays version information.
-d, --debug Enable debugging
-q, --quiet Dont print headers and checks
-r, --reset Reset, and then run, the specified module
-u, --submodule <submodule> For running on cluster. Sub-modules [
resultinsert, pipelinecheckin, updateanalysis,
checkcompleteanalysis ]
-a, --analysisid <analysisid> resultinsert -or- pipelinecheckin submodules
only
-s, --status <status> pipelinecheckin submodule
-m, --message <message> pipelinecheckin submodule
-c, --command <command> pipelinecheckin submodule
-t, --text <text> Insert text result (resultinsert submodule)
-n, --number <number> Insert numerical result (resultinsert
submodule)
-f, --file <filepath> Insert file result (resultinsert submodule)
-i, --image <imagepath> Insert image result (resultinsert submodule)
-e, --desc <desc> Result description (resultinsert submodule)
--unit <unit> Result unit (resultinsert submodule)
Arguments:
module Available modules: import export fileio
mriqa qc modulemanager importuploaded
upload pipeline cluster minipipeline backup
./nidb import
-------------------------------------------------------------
----- Starting Neuroinformatics Database (NiDB) backend -----
-------------------------------------------------------------
Loading config file /nidb/nidb.cfg [Ok]
Connecting to database [Ok]
NiDB version 2023.2.942
Build date [Feb 10 2023 11:22:26]
C++ [201703]
Qt compiled [6.4.2]
Qt runtime [6.4.2]
Build system [x86_64-little_endian-lp64]
Found [0] lockfiles for module [import]
Creating lock file [/nidb/lock/import.441787] [Ok]
Creating log file [/nidb/logs/import20230428113035.log] [Ok]
Checking module into database [Ok]
.Deleting log file [/nidb/logs/import20230428113035.log] [Ok]
Module checked out of database
Deleting lock file [/nidb/lock/import.441787] [Ok]
-------------------------------------------------------------
----- Terminating (NiDB) backend ----------------------------
-------------------------------------------------------------
./nidb cluster -u pipelinecheckin -a <analysisid> -s <status> -m <message>
# example
./nidb cluster -u pipelinecheckin -a 12235 -s started -m "Copying data"
./nidb cluster -u updateanalysis -a <analysisid>
./nidb cluster -u checkcompleteanalysis -a <analysisid>
Last Name (Required): Field name containing the last name information in Redcap. This is not the actual last name of a subject.
Birthdate (Required): Redcap field name storing the date of birth information for the subjects.
Sex (Required): Redcap field name that stores the sex of the subjects. For this field, codes stored in Redcap representing the subject's sex should be provided here. The codes for male (M), and female(F) are required. Codes for Other (O) and undefined (U) can also be defined if used in the Redcap project. A suggestive coding scheme 1 for male (M), 2 for female (F), 3 for other (O) and 4 for undefined (U) is also displayed for help.
Already exist in the project: these already exist in the current project and cannot be duplicated.
Project 3 a range of 10000 to 10100
Alternate Study IDs can be edited by clicking the Edit Study button
We're searching for six IDs: 2310, 50, 13, 529, 401, S1234ABC
4 of 6 IDs were found!
Methods used to analyze the data.
JSON object
Experimental methods used to collect the data.
JSON object
Data dictionary containing descriptions, mappings, and key/value information for any variables in the package.
NumPipelines
number
🟡
Number of pipelines.
NumExperiments
number
🟡
Number of experiments.
TotalFileCount
number
🟡
Total number of data files in the package, excluding .json files.
Path to the group analysis data within the squirrel package.
Datetime
datetime
Datetime of the group analysis.
Description
string
Description.
GroupAnalysisName
string
🔴🔵
Access the user administration page from the
Admin
page.
Admin
page is only accessible if you are logged in as an administrator
Main admin page
Creating Users
NIS Users
NiDB will check by default if an NIS account already exists when a user logs in for the first time. If the user exists in NIS, an account will created within NiDB. NIS must be enabled and able to authenticate to the NIS through the NiDB server.
Regular Users
To create a regular user, go to Admin → Users. Click the Add User button. Enter their information, including password and email address. The username can be any field, such as an alphanumeric string, or an email address. If the user is given NiDB admin permissions, then they will be able to add/edit users.
Account Self-registration
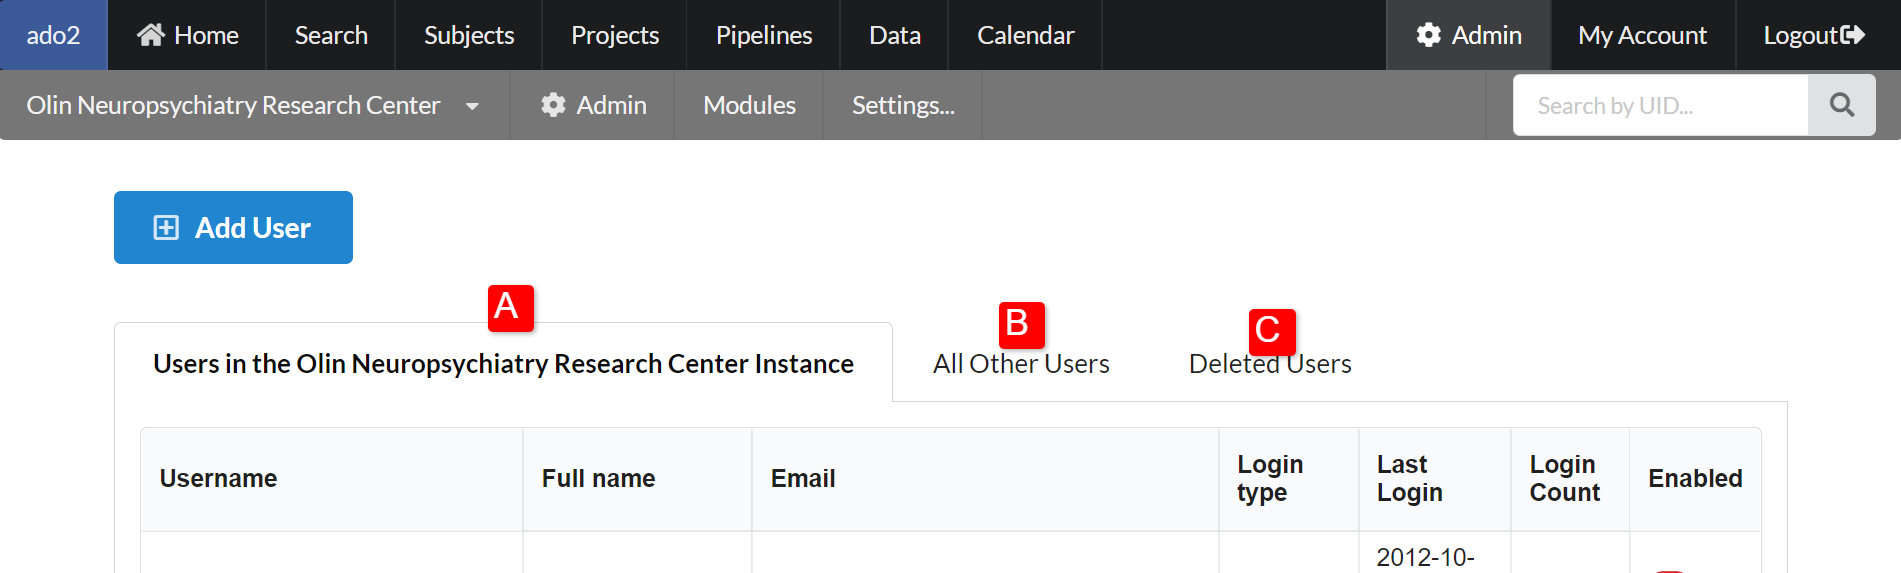
On public servers, or systems where users are allowed to register themselves, they can create an account and verify their email address to fully register the account. The account will then exist, but they will have no permissions to any projects within NiDB. After a user registers, they will appear on the Admin → Users → All Other Users tab. Click the username to edit their project permissions. Note: be careful allowing users to self-register, for obvious reasons.
Managing Users
There are 3 options of where to find users A) users in the current instance (switch instance by clicking the instance list in the upper left menu) B) users not in the current instance C) deleted users
To manage project permissions for users, go to Admin → Users and click on the username you want to manage. The page can change the name, password, email, admin status, if the account is enabled/disabled, and the projects to which the user has permissions. After changing any information on the page, click the Save button at the bottom of the page. See list of user options and settings below.
Item
Meaning
Enabled
If checked, then the user can login, otherwise they cannot login
NiDB Admin
If checked, this user can add/manage users, and various other Admin tasks within NiDB
Project admin
The user has permissions to add subjects to the project
Projects
Data collected in the system must be associated with a subject, and that subject must be enrolled in a project. There is a default project in NiDB called Generic Project, but its preferable to create projects parallel to IRB approved studies.
Projects are listed after clicking on the Admin → Projects menu. Clicking the project allows editing of the project options. Clicking the Create Project button will show the new project form. Fill out the form, or edit the form, using the following descriptions of the options
Item
Meaning
Name
Project name, displayed in many places on NiDB
Project number
Unique number which represents a project number. May be referred to as a 'cost center'
Use Custom IDs
Certain pages on NiDB will display the primary alternate ID instead of the UID (S1234ABC) if this option is checked
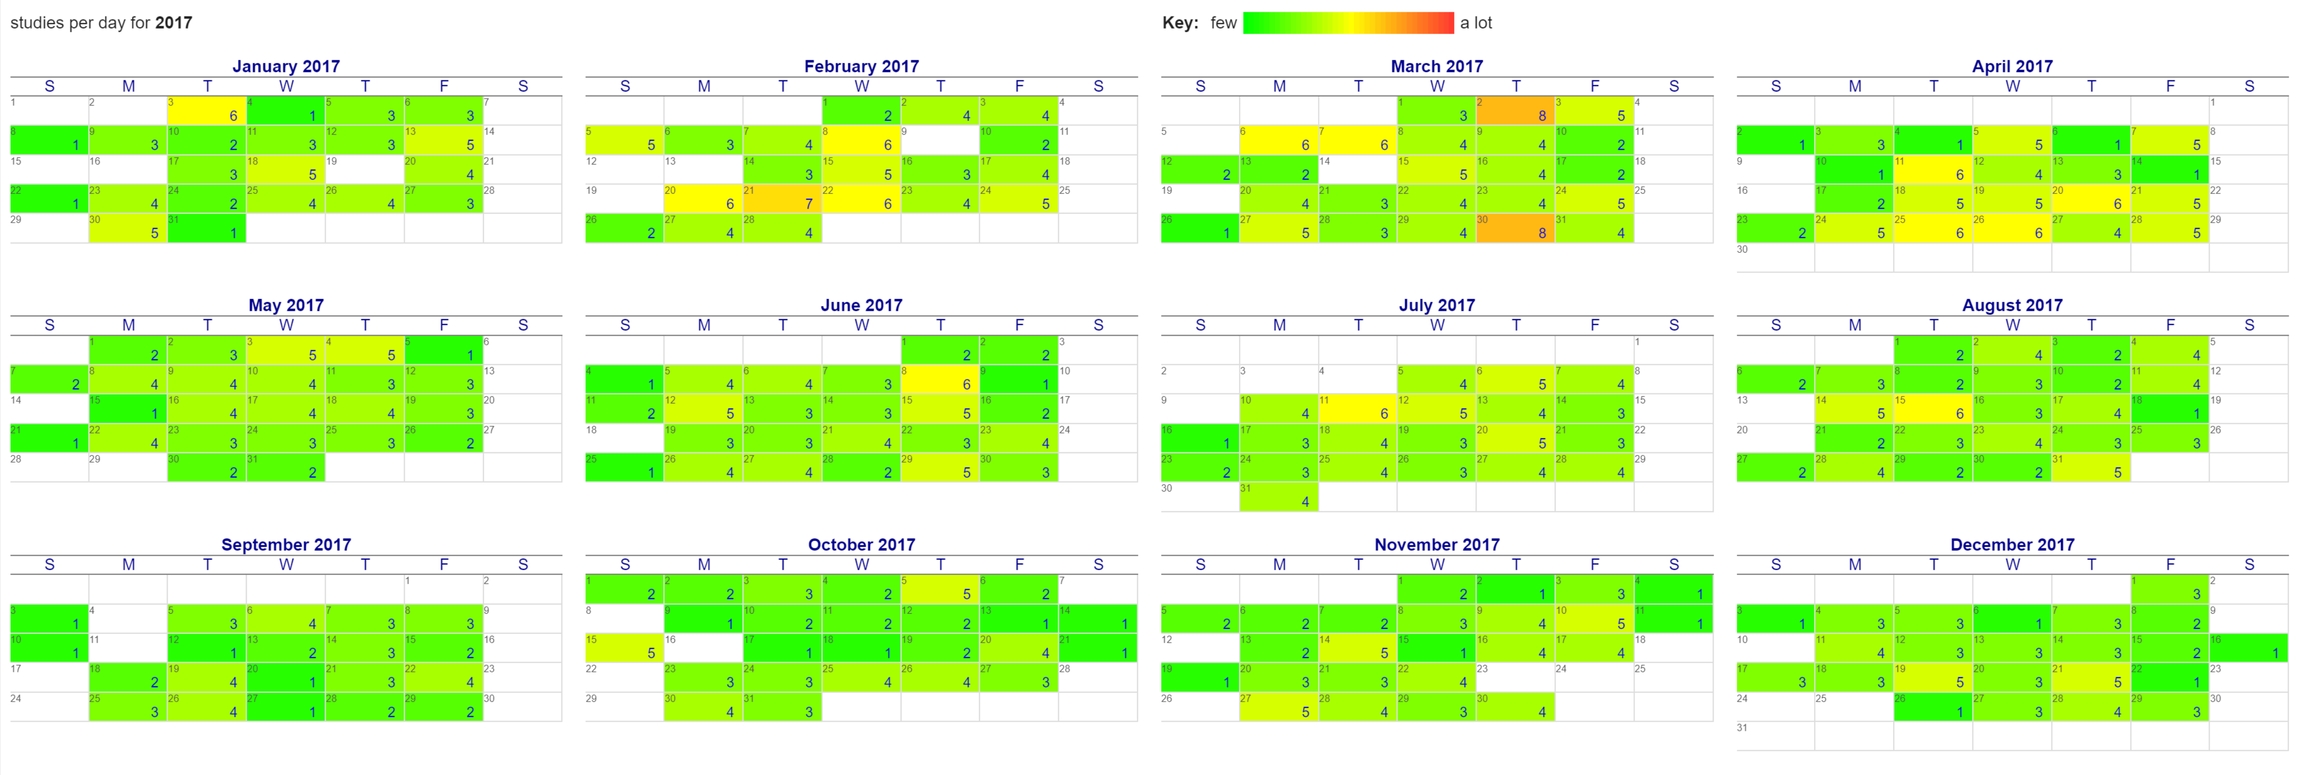
Reports
Reports of imaging studies (often used for billing/accounting purposes on MRI equipment for example) are organized by modality or equipment. Clicking any of the 'year' links will display a calendar for that year with the number of studies per day matching the specified criteria. Clicking the month name will show a report for that month and modality/equipment. Clicking the day will show a report of studies collected on that day.
nidb.cfg
file. The default path for this file should be /nidb/nidb.cfg. The exact location of the config file is specified on the NiDB Settings page.
PHP Variables
PHP has default resource limits, which may cause issues with NiDB. Limits are increased during the installation/upgrade of NiDB. The current limits are listed on the bottom of the Settings page as a reference if your NiDB installation is not working as expected.
cron
NiDB replaces the crontab for the nidb account with a list of modules required to run NiDB. This crontab is cleared and re-setup with the default nidb crontab each time NiDB is setup/upgraded. Any items you add to the crontab will be erased during an upgrade and need to be setup again.
System messages
At the top of the Settings page, you can specify messages which are displayed system-wide when a user logs in. These can be messages related to planned system down time or other notifications.
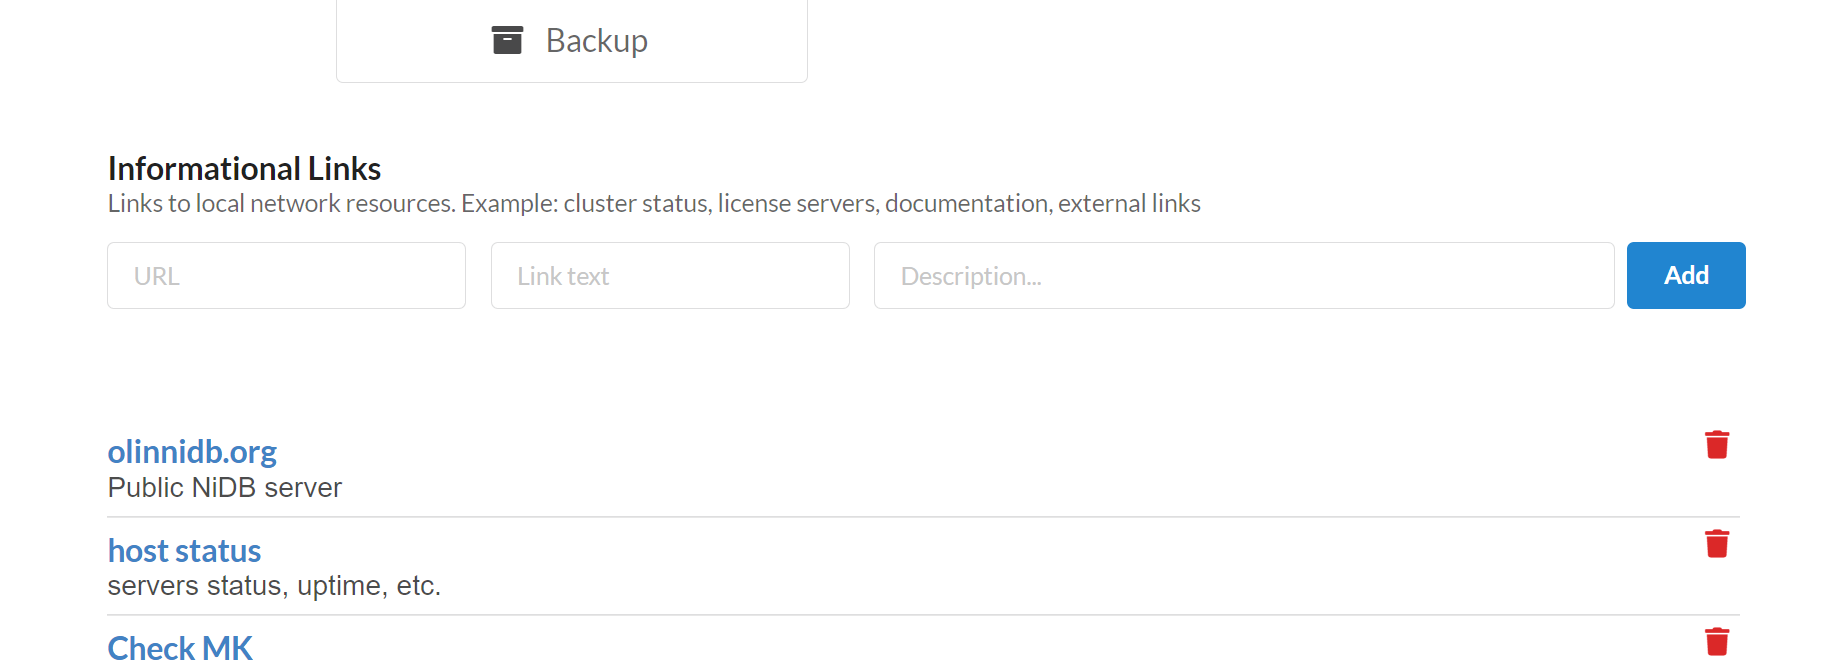
Informational Links
NiDB is often run on a network with many other websites such as compute node status, internal Wikis, and project documentation. Links to websites can be specified on the Admin page directly.
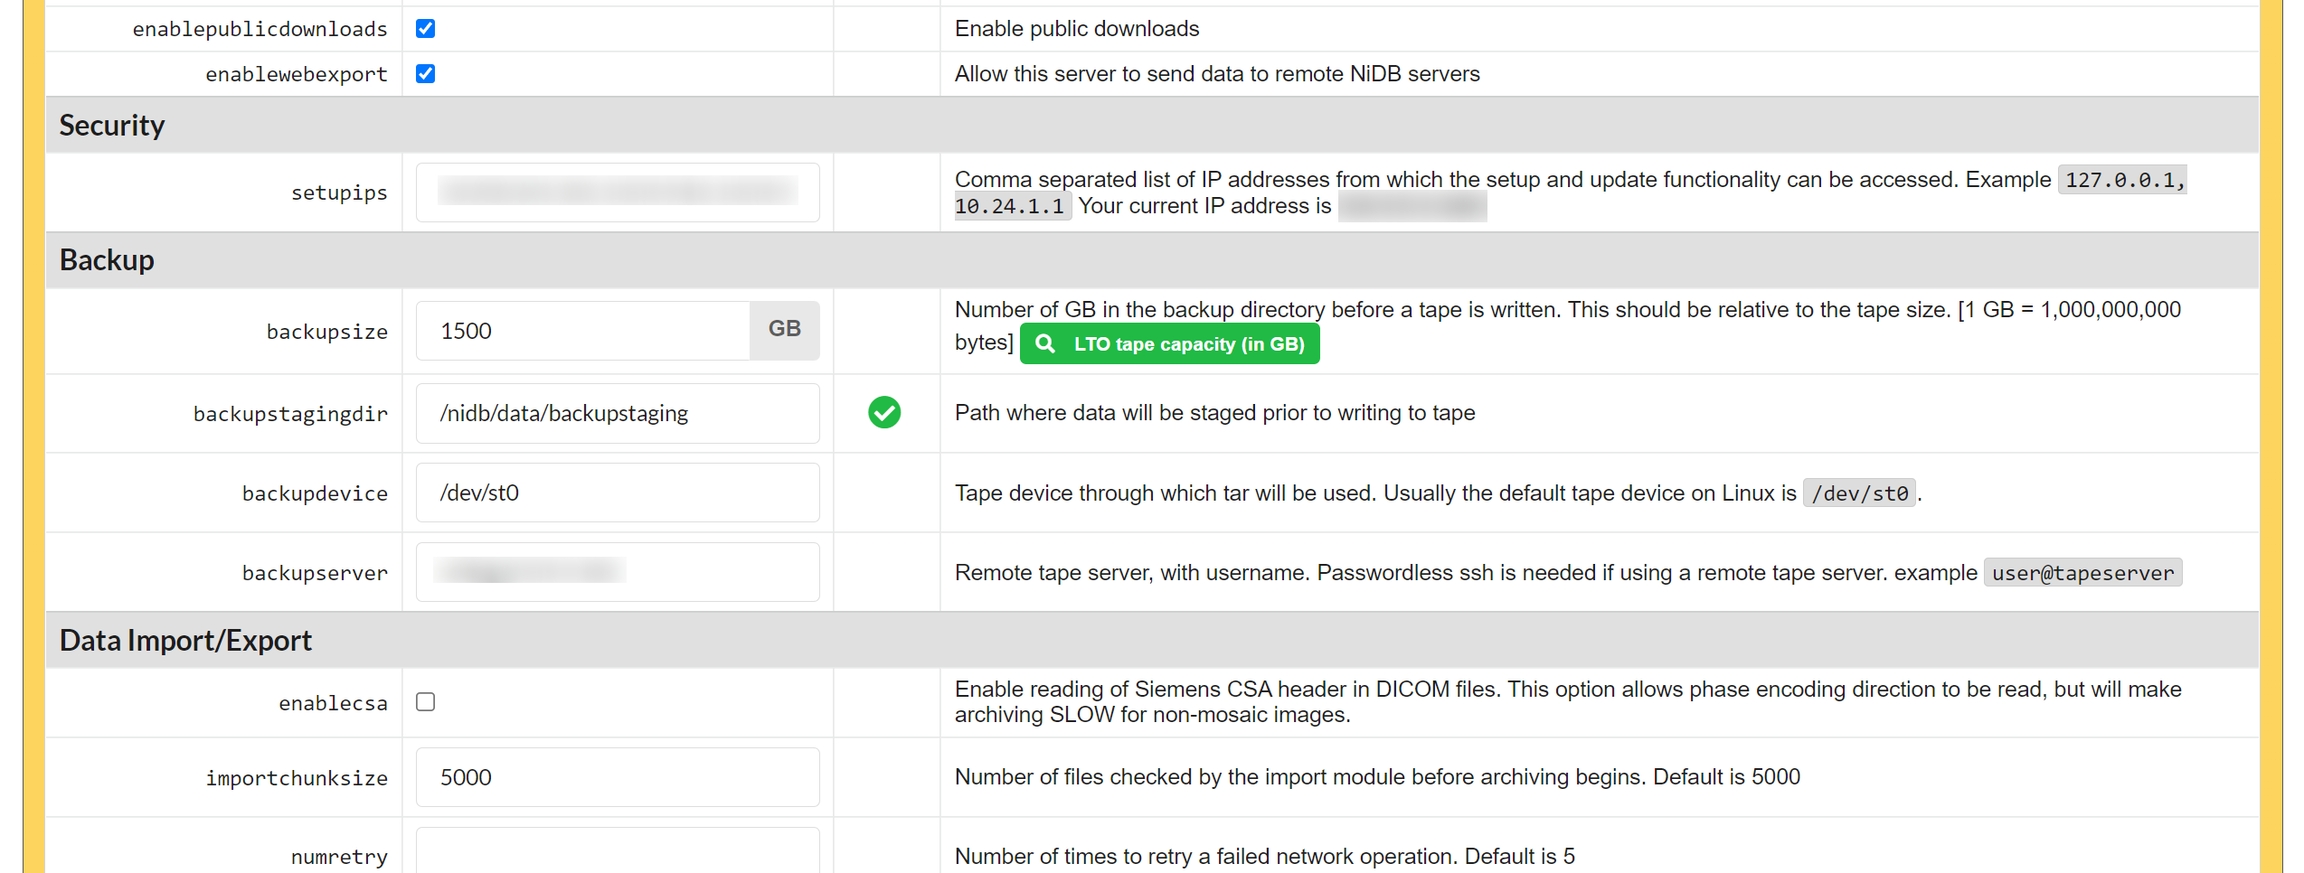
Backup
Depending on the size or importance of your data, you may want to backup your data in an off-line format rather than simply mirroring the hard drives onto another server. A backup system is available to permanently archive imaging data onto magnetic tape. LTO tapes are written in triplicate to prevent loss of data. Each tape can be stored in a separate location and data integrity ensured with a majority rules approach to data validation.
Backup process
Backup directory paths are specified in the config file. See the Config variables section.
Data is automatically copied to the backupdir when it is written to the archivedir. Data older than 24 hours is moved from backupdir to backupstagingdir. When backupstagingdir is at least the size of backupsize, then a tape is ready to be written.
archivedir
→
backupdir
→
backupstaging
→
LTO tape
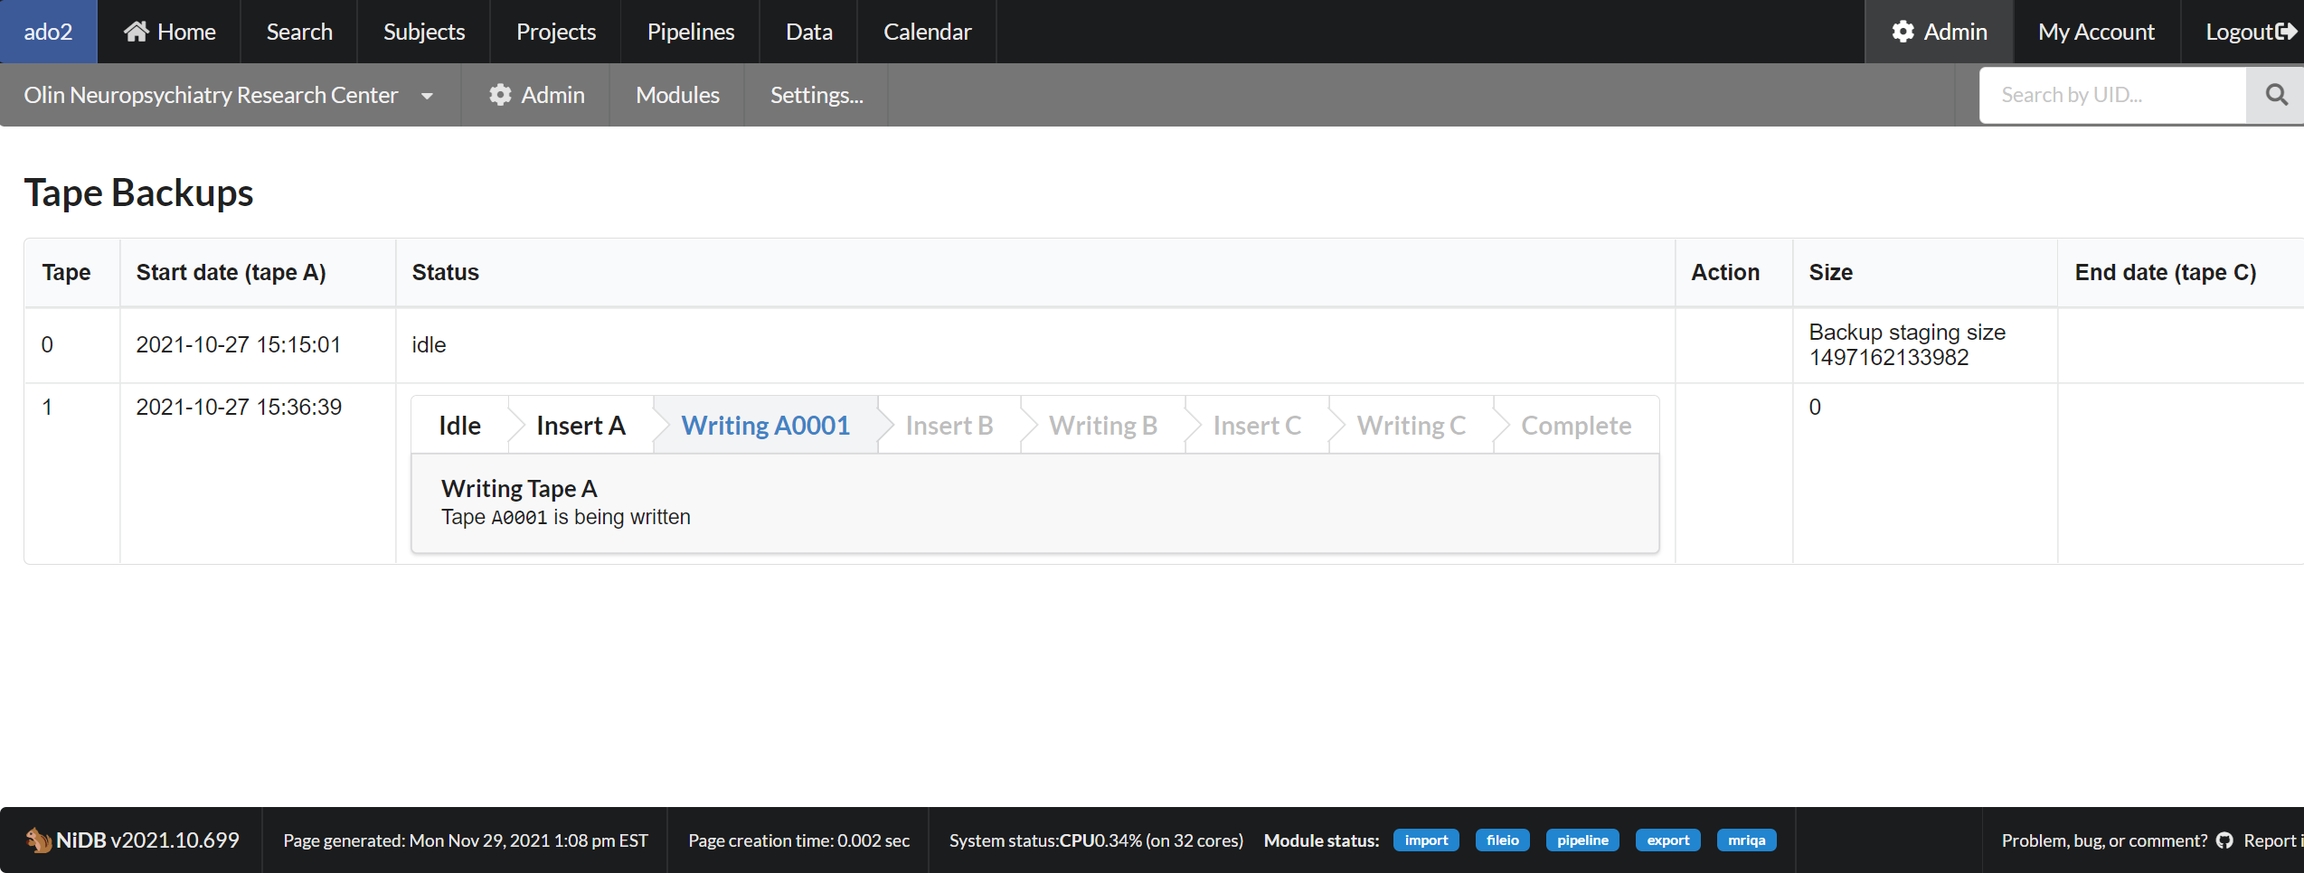
automatic
Tape 0 lists the current size of the backupstagingdir.
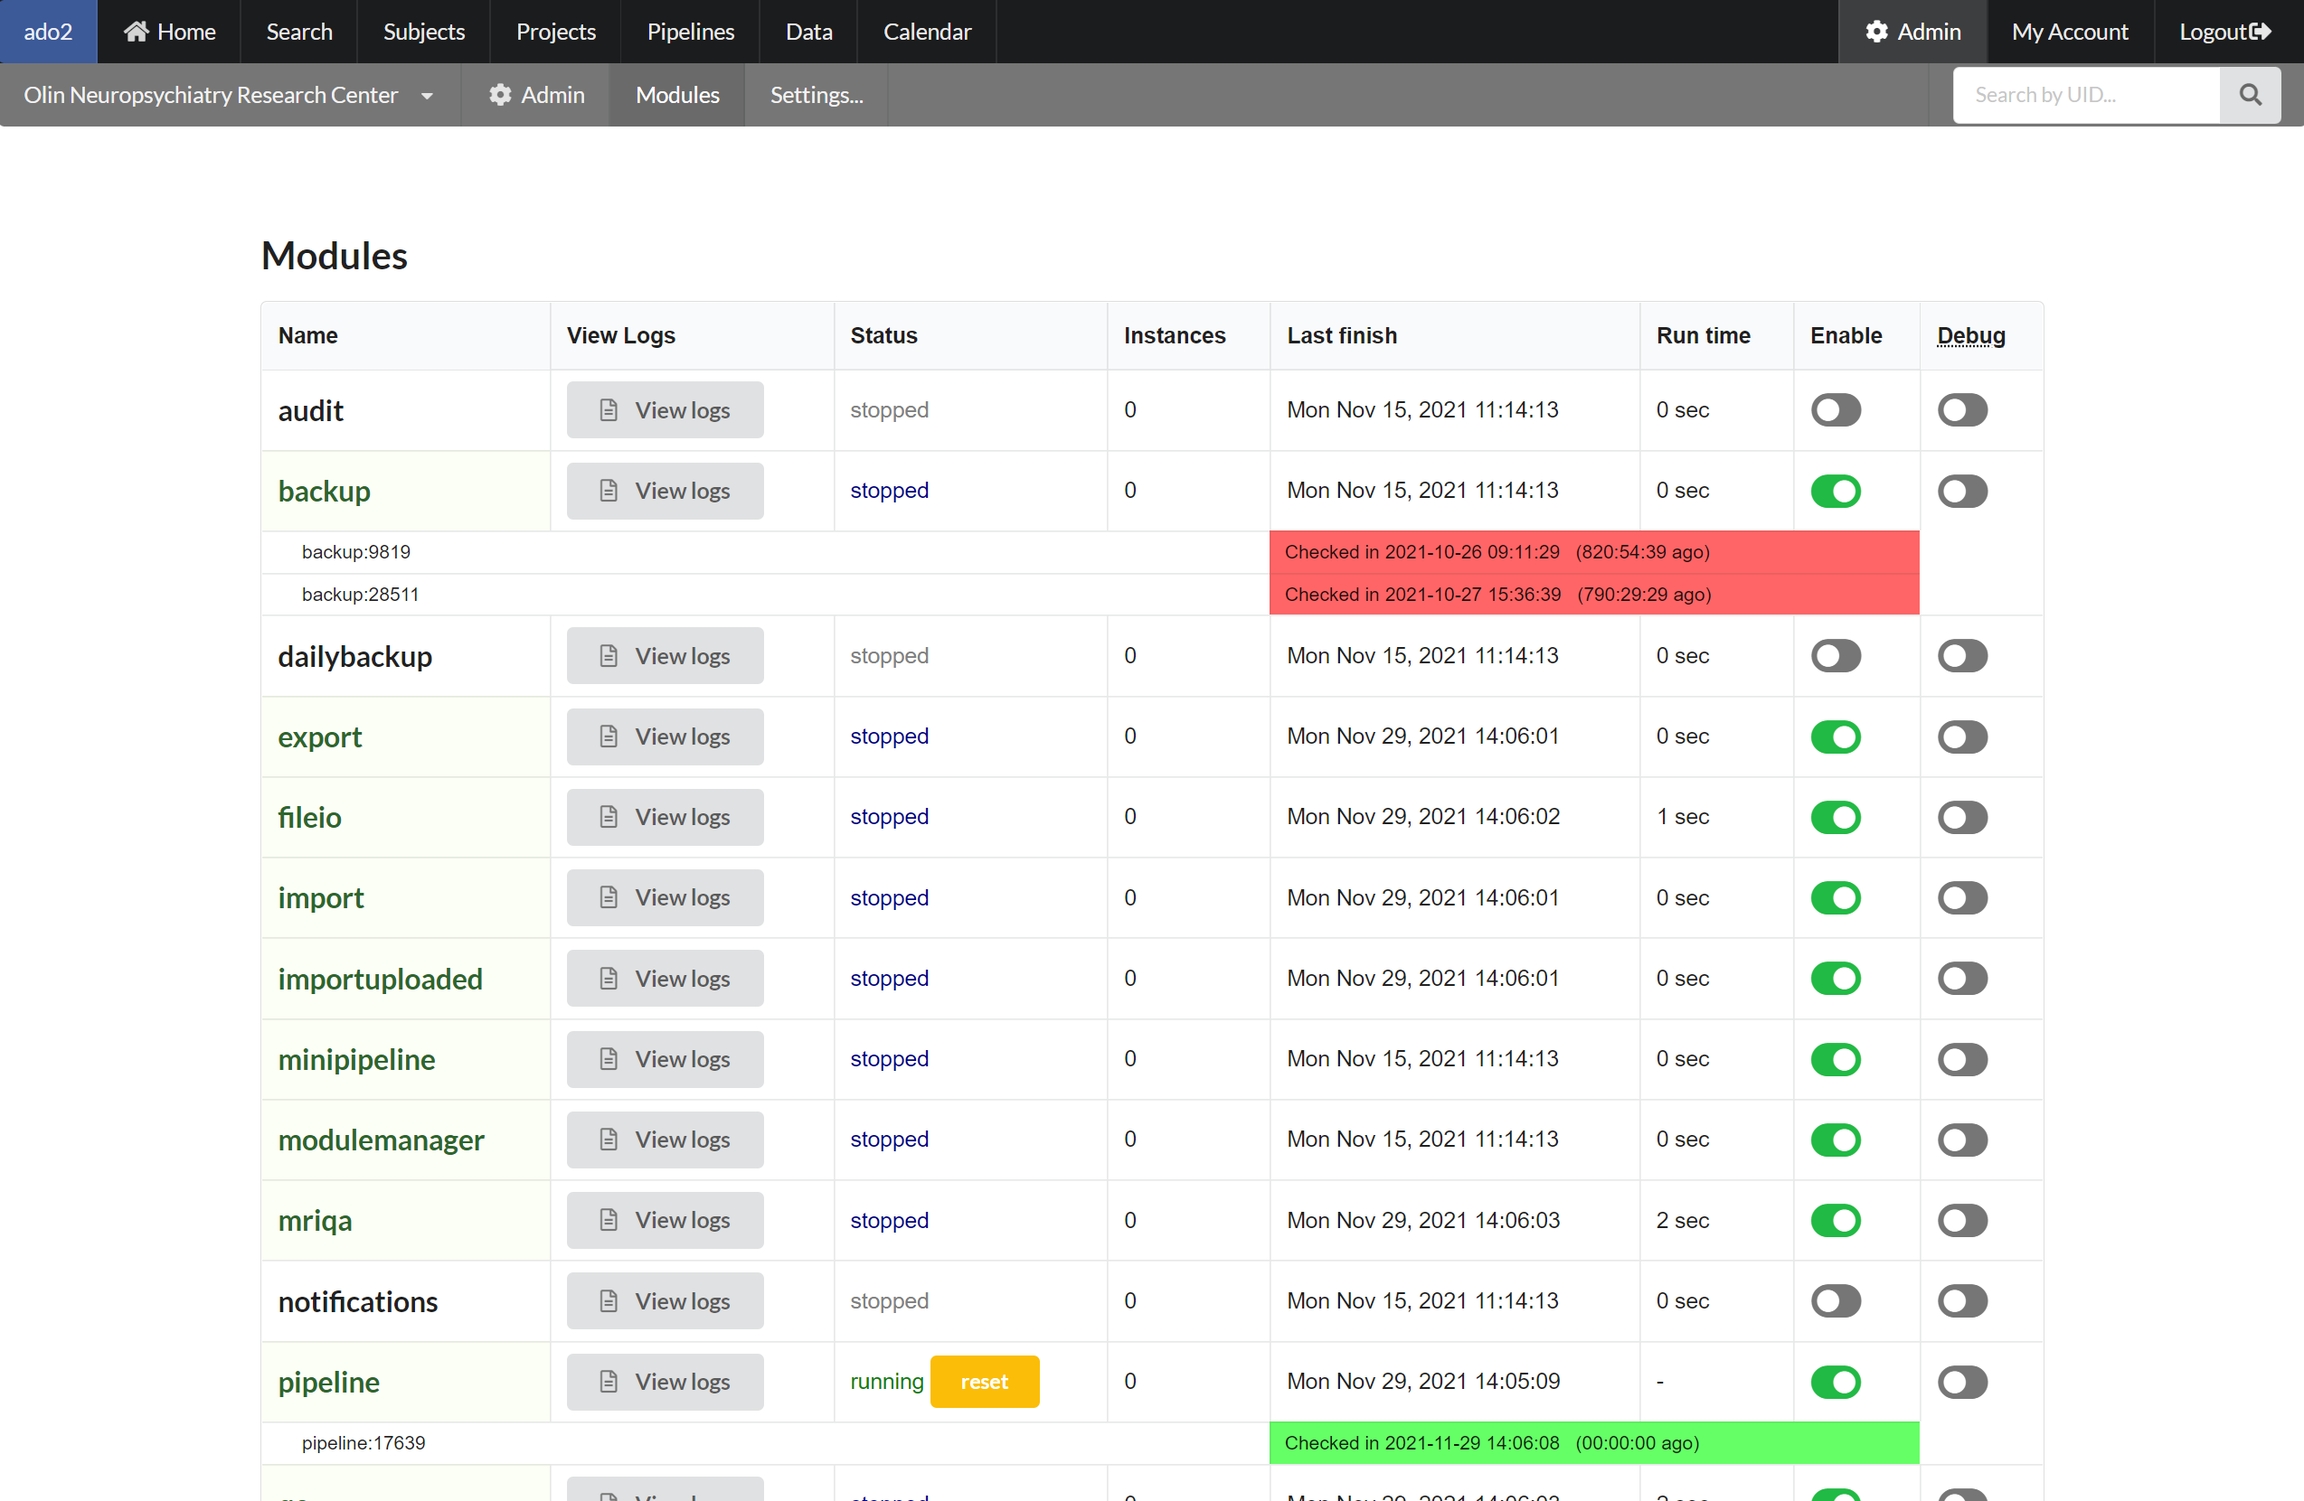
Modules
NiDB has several modules that control backend operations. These can be enabled, disabled, put into debug mode, and the logs viewed.
Enabled modules are listed in green. Running modules will list the process id of the instance of the module. Some modules can have multiple instances running, ie multithreaded, while some modules can only run 1 instance. Each running instance is color-coded with green having checked in recently and red having checked in 2 hours.
Each module has lock file(s) stored in /nidb/lock and log files in /nidb/logs
Module manager
The module manager monitors modules to see if they have crashed, and restarts them if they have. If a module does not checkin within 2 hours (except for the backup module) it is assumed that it has crashed, and the module manager will reset the module by deleting the lock file and removing the database entry.
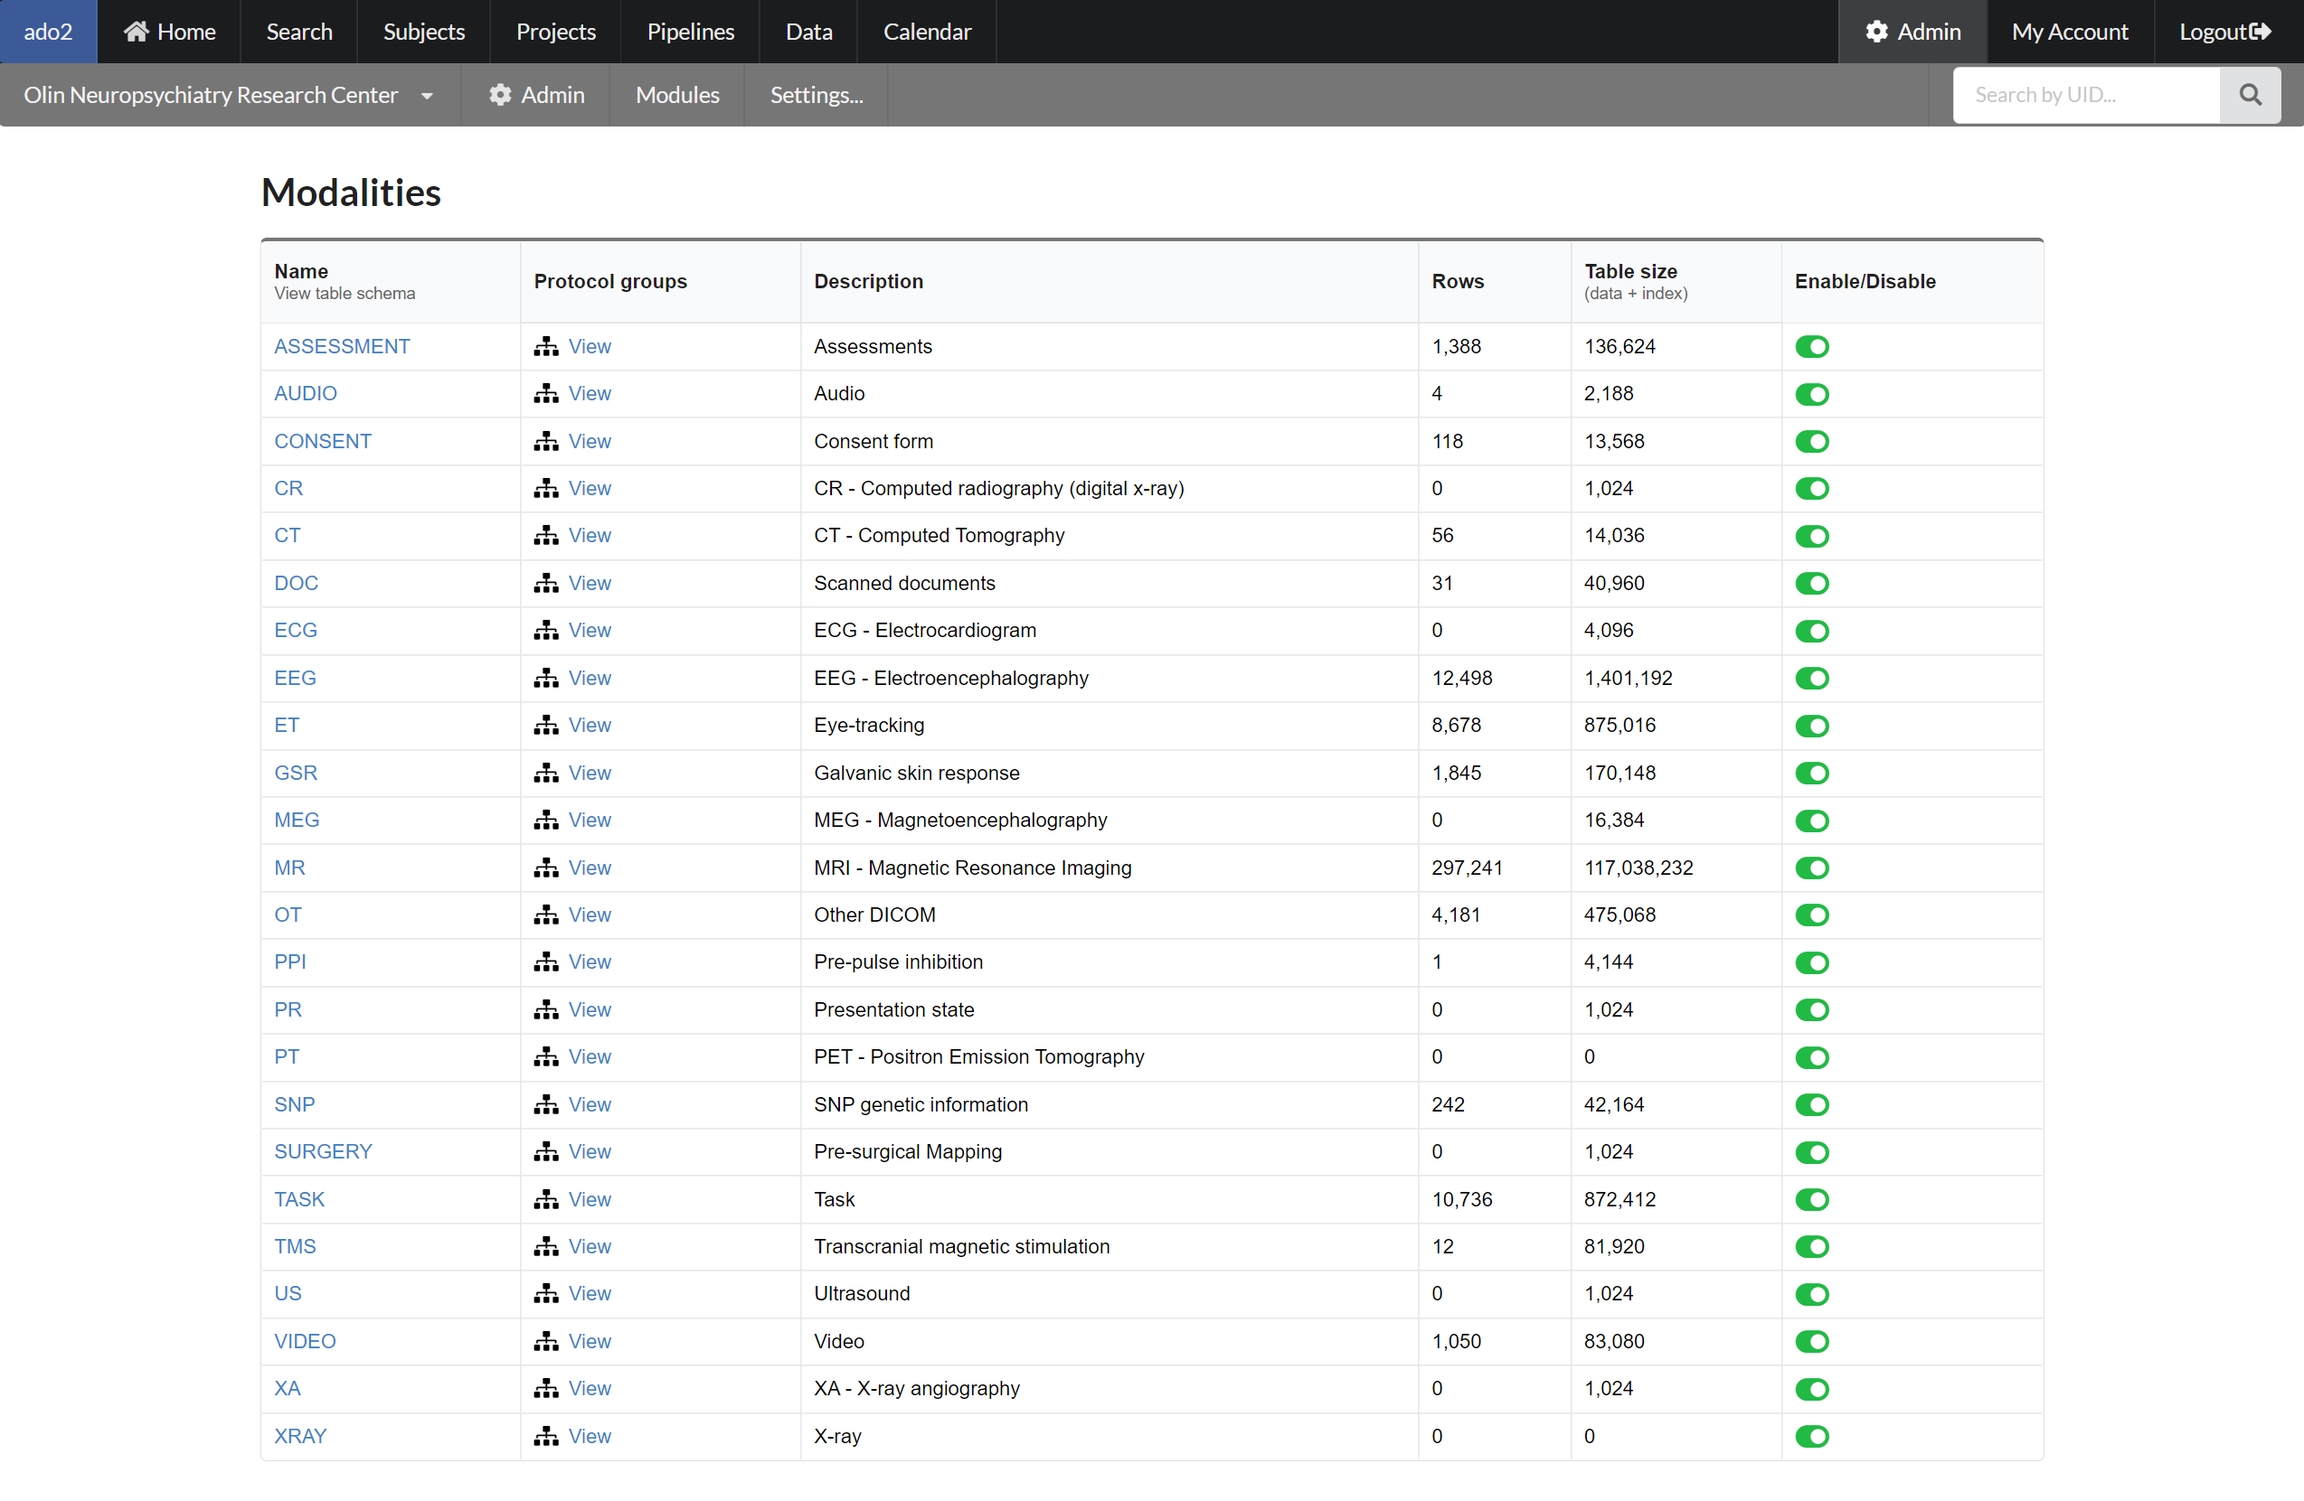
Modalities
Each modality requires it's own SQL table. Details of the SQL tables, including number of rows and table size, can be viewed on the modalities page.
Sites
Sites are used in various places within NiDB. This section is used when data is collected at multiple sites and stores details about each site.
Instances
NiDB has the ability to separate projects into different instances, basically creating project groups, to which access permissions can be applied. For example, a user can be part of certain instances, giving them the opportunity to view projects within that instance if they have permissions. This can be a good way to group projects from a multi-site project.
Mass email
This will attempt to send an email to every registered email address within the system. It's spam, so use it sparingly.
DICOM receiver
Variable
Type
Default
Description
DateEnd
datetime
End datetime of the observation.
DateRecordCreate
datetime
Date the record was created in the current database. The original record may have been imported from another database.
DateRecordEntry
datetime
Required
🟡
Computed (squirrel writer/reader should handle these variables)
data-dictionary
Variable
Type
Default
Description
DataDictionaryName
string
🔴
Name of this data dictionary.
NumFiles
data-dictionary-item
Variable
Type
Default
Description
VariableType
string
🔴
Type of variable.
VariableName
Directory structure
Files associated with this section are stored in the following directory.
/data-dictionary
Common pipeline configurations
Single study, single pipeline
This configuration starts off with a single imaging study, and a single pipeline. An example is a single T1 image which is passed through a freesurfer pipeline.
Simple pipeline example
Here's a sample pipeline specification for the above scenario
Pipeline: Data & Scripts - Options
Pipeline dependency --> Criteria: study
Pipeline: Data & Scripts - Data:
T1 --> Output --> Data Source: Study
Single study, multiple pipeline
This configuration gets data from a single imaging study, but passed it through one or more pipelines. An example is an fMRI task that requires structural processing as in the HCP pipeline: the fMRI stats require output from a freesurfer pipeline.
Pipeline A: Data & Scripts - Options
Pipeline dependency --> Criteria: study
Pipeline A: Data & Scripts - Data
Output --> Data Source: Study
Pipeline B: Data & Scripts - Options
Pipeline dependency --> dependency: pipeline A
Pipeline dependency --> Criteria: study
Multiple study, single pipeline
This configuration takes data from multiple studies and passes it through a single pipeline. An example is an fMRI task analysis that requires a T1 from a different study. The T1 comes from study A, and the fMRI task from study B.
In this example, Study1 is the study of record.
In this example, Study1 is the 'study of record'. All analyses, statuses, and results are associated with Study1. Here's the pipeline settings to use in this example.
Pipeline A - "Preprocessing1"
Data & Scripts tab:Options --> Pipeline dependency --> Criteria: study
Data (fMRI) --> Output --> Data Source: Study
Data (T1) --> Output --> Data Source: Subject
Data (T1) --> Output --> Subject linkage: Nearest in time
Pipeline B - "Stats1"
Data & Scripts tab:Options --> Pipeline dependency --> dependency: pipeline A
Options --> Pipeline dependency --> Criteria: study
Multiple study, multiple pipeline
This configuration takes data from multiple studies and uses multiple pipelines to analyze the data. This can come in multiple ways. Below are some examples of complex pipelines.
An HCP example
In this example, the pipeline settings are the same as above. The only difference is that each analysis (each study) will pull fMRI from the study, and the T1 from 'somewhere'. For the studies that have a T1, it will come from there. For studies that don't have a T1, the T1 will come from the study nearest in time.
Here's the pipeline settings to use in this example.
Pipeline A - "Preprocessing1"
Data & Scripts tab:Options --> Pipeline dependency --> Criteria: study
Data (fMRI) --> Output --> Data Source: Study
Data (T1) --> Output --> Data Source: Subject
Data (T1) --> Output --> Subject linkage: Nearest in time
Pipeline B - "Stats1"
Data & Scripts tab:Options --> Pipeline dependency --> dependency: pipeline A
Options --> Pipeline dependency --> Criteria: study
Path to the experiment within the squirrel package.
wget https://github.com/gbook/nidb/releases/download/v2021.10.699/nidb-2021.10.699-1.el8.x86_64.rpm
sudo yum localinstall --nogpgcheck nidb-2021.10.699-1.el8.x86_64.rpm
Last metadata expiration check: 0:28:21 ago on Thu 14 Oct 2021 10:01:28 AM EDT.
Dependencies resolved.
============================================================================================================================================
Package Architecture Version Repository Size
============================================================================================================================================
Upgrading:
nidb x86_64 2021.10.699-1.el8 @commandline 56 M
Transaction Summary
============================================================================================================================================
Upgrade 1 Package
Total size: 56 M
Is this ok [y/N]:
NiDB is a multi-project database. Data from multiple projects can be managed in one database instance. Each project can have different attributes according to the needs of the project.
Creating a Project
A user with admin rights can create, and manage a project in NiDB. A user with Admin rights will have an extra menu option "Admin". To create a new project in NiDB, click "Admin" from the main menu and then click "Projects" as shown in the figure below.
The following page with the option "Create Project" will appear. This page also contains a list of all the current projects. To create a new project, click on the "Create Project" button on the left corner of the screen as shown in the figure below.
On the next page, fill the following form related to the new project. Name the new project, fill the project number. Select the option "Use Custom IDs" if project need to use its own ID system. Select the Principal Investigator (PI) and project administrator (PA) from the existing NiDB users. The PI and PA can be the same subject. Mention the start and end date if they are known. Also there is an option if you want to copy an existing setting from one of your projects.
After clicking "Add" button, a new project will be added to the project list and it will be shown in the list of existing projects as shown in the figure below.
Project Setup
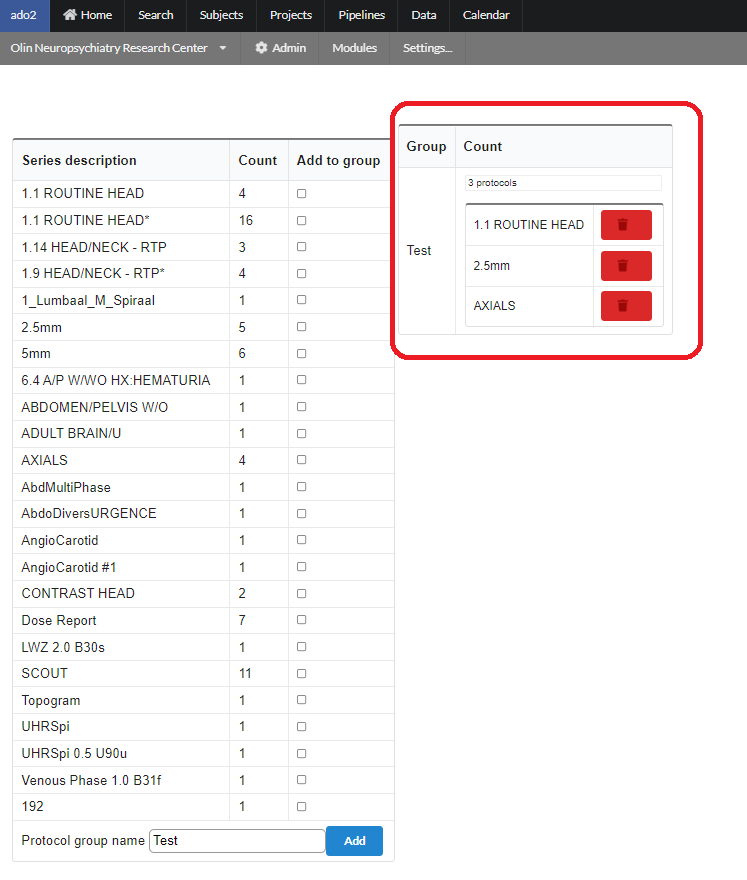
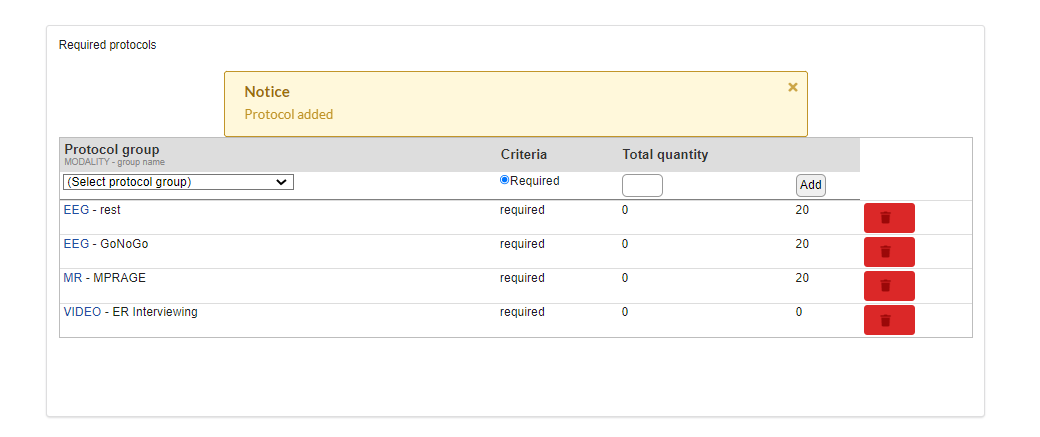
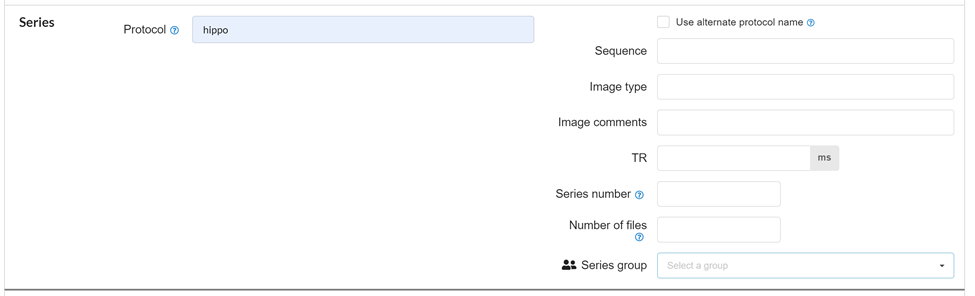
To setup the project for collecting data click the name of the project on the above page and the following page can be used to add the right set of protocols.
After adding the required set of protocols, a list of protocols will be shown as follow. A protocol can be deleted by clicking the "delete" button in front of an added protocol as shown in the figure below.
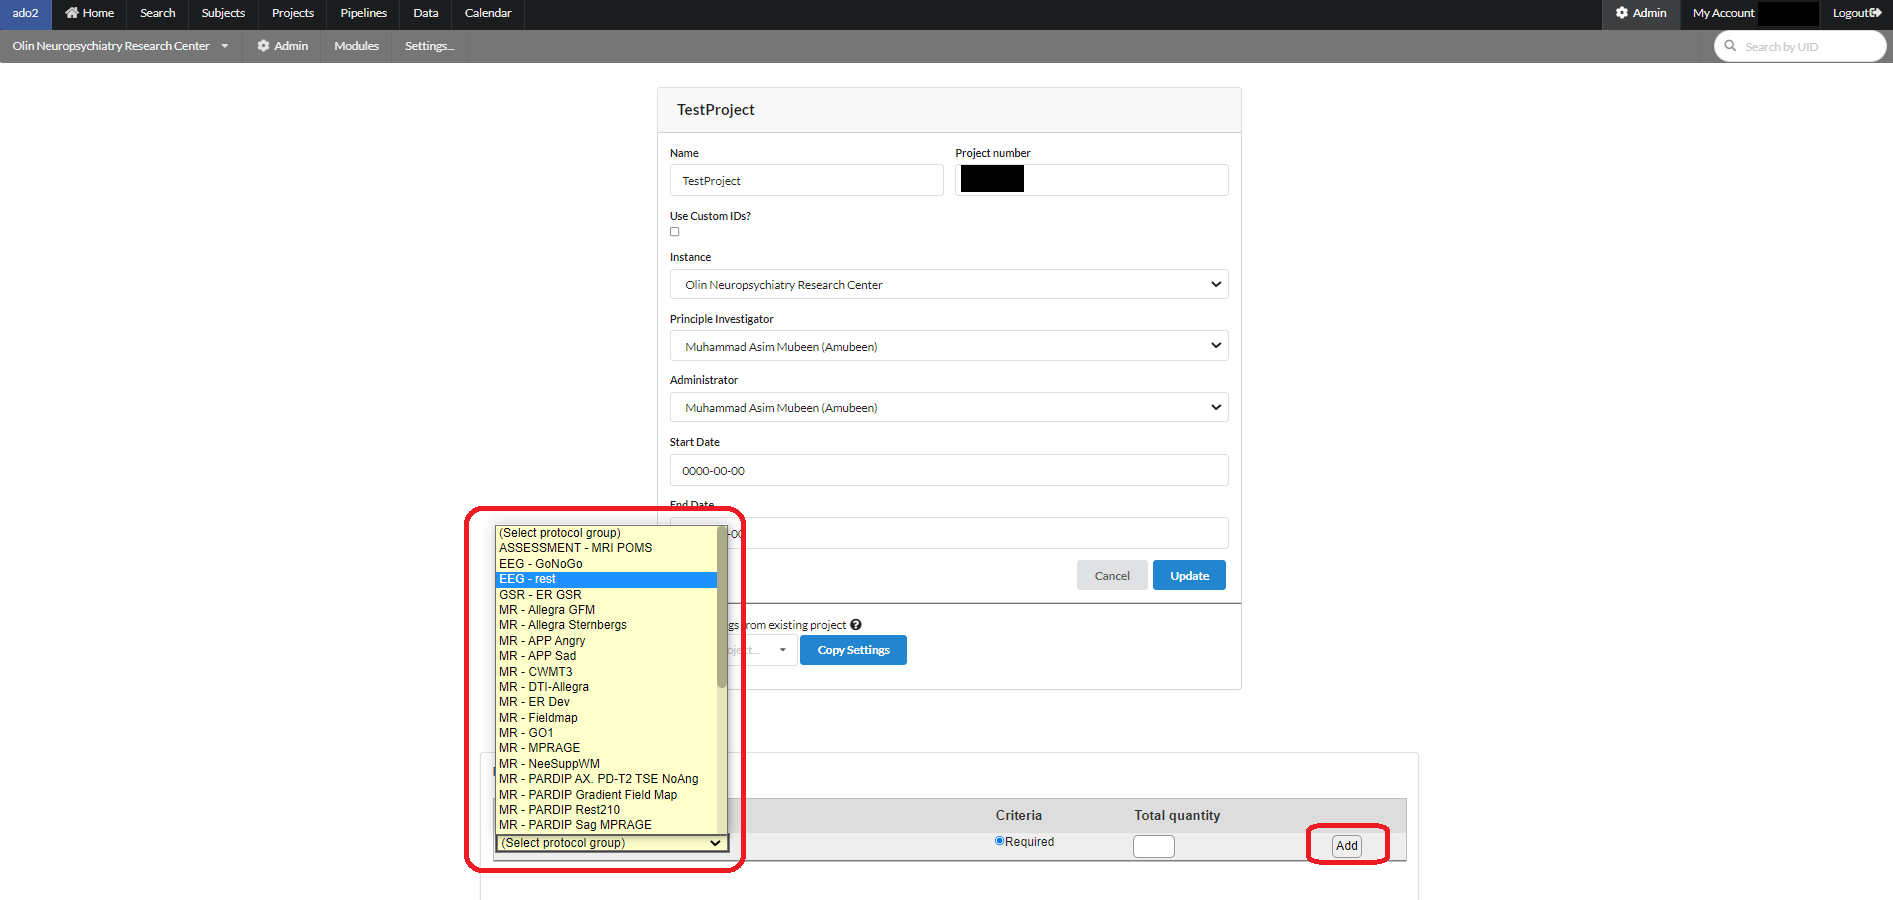
To define a protocol, click on the name of a protocol in the above list. For example if we click on EEG-Rest, the following page will appear with the existing list of EEG-series being already used in various projects. You can pick any of those to add to your own protocol group. A group name can be assigned by using the "Protocol group name" box at the end of the page as shown. After clicking the "Add" button the selected series in the group will be added to the group and will be shown on the right.
Working With a Project
After setting up project accordingly, the project can be accessed by users having its rights. A user can access a project via "Projects" menu from the main menu. A list of existing projects will be displayed. TO search a specific project, type the name of a project and the list will reduced to the projects containing the search phrase.
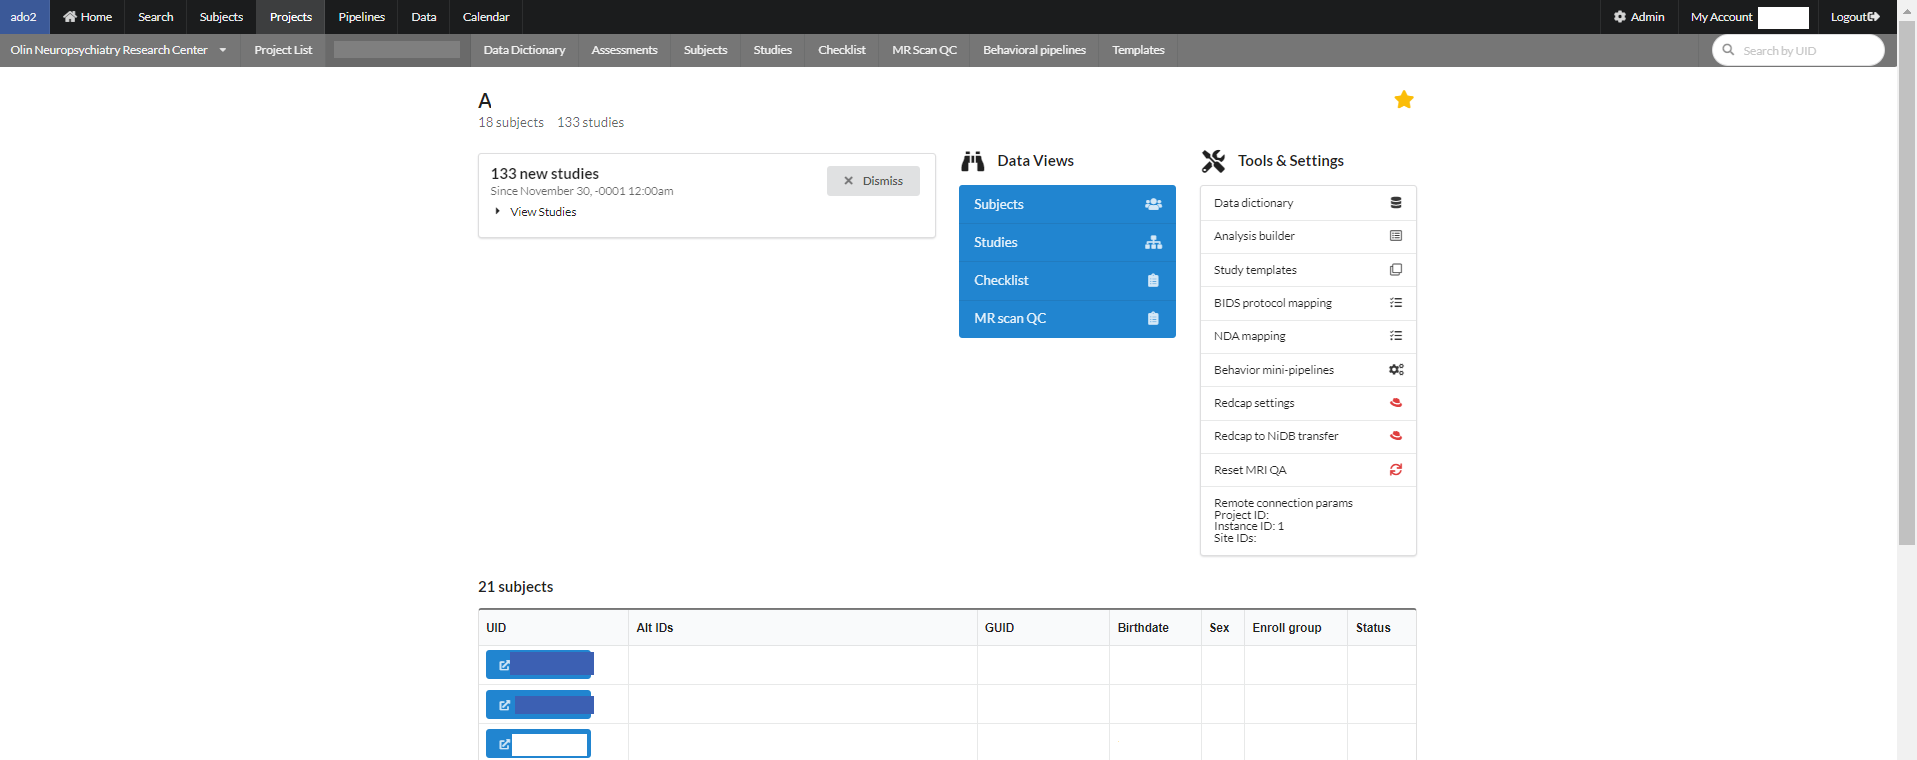
Click the name of the project from the list as shown above. A project specific page will appear as seen below.
A project page consists of some information regarding the current project. Under the project name there is total number of subjects and studies. Undeneath that is a message box consists of number of studies. One can dismiss this message box by clicking "dismiss" button or view all the studies inside the message box.
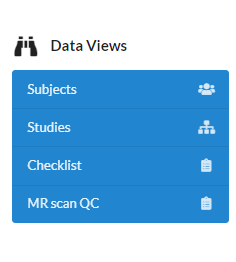
In the middle of a project page is "Data Views" for subjects, studies, checklist for subjects and an option to QC the MR scans.
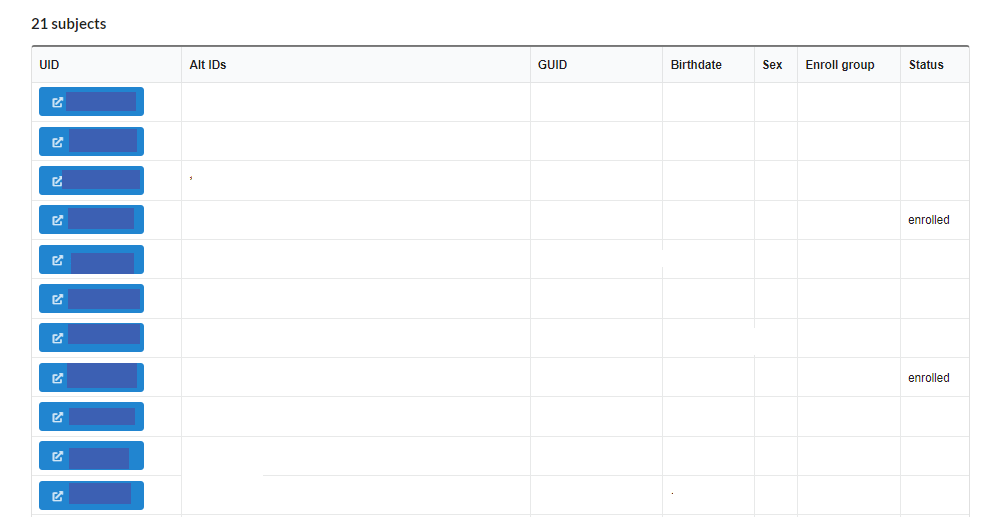
To update information regarding the subjects in the current project, click on the "Subjects" button in the data view, a page will appear where the information can be updated for all the subjects and can be saved at once by clicking "Save" button at the end.
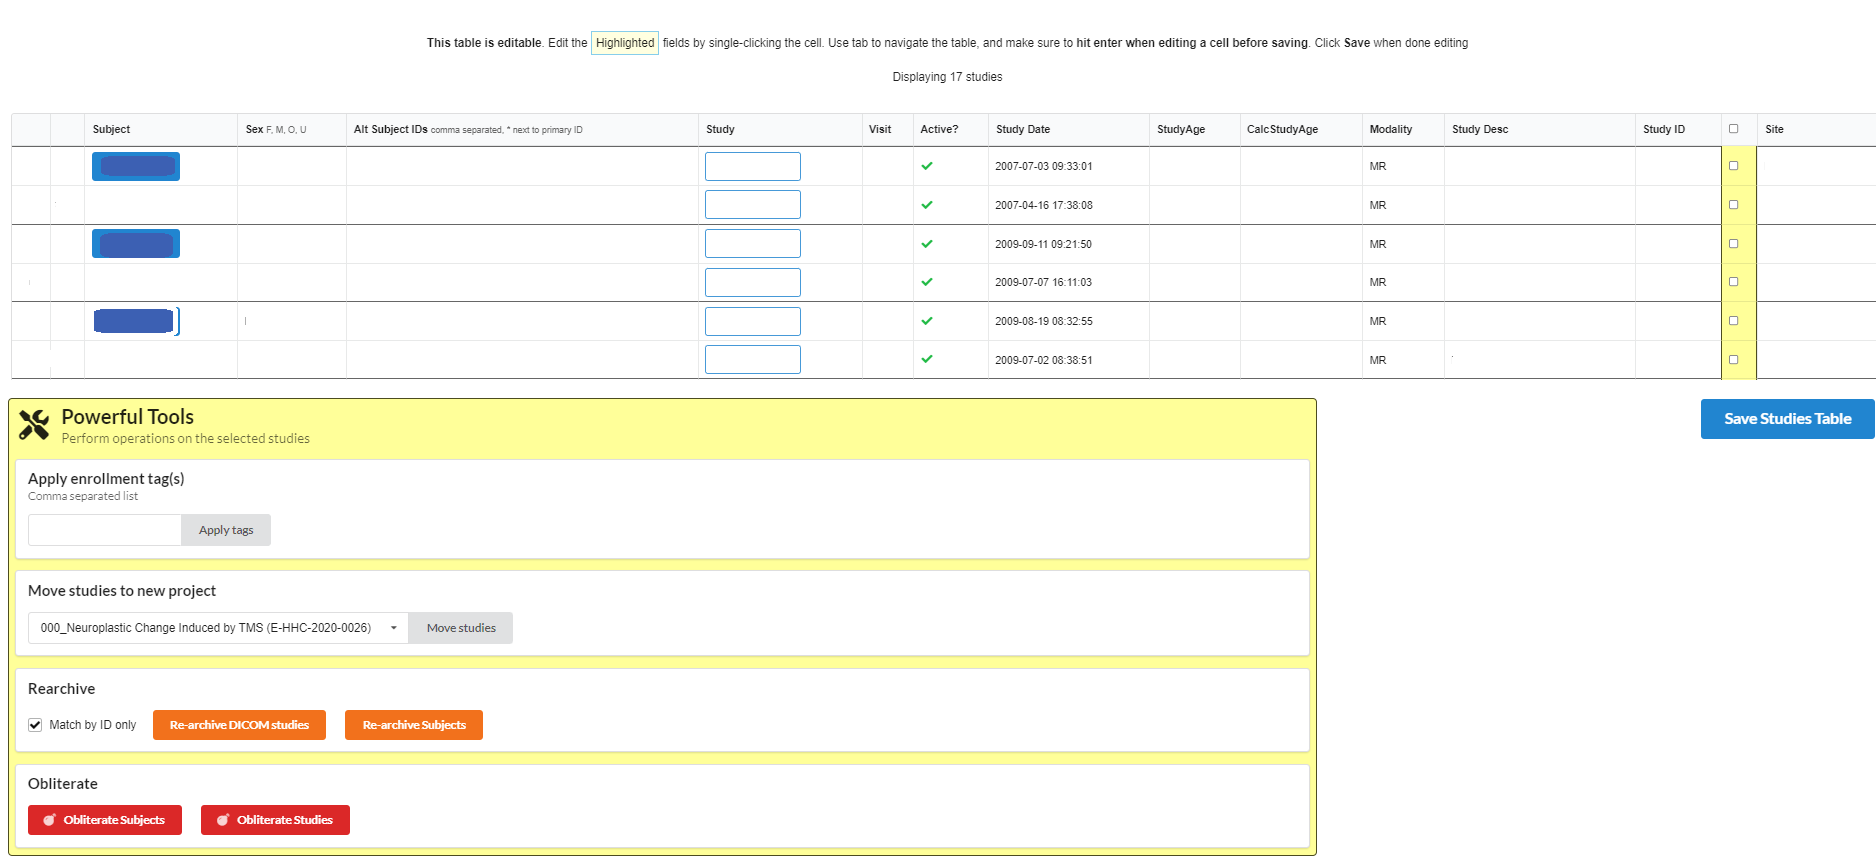
By clicking the Studies button from Data Views section, following page will appear. The studies can be selected to perform various operations like adding enrollment tags, moving studies to another project.
If you are an NiDB system admin, you may see the Powerful Tools box at the bottom of the page. This allows you to perform maintenance on the data in batches. Select the studies, and then click one of the options. This is a powerful tool, so use with caution!
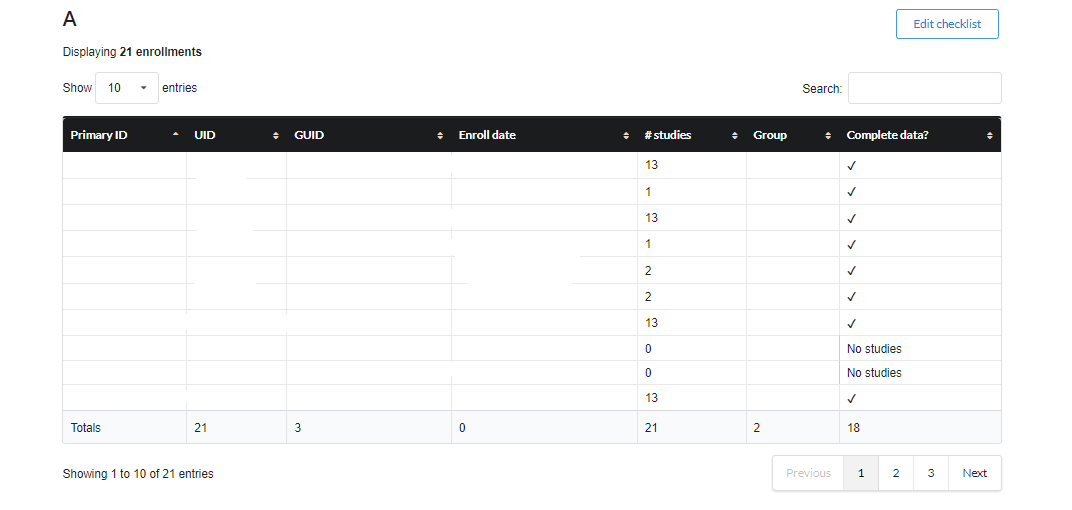
Checklist provides a brief summary on the subjects, studies and their status as shown below.
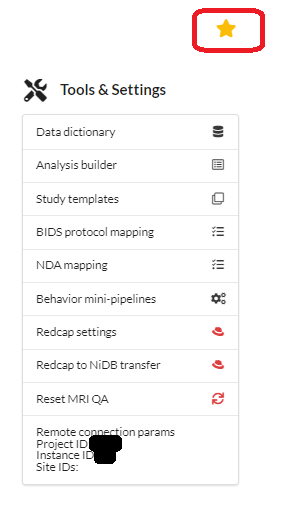
On the right side of the project page is a star that can be selected to make this project "favorite" that will show this project on the main page of NiDB to access it easily from there. Also there are links to the project related tools and their settings. This section is named as "Project tools & settings". This section includes:
Data Dictionary
Analysis Builder
Study Templates
It also possess the parameters required to connect this project remotely.
The last section of a project page consists of a list of subjects registtered, with its alternate Ids, GUID, DOB, Sex, and status as shown below:
The projects main-menu also has a sub-menu to navigate through various project related tools. The sub-menu includes links to Data Dictionary, Assessments, Subjects, Studies, Checklist, MR Scan QC, Behavioral pipeline and Templates. Also "Project List" can navigate back to the list of all the projects in the current database instance.
Installation
Detailed installation instructions
Prerequisites
Hardware - There are no minimum specifications. Hardware must be able to run Linux.
Operating system - NiDB runs RHEL 8, RHEL 9 compatible OSes. NiDB does not run on Fedora or CentOS Stream.
NiDB will not run correctly on Fedora, CentOS Stream 8, or RHEL/Rocky 8.6 as they contain a kernel bug. If you have already updated to this version, you can downgrade the kernel or boot into the previous kernel. Kernel 4.18.0-348.12.2.el8_5.x86_64 is known to work correctly.
FSL
FSL is required for MRI QC modules. FSL requires at least 20GB free disk space to install. Download FSL from and follow the installation instructions. After installation, note the location of FSL, usually /usr/local/fsl.
Alternatively, try these commands to install FSL
firejail
firejail is used to run user-defined scripts in a sandboxed environment. This may be deprecated in future releases of NiDB. Install firejail from https://firejail.wordpress.com/
Install NiDB rpm
Download the latest .rpm package from and run the following commands
Run the following commands
Alma Linux
Secure the MariaDB installation by running mysql_secure_installation as root and using the following responses. The MariaDB root password is already set to password.
Finish Setup
Use Firefox to view (or http://servername/setup.php). Follow the instructions on the webpage to configure the server.
If you encounter an error when viewing the Setup page...
The setup page must be accessed from localhost.
Or the config file must be manually edited to include the IP address of the computer you are using the access setup.php. Add your IP address by editing
1 - Backup SQL database
Copy the mysqldump command and run that on the command line. It should create a .sql file that contains a backup of the database. This is required even for new installations because you should become familiar with, and get int the habit of, backing up the SQL database. After you've backed up the database using mysqldump, refresh the setup page and it should allow you to continue with the setup.
Click Next to continue, and the following page will show the status of Linux packages required by NiDB.
2 - Linux Prerequisites
If there are any missing packages or if a version needs to be updated, it will show here. Install the package and refresh the page. Click Next to continue, and the following page will show the SQL schema upgrade information.
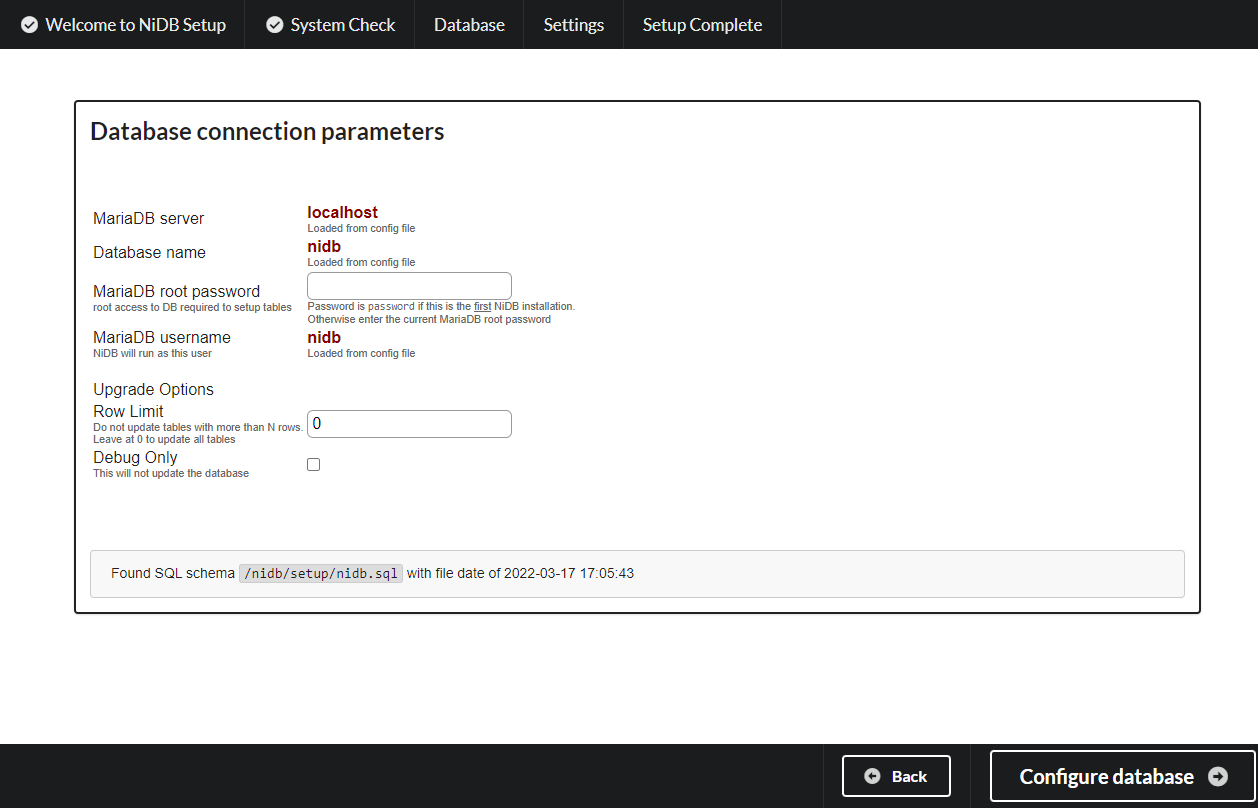
3 - Database connection
Enter the MariaDB root password, which should be password if this is the first installation. The SQL schema will be upgraded using the .sql file listed at the bottom. As your instance of NiDB collects more data, the tables can get very large and tables over 100 million rows are possible. This will cause the setup webpage to time out, so there is an option to skip tables that have more than x rows. This should really only be done if a specific table is preventing the schema upgrade because it so large and you are familiar with how to manually update the schema. The debug option is available to test the upgrade without actually changing the table structure. Click Next to continue, and the following page will perform the actual schema upgrade.
4 - Schema upgrade
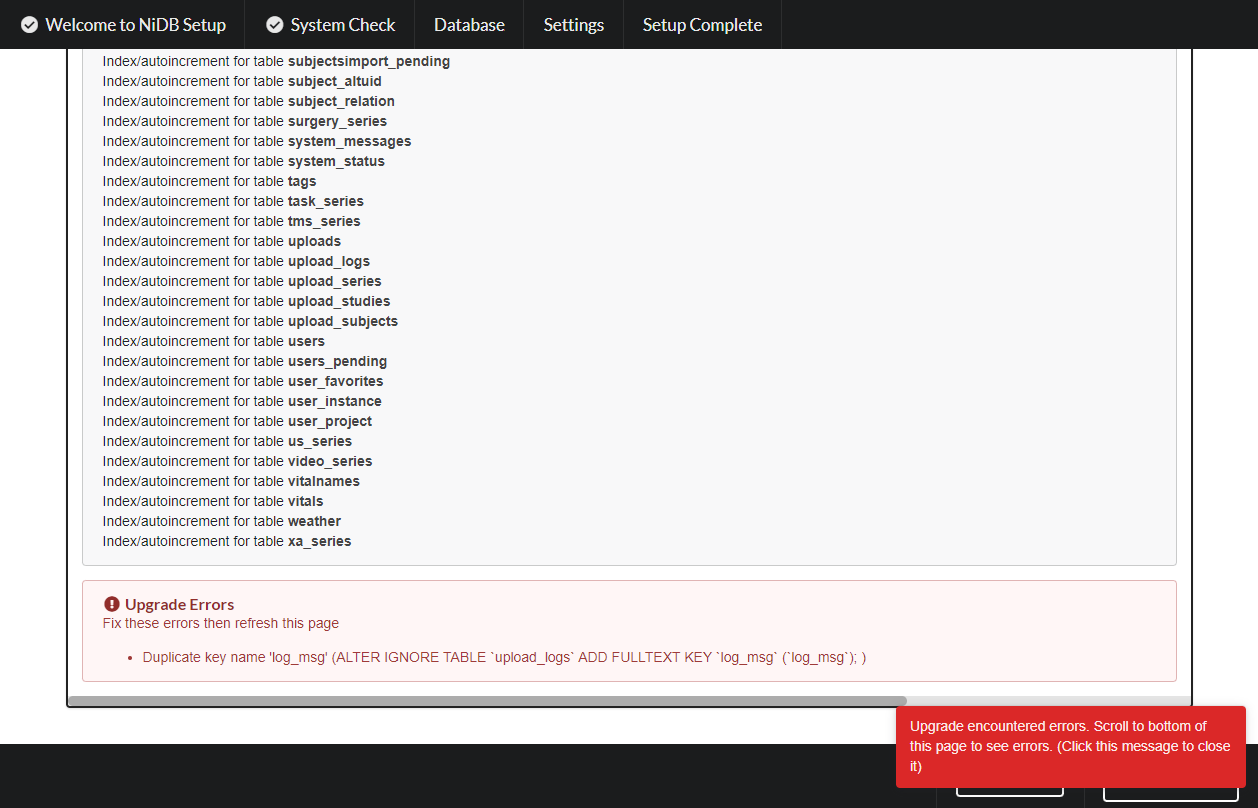
If any errors occur during upgrade, they will be displayed at the bottom of the page. You can attempt to fix these, or preferably seek help on the NiDB github support page! Click the red box to dismiss any error messages. Click Next to go to the next page which will show the configuration variables.
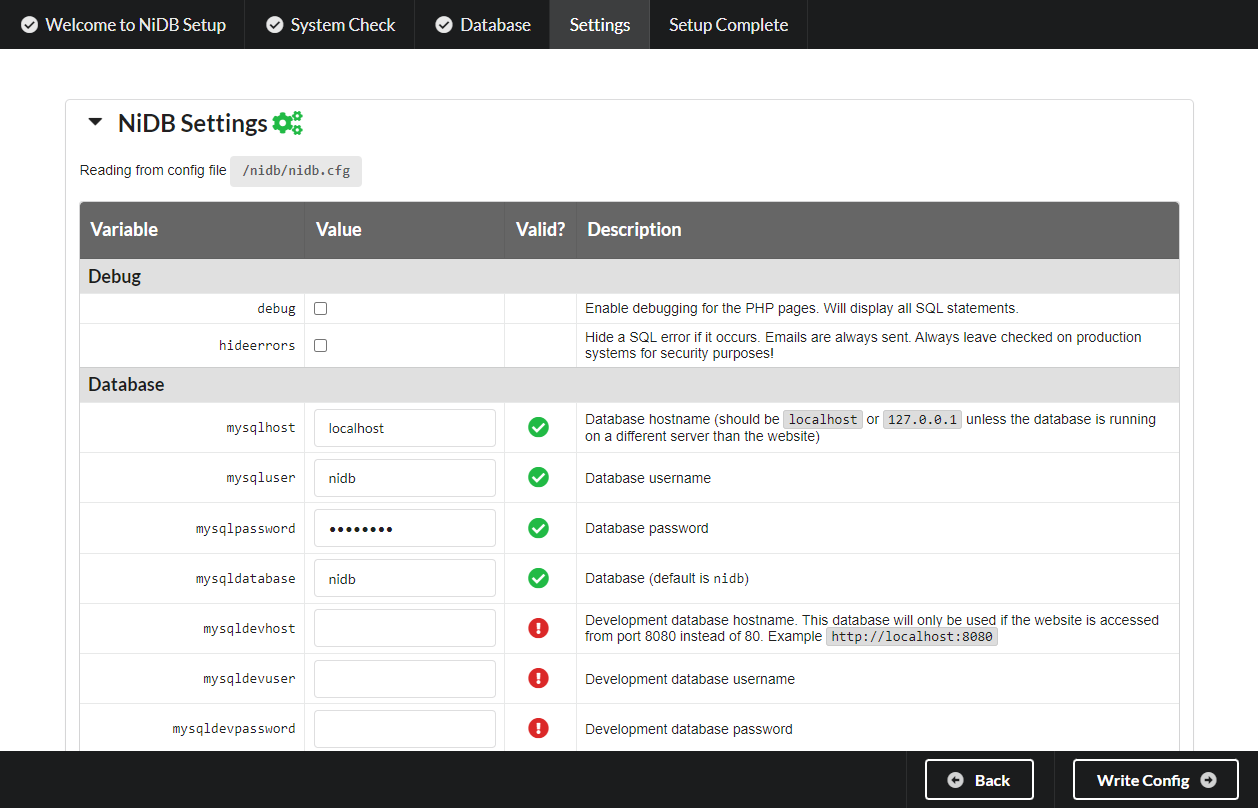
5 - Config settings
On this page you can edit variables, paths, name of the instance, email configuration, enable features.
Click Write Config to continue.
The locations of the written config file(s) are noted on this page. nidb-cluster.cfg is meant to be placed on cluster nodes, to allow nidb pipelines running on the cluster to communicate with the main nidb instance and perform check-ins and storing of pipeline results.
Setup should now be complete and you can visit the home page.
Uploading data for a sample project
How to upload data into a sample project
Overview
A project will often need imaging data of different modalities uploaded to an instance of NiDB. All of the data must be associated with the correct subject, and each modality must have it's own study.
Follow this order of operations when uploading data
Create the subject(s) - Subjects must exist in NiDB and be enrolled in a project before uploading any imaging data
Upload EEG and ET data before MRI data - MRI data is automatically sorted into subject/session during import which is different than how EEG and ET are imported. Uploading the EEG and ET first makes sure that all of the subjects and associated IDs exist before attempting to upload the MRI data
Upload small MRI imaging sessions (less than 1GB in size) using the NiDB website - This is useful to upload data for a single subject.
Upload large MRI imaging sessions (greater than 1GB in size, or dozens of subjects), or data that must be anonymized, using the NiDBUploader - This is useful if you need to upload thousands of MRI files. Sometimes a single session might generate 10,000 files, and maybe you have 20 subjects. Might be easier to use the NiDBUploader.
Create a Subject
Make sure you have permissions to the instance and project into which you are uploading data.
Select the correct instance.
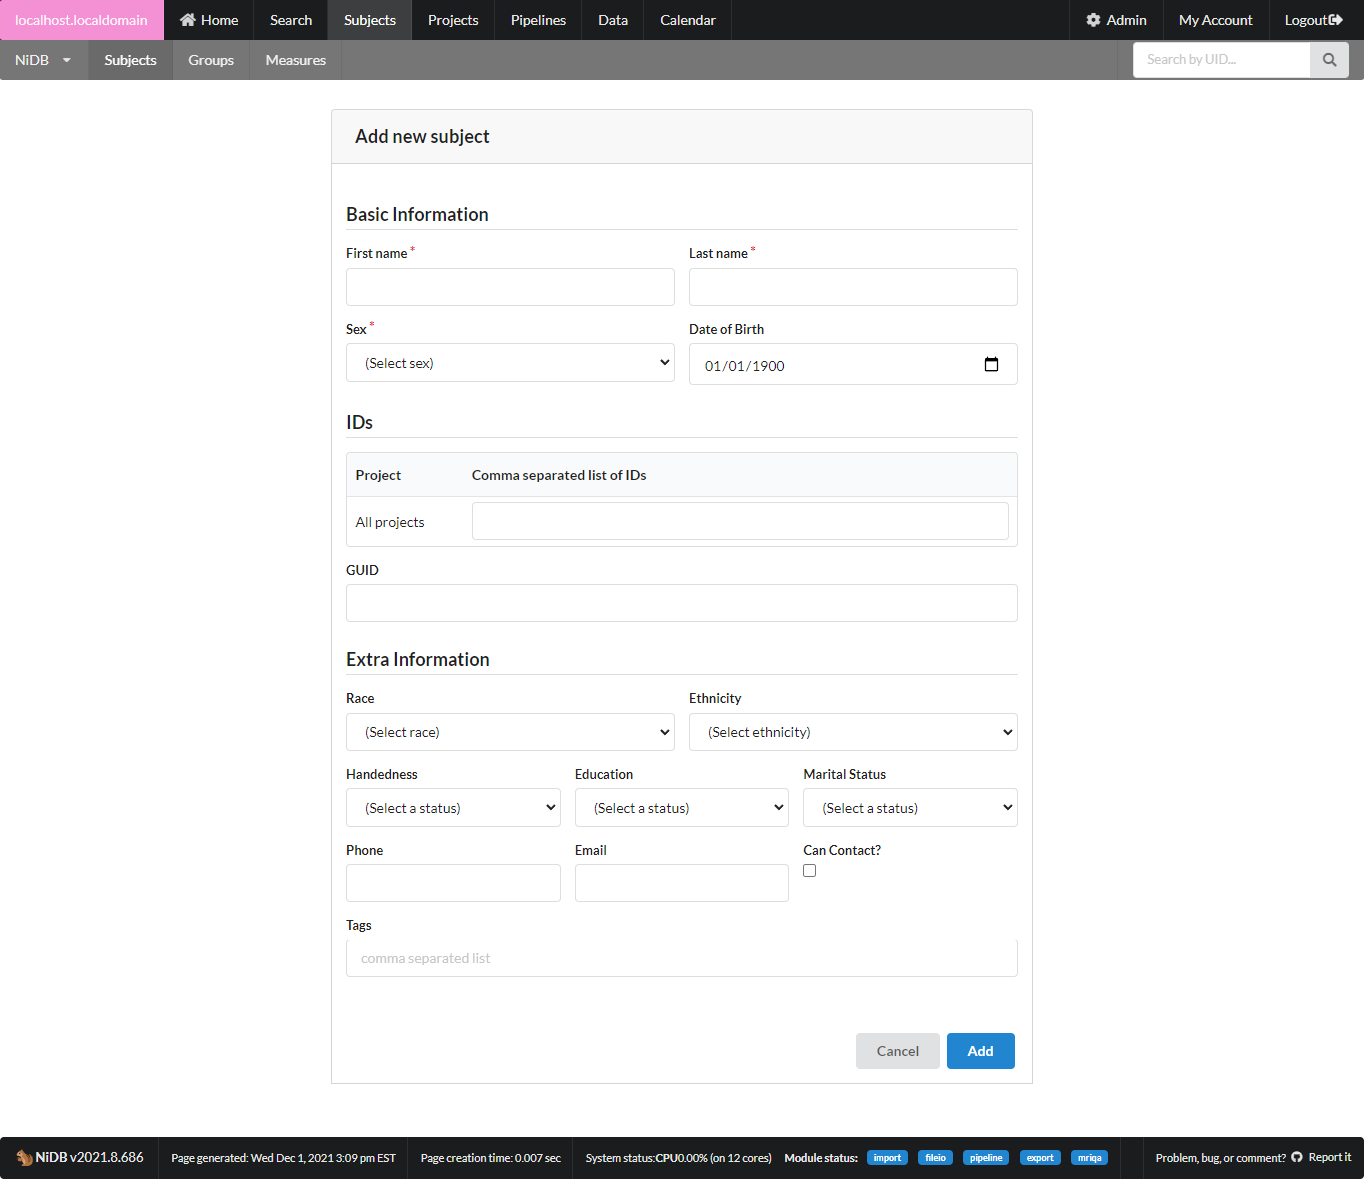
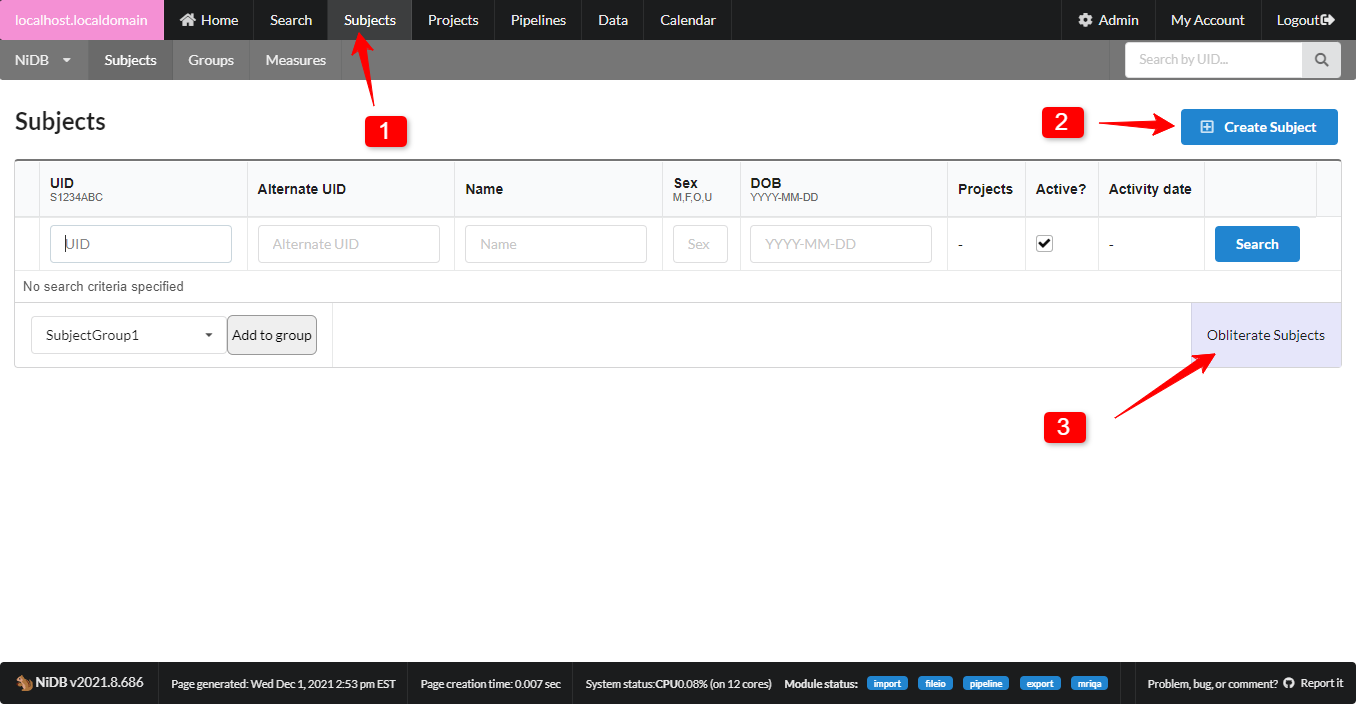
On the top menu click Subjects --> Create Subject
Fill out the information. First name, Last name, Sex, Date of Birth are required
Updating IDs
On the subject's page, click the Edit Subject button on the left.
In the IDs section, enter the extra ID(s) in the specific project line. Separate more than one ID with commas, and put a * next to the primary ID. Such as *423, P523, 3543
Click Update and confirm at the next screen.
Upload EEG and ET data
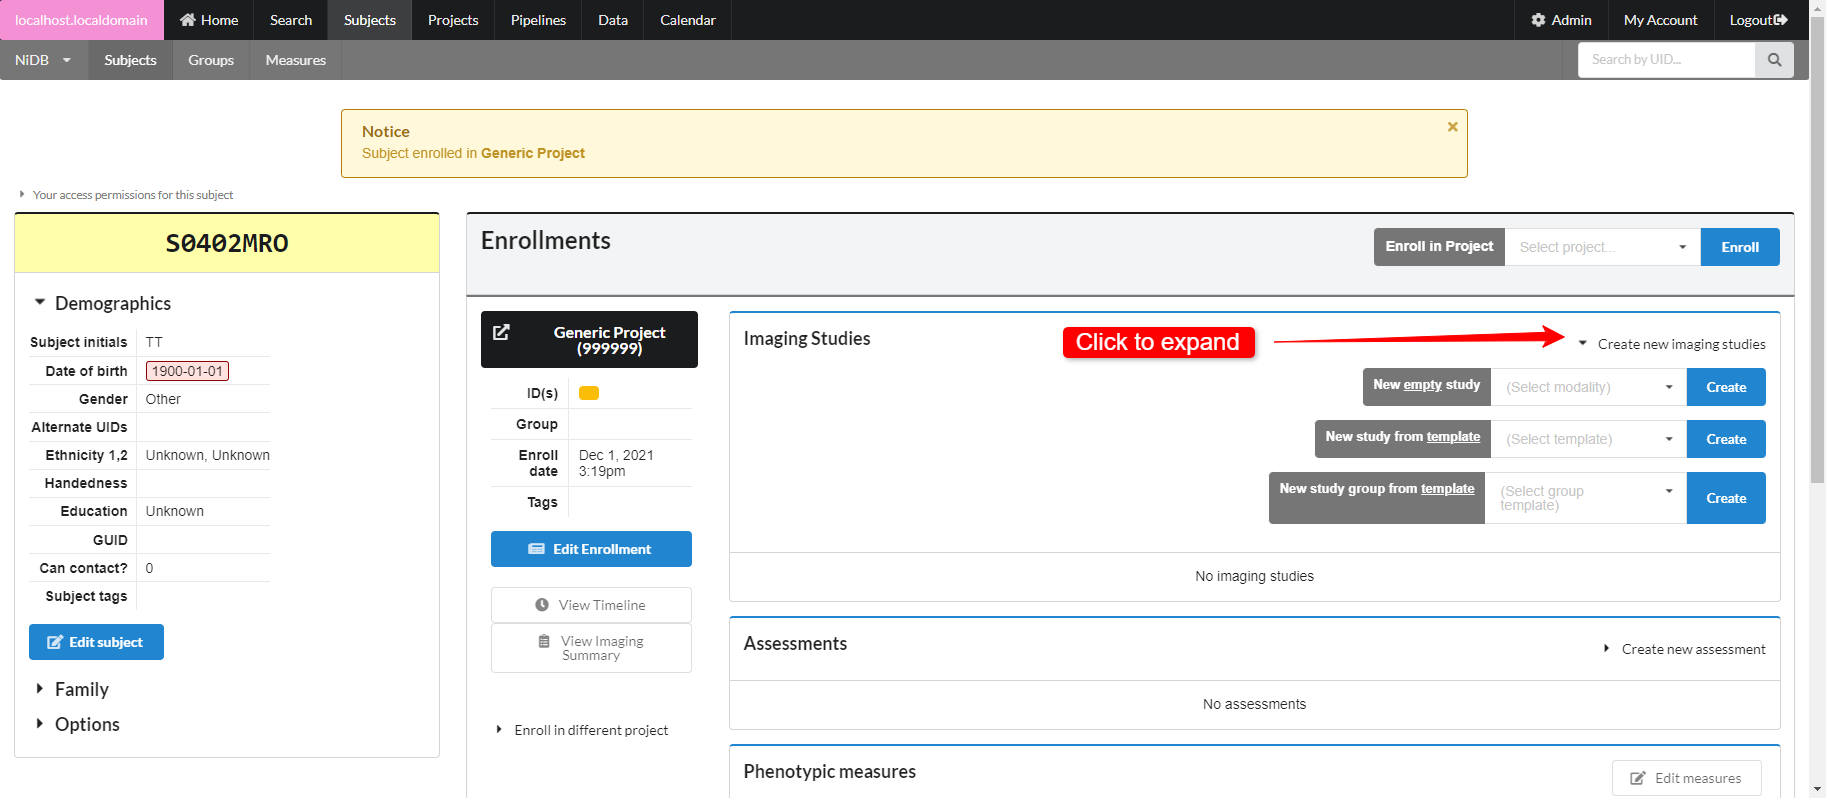
On the subject's page, find the Create New Imaging Studies dropdown. Expand that and find the New empty study dropdown. Select the ET or EEG modality, and click Create. Your study will be created.
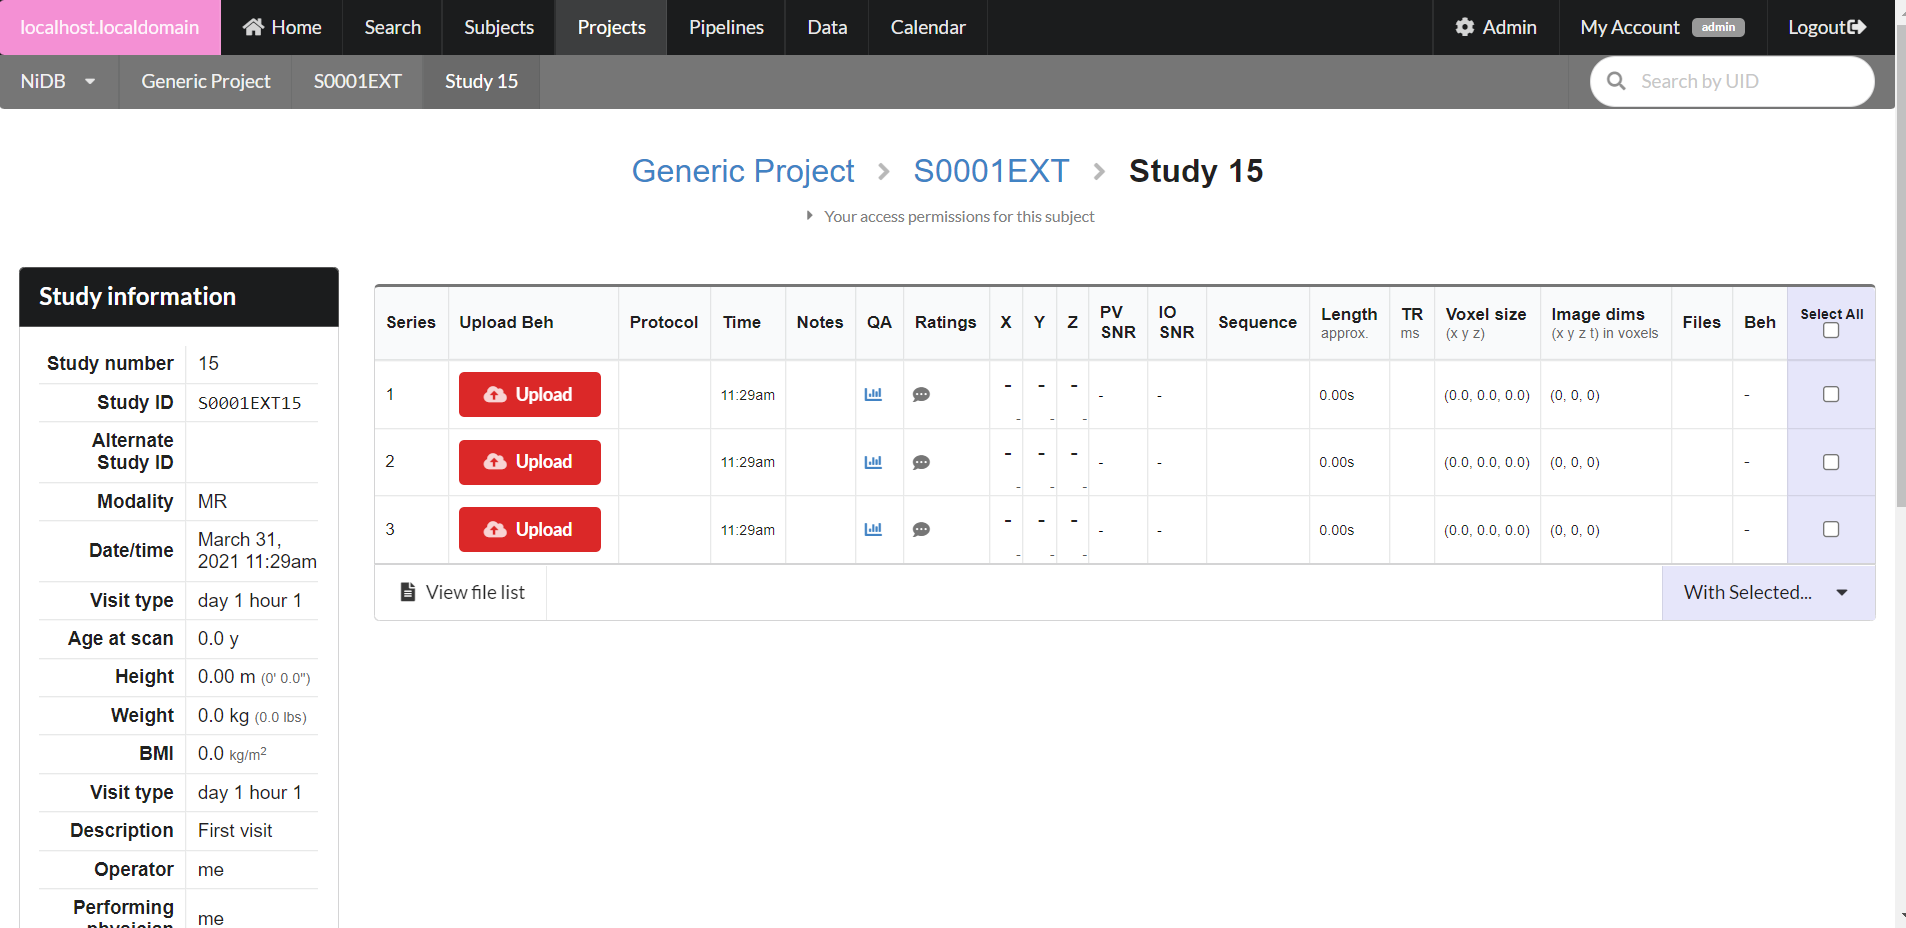
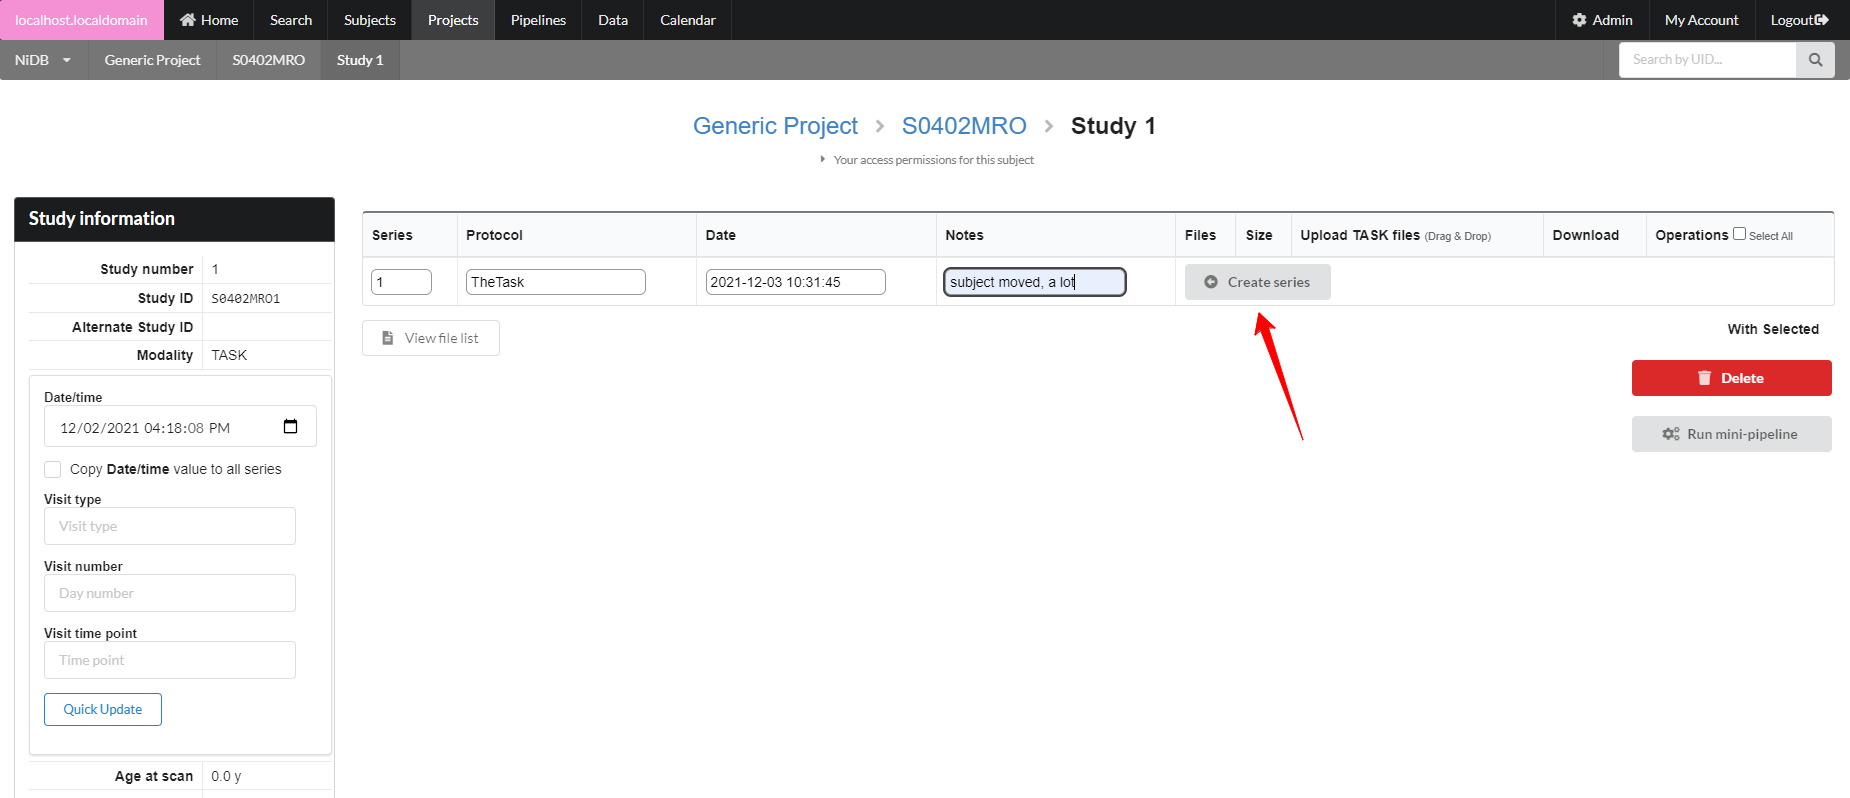
On the subject's page, click the Study number that was just created, and it will show the study.
Fill out the protocol name, the date/time of the series, and any notes, then click Create series.
Upload MRI data through the website (small datasets)
Upload the data
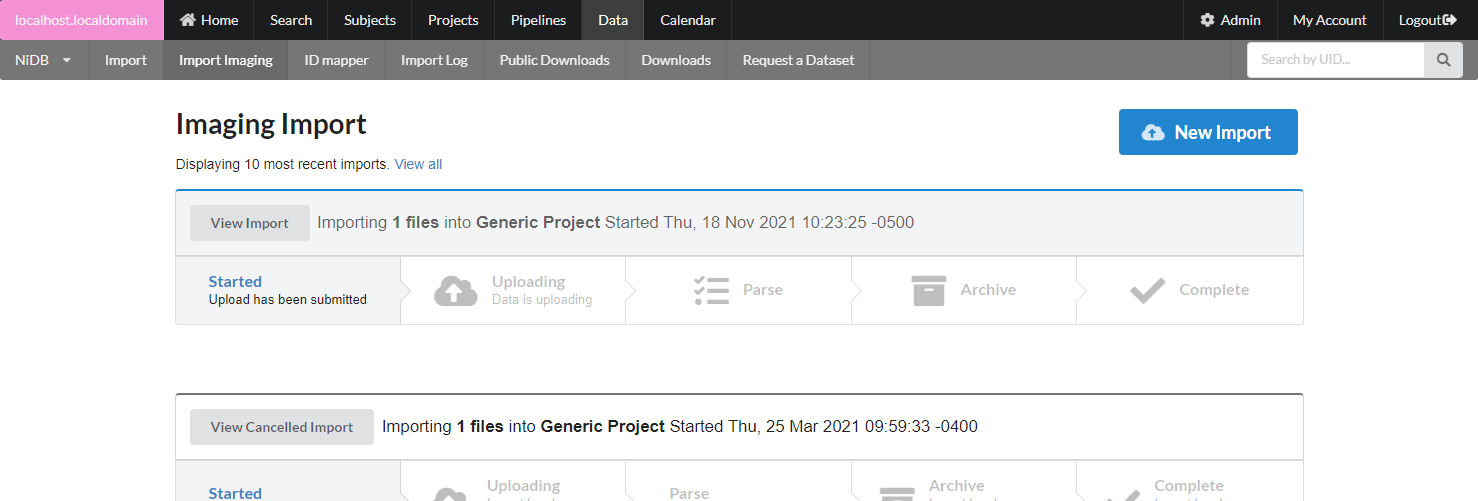
On the top menu, click Data. Then click the Import imaging button.
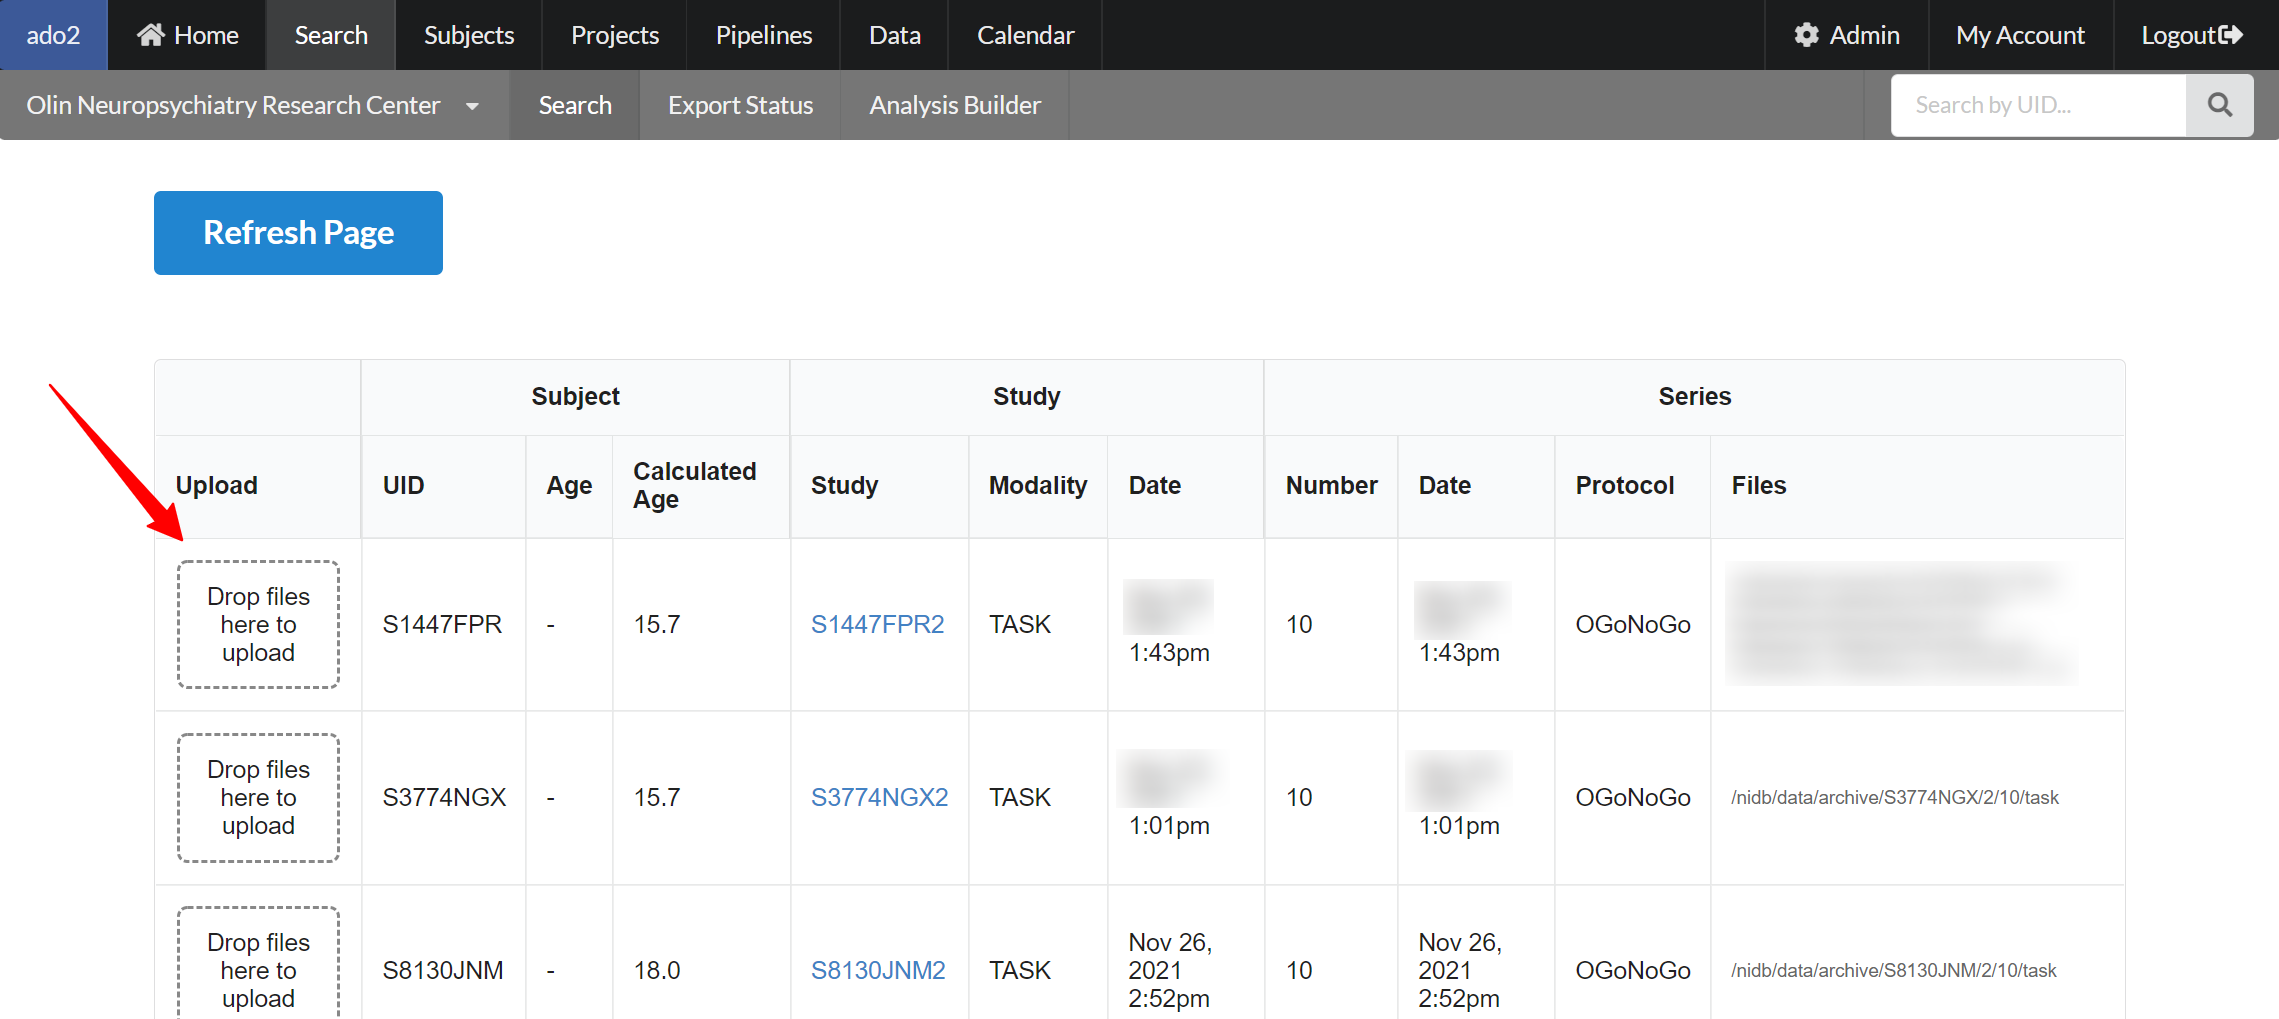
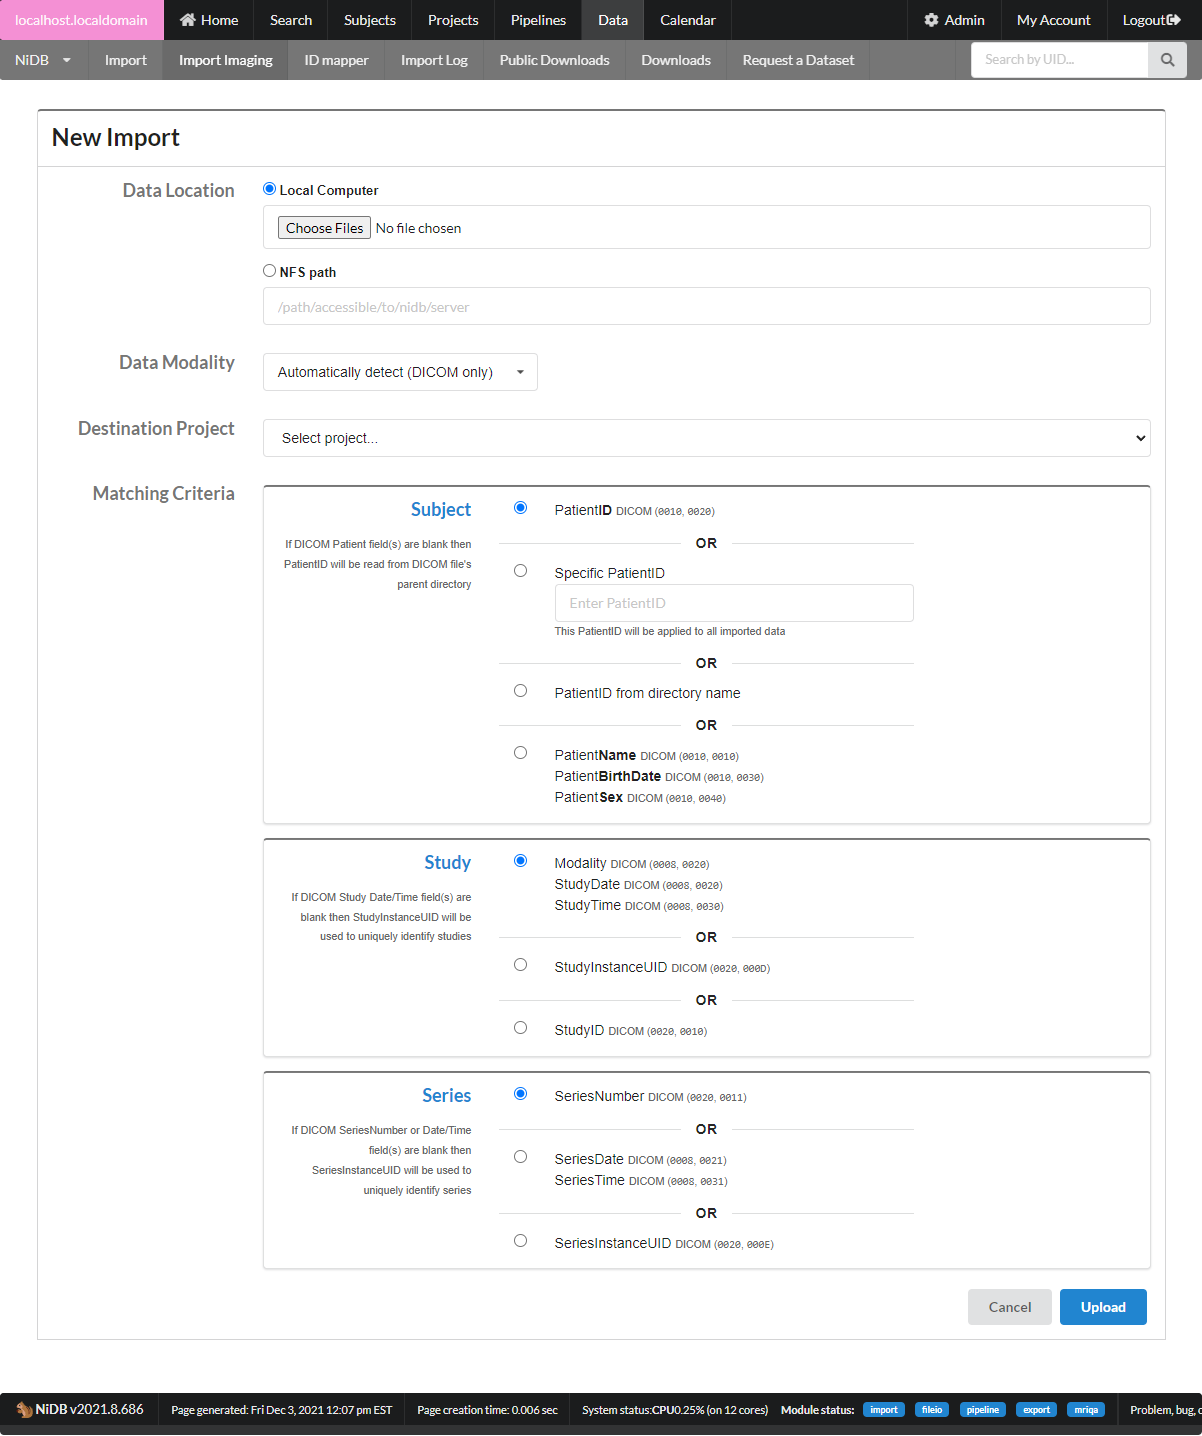
Click the New Import button.
Choose the files you want to upload. These can indivudual files, or zip files containing the DICOM or par/rec files.
A new row will be created with your upload. MRI data can contain just about anything, so NiDB needs to read through all the files and see what's there.
Once NiDB has parsed the data you uploaded, you'll need to decide which data to actually import.
Click the yellow Choose Data to Import button
Details about the import will be displayed. On the bottom will be a list of subjects, studies, and series. You can deselect certain series if you don't want to import them, but likely you'll just want to import all of the series, so click the Archive button.
Click on the Back button on the page to go back to the import list.
Upload MRI data through NiDBUploader (large datasets)
Download the NiDBUploader from github:
Install it and run the program.
Create a connection
Fill in the server: https://yourserver.com, and enter your username/password. Click Add Connection.
Click on the connection and click Test Connection. It should say Welcome to NiDB after a little while.
Select the data
Select a Data Directory at the top of the program. This should be the parent directory of your data.
Change the Modality to MR. Uncheck the Calculate MD5 hash...
Click Search. This will slowly populate that list with DICOM/ParRec files that it finds.
Set anonymization options
Make sure Replace PatientName is checked.
Set the destination
Click the ... button for the Instance, which will populate the list of instances. Select your instance. Then select the Project.
Click the ... for the Site and Equipment to load the lists. Select the Site and Equipment.
Upload the data
Click Upload.
It will take a while. Like a long time. Be prepared for that. Depending on the number of files, it could take hours to upload.
If any files fail, it will be displayed along with a reason. If you fix the errors, then you can click Resend Failed Objects.
Importing Data from a Redcap Project
Tutorial on how to import data form a Redcap project to a NiDB project
Step 1
Gather the following information from Redcap administrator for API connection .
Redcap Server
Redcap API Token
Step 2
Use 'Projects' menu in NiDB to get to the desired project's main page. From Data Transfer section of the links on the right, click "Global Redcap Settings" link.
Step 3
Enter the Redcap server address and API token information and press "Update Connection Settings" button on the right as shown below.
Step 4
Next steps to import the data correctly from redcap into NiDB is testing the connection, mapping each variable / field from redcap to NiDB and transferring the data. To test and established the connection with Redcap follow the following steps:
Go to the project page and click the "Import from Redcap" link as shown below.
Click on the "Connect To Redcap" button on the right. If the connection is successful, a table with the Redcap Project information as shown below will appear.
Once the connection is tested, click on thebutton to start the mapping and /or transfer data process.
Step 5
The Mapping / Transfer page will appear as shown below. This page is used to map variables or transfer data according to established mapping.
To start new or edit existing mapping Click on the "Edit Mapping" button on the left as shown in the above figure. A new page will appear as shown below.
Each Redcap form is required to map separately. Pick NiDB data type and "Redcap Form" from the drop-down list shown above.
Select a type of data that redcap form contains. NiDB handles this in three types of data, which are following:
Measures: Redcap forms storing cognitive measures and similar other measures are stored as this data form in NiDB
Vitals: Redcap forms that contains information of vitals like hearth rate, blood pressure, blood test results are stored as this form of data. Also any tests that need to be done multiple times in a day can be recorded as this form.
Drug / dose: If your project have information related to administrating drugs, this type of Redcap form is stored as Drugs / Dose in NiDB.
After choosing the Redcap "Form", a new section to map the variables from Redcap to NiDB will appear as shown in the figure below.
A variable mapping table has two sides: NiDB and Recap.
NiDB Variable Side
The NiDB variable side contains two columns. These columns will automatically filled with the same variable and instrument names based on the Redcap choices of the form and variables. However, one can change these names. These are the names that will be stored in NiDB for corresponding Redcap Form and variable names.
Redcap Variable Side
This side has seven columns. Following is the explanation of each column on Redcap side.
Event: A Redcap project can have multiple events. All the events will be listed in this column. Any number of events can be chosen from the list that is needed to map. In our example we chose only one event because the Redcap form selected tp map contain only data for that event.
Value: Pick the Redcap variable to map from a dropdown menu list.
Date: Pick the Redcap variable storing "date" information of the redcap form from a dropdown menu list.
Defining the correct type of field is very crucial for the mapping in NiDB. Especially time and date are very important to create reports based on the information stored in NiDB.
Add the Mapping
After defining one variable in a form, hit "Add" button on the right to add this mapping definition.
In case of any mistake, a mapping item can be deleted and later can be added again according to the above stated process.
After completing the mapping for a redcap form. Complete mapping the other redcap forms similarly.
Step 6
Before the last step it is critical to recheck all the mapping information. It is important, because the integrity, and accuracy of data transfer is based on accurate mapping. So check, recheck and make sure!
After you have done with your recheck, you are ready to transfer the data from Redcap to NiDB.
Go to the following Mapping / Transfer page by clicking on thebutton from the mapping page or connection page.
Click on the "Transfer Data" button, the following screen will appear.
First select the NiDB instrument (mapped in the mapping step) to transfer the data for.
Choose the recap event that holds the subject identification information.
Next, select the Redcap variable storing the redcap unique id.
Tips / Information
You can complete all the mapping for the Redcap forms to be exported at once and then transfer the data one by one OR you can transfer the data of one Redcap form mapped and then go to the next forms to map and transfer.
To transfer / synchronized the data, Just press the "Transfer" button on the right The data will be transferred / synchronized for the selected NiDB instrument.
You need to transfer the data for each mapped instrument separately by selecting them one by one.
Reports on data can be generated by using the "Analysis Builder" tool, selection from a project's main page from "Tools" section on the right.
Specification v1.0
Format specification for v1.0
Overview
A squirrel contains a JSON file with meta-data about all of the data in the package, and a directory structure to store files. While many data items are optional, a squirrel package must contain a JSON file and a data directory.
JSON File
JSON is JavaScript object notation, and many tutorials are available for how to read and write JSON files. Within the squirrel format, keys are camel-case; for example dayNumber or dateOfBirth, where each word in the key is capitalized except the first word. The JSON file should be manually editable. JSON resources:
JSON tutorial -
Wiki -
JSON specification -
Data types
The JSON specification includes several data types, but squirrel uses some derivative data types: string, number, date, datetime, char. Date, datetime, and char are stored as the JSON string datatype and should be enclosed in double quotes.
Directory Structure
The JSON file squirrel.json is stored in the root directory. A directory called data contains any data described in the JSON file. Files can be of any type, with file any extension. Because of the broad range of environments in which squirrel files are used, filenames must only contain alphanumeric characters. Filenames cannot contain special characters or spaces and must be less than 255 characters in length.
Squirrel Package
A squirrel package becomes a package once the entire directory structure is combined into a zip file. The compression level does not matter, as long as the file is a .zip archive. Once created, this package can be distributed to other instances of NiDB, squirrel readers, or simply unzipped and manually extracted. Packages can be created manually or exported using NiDB or squirrel converters.
Package Specification
analysis
JSON array
Analysis results, run on an imaging study level. Can contain files, directories, and variables.
JSON variables
🔵 Primary key
🔴 Required
🟡 Computed (squirrel writer/reader should handle these variables)
Calendar
Calendar for appointments, scheduling of equipment time, etc
Calendar View
If the calendar is enabled in your NiDB installation, a link on the top menu will be available. The default view is the current week. Click Day, Week, or Month to change view. Click arrows to go forward or backward in the calendar. Click the dropdown list of calendars to change the current calendar. Information about what you are viewing will be displayed at the top of each page.
Managing the Calendars
If you are an admin, you can click the Manage link on the second row of the menu. This will show a list of calendars. Click the Add Calendar button to create a new calendar. Click the calendar name to edit the calendar.
Creating Appointments
On the Day, Week, or Month views, click the + button to add an appointment. Fill out the information, and click Add. Appointments can regular, or can be an all day event or time request, the latter special types do not block overlapping appointments from being created. For example, if a regular appointment is scheduled from 2:00pm-3:00pm, another appointment could not be scheduled from 2:30-3:30pm. But both appointments can be created if either one is a time request or all day event.
Issues
If you try to create an appointment and it says it conflicts with an existing appointment, but you can't see the offending appointment on the calendar, check if there is an appointment that spans more than one day. For example, if an appointment runs from 3pm Monday to 3pm Wednesday, you will not be able to create any appointments on Tuesday. This can be fixed by setting the multi-day appointment to be all day.
Modifying Appointments
Click on the appointment to show appointment form. Make any changes and click Update. You can also modify a repeating appointment, or delete appointment.
studies
JSON array
An array of imaging studies, with information about each study. An imaging study (or imaging session) is defined as a set of related series collected on a piece of equipment during a time period. An example is a research participant receiving an MRI exam. The participant goes into the scanner, has several MR images collected, and comes out. The time spent in the scanner and all of the data collected from it is considered to be a study.
Valid squirrel modalities are derived from the DICOM standard and from NiDB modalities. Modality can be any string, but some squirrel readers may not correctly interpret the modality or may convert it to “other” or “unknown”. See full list of .
Click Add and confirm on the next screen. The subject is now created
On the subject's page, select a project from the Enroll in Project dropdown (you might need to scroll down in the dropdown), and click Enroll.
If demographic data are stored in a redcap (or other) database and NiDB is storing imaging data, make sure to put each ID in each database. In other words, put the redcap ID into the the NiDB ID field and store the S1234ABC ID in redcap.
Drag and drop your file(s) onto the Upload button. The status of the upload will be shown below the button.
Don't click Refresh or press ctrl+R to reload the page. Instead, click the Study n link at the top of the page.
If you need to rename or delete files, click the Manage N file(s) button on the study page.
Data modality should be Automatically detect.
Select the destination project
Leave the other matching criteria as the defaults
Click Upload.
Refresh this page and eventually your import should change to a status of Archived.
Once it is done loading files, you can select multiple files and click Remove Selected if you need to.
> sudo mysql_secure_installation
Enter current password for root (enter for none): password
Change the root password? [Y/n] n
Remove anonymous users? [Y/n] Y
Disallow root login remotely? [Y/n] Y
Remove test database and access to it? [Y/n] Y
Reload privilege tables now? [Y/n] Y
If run on a cluster, the hostname of the node on which the analysis run.
PipelineName
string
🔴🔵
Name of the pipeline used to generate these results.
PipelineVersion
number
1
Version of the pipeline used.
RunTime
number
0
Elapsed wall time, in seconds, to run the analysis after setup.
SeriesCount
number
0
Number of series downloaded/used to perform analysis.
SetupTime
number
0
Elapsed wall time, in seconds, to copy data and set up analysis.
Status
string
Status, should always be ‘complete’.
StatusMessage
string
Last running status message.
Successful
bool
Analysis ran to completion without error and expected files were created.
Size
number
🟡
Size in bytes of the analysis.
VirtualPath
string
🟡
Relative path to the data within the package.
Variable
Type
Default
Description
DateStart
date
🔴
Datetime of the start of the analysis.
DateEnd
date
JSON variables
🔵 Primary key
🔴 Required
🟡 Computed (squirrel writer/reader should handle these variables)
Variable
Type
Default
Description
AgeAtStudy
number
🔴
Subject’s age in years at the time of the study.
Datetime
Directory structure
Files associated with this section are stored in the following directory. SubjectID and StudyNum are the actual subject ID and study number, for example /data/S1234ABC/1.
To give permissions to a project, the instance that the project is part of must be checked
Instance
Project will be part of this instance
Principle Investigator
The PI of the project
Administrator
The admin in charge of the project
Start/End Dates
Possibly corresponding to the IRB starting and ending dates of the project
data older than 24hrs is moved
when large enough to fill a tape
Date the record was first entered into a database.
DateRecordModify
datetime
Date the record was modified in the current database.
DateStart
datetime
🔴
Start datetime of the observation.
Description
string
Longer description of the measure.
Duration
number
Duration of the measure in seconds, if known.
InstrumentName
string
Name of the instrument associated with this measure.
ObservationName
string
🔴🔵
Name of the observation.
Notes
string
Detailed notes.
Rater
string
Name of the rater.
Value
string
🔴
Value (string or number).
number
🟡
Number of files contained in the experiment.
Size
number
🟡
Size, in bytes, of the experiment files.
VirtualPath
string
🟡
Path to the data-dictionary within the squirrel package.
data-dictionary-item
JSON array
Array of data dictionary items. See next table.
string
🔴🔵
Name of the variable.
Description
string
Description of the variable.
KeyValueMapping
string
List of possible key/value mappings in the format key1=value1, key2=value2. Example 1=Female, 2=Male
ExpectedTimepoints
number
Number of expected timepoints. Example, the study is expected to have 5 records of a variable.
RangeLow
number
For numeric values, the lower limit.
RangeHigh
number
For numeric values, the upper limit.
NeuroInformatics Database
The NiDB logo
Overview
The Neuroinformatics Database (NiDB) is designed to store, retrieve, analyze, and share neuroimaging data. Modalities include MR, EEG, ET, video, genetics, assessment data, and any binary data. Subject demographics, family relationships, and data imported from RedCap can be stored and queried in the database.
Features
.rpm based installation for RHEL 8 and RHEL 9 compatible (not for CentOS Stream)
Store any neuroimaging data, including MR, CT, EEG, ET, Video, Task, GSR, Consent, MEG, TMS, and more
Store any assessment data (paper-based tasks)
Features
.rpm based installation & upgrade
Install or upgrade NiDB in minutes on RHEL compatible Linux OS.
Automated import of DICOM data
DICOM data can be automatically imported using the included dcmrcv DICOM receiver. Setup your MRI or other DICOM compatible device to send images to NiDB, and NiDB will automatically archive them. Image series can arrive on NiDB in any order: partial series, or full series to overlap incomplete series.
Store any type of data
Literally any type of imaging data: binary; assessment; paper based; genetics. See full list of . All data is stored in a hierarchy: Subject --> Study --> Series. Data is searchable across project and across subject.
Store clinical trial data
NiDB stores multiple time-points with identifiers for clinical trials; exact day numbers (days 1, 15, 30 ...) or ordinal timepoints (timepoint 1, 2, 3 ...) or both (day1-time1, day1-time2, day2-time1, ... )
Bulk import of imaging data
Got a batch of DICOMs from a collaborator, or from an old DVD? Import them easily
Search and export imaging data
Find imaging data from any project (that you have permissions to...) and export data. Search by dozens of criteria.
Export to multiple formats
Image formats
Original raw data - DICOM, Par/Rec, Nifti
Anonymized DICOM data: partial and full anonymization
Nifti3d
Package formats
squirrel
BIDS
NDA/NDAR
Destinations
NFS share
Web
Public download/dataset
Search and export non-imaging data
Data obtained from pipeline analysis, imported and locally generated measures, drugs, vitals, measures, are all searchable.
Full analysis pipeline system
From raw data to analyzed, and storing result values/images. Utilize a compute cluster to process jobs in parallel. Example below, 200,000 hrs of compute time completed in a few weeks. Hundreds of thousands of result values automatically stored in NiDB and are searchable.
Automated MR quality control
Large number of automatically generated metrics. Metrics are exportable as .csv and tables.
Calendar
Fully featured calendar, running securely on your internal network. Repeating appts, blocking appts, and time requests.
Publications
Book GA, Anderson BM, Stevens MC, Glahn DC, Assaf M, Pearlson GD. Neuroinformatics Database (NiDB)--a modular, portable database for the storage, analysis, and sharing of neuroimaging data. Neuroinformatics. 2013 Oct;11(4):495-505. doi: 10.1007/s12021-013-9194-1. PMID: 23912507; PMCID: PMC3864015. https://pubmed.ncbi.nlm.nih.gov/23912507/
Book GA, Stevens MC, Assaf M, Glahn DC, Pearlson GD. Neuroimaging data sharing on the neuroinformatics database platform. Neuroimage. 2016 Jan 1;124(Pt B):1089-1092. doi: 10.1016/j.neuroimage.2015.04.022. Epub 2015 Apr 16. PMID: 25888923; PMCID: PMC4608854. https://pubmed.ncbi.nlm.nih.gov/25888923/
Outdated information Watch an overview of the main features of NiDB (recorded 2015, so it's a little outdated): | |
Documentation
Getting Started
Using NiDB
Advanced
Import DICOM data
Tutorial on how to import DICOM data into NiDB
Step 1 - Choose an Import Method
There are two main methods to import DICOM data into NiDB
(a) Global Import - used by the DICOM receiver. All files go into the same directory to be archived completely unattended. Filenames must be unique. Preferable if you have a large batch of disorganized DICOM data
(b) Individual Import - import a single zip file or directory. The import can contain subdirectories. This will parse and display the contents of the import and wait until you select which series to archive before any data will be imported. Preferable if you have smaller batches of data, or data that must be parsed differently than the default global method
Step 2 - (a) Global Import
Overview
DICOM files are parsed into subject/study/series groups using 3 DICOM header tags (or set of tags). These are parsed in order.
Subject - PatientID (0010,0020) - this uniquely identifies the subject. PatientID will match to existing subjects in the database (regardless of project enrollment) by comparing the UID, and alternate UID fields in NiDB
Study - Modality (0008,0020) & StudyDate (0008,0020) & StudyTime (0008,0030) - this set of tags uniquely identifies the study. This will match to existing studies within NiDB. Those existing studies must also be associated with the Subject from the previous step.
Copy/move DICOM files into the import directory
Check your configuration (Admin-->Settings-->NiDB Config) for the incomingdir variable. It will most likely be /nidb/data/dicomincoming. This will be the directory NiDB will search every minute for new data, which will then be automatically parsed and archived.
From a Linux terminal on the NiDB server, run the following commands as the nidb user to find and copy all dicom files.
You can also move files, instead of copying, by replacing cp with mv. If your files have a different extension, such as .IMG, or no extension, you can change that in the command as well.
Check status of archiving
Go to Admin-->Modules-->import-->View Logs to view the log files generated by the import process. The global import process expects to process a stream of data, where there is no beginning and no end, so the log file will not delineate this particular import from any other data that were found and archived. This import method is also designed to take a stream of potentially random data, and only utilize readable DICOM files.
The global import method will only archive readable DICOM files. Any unreadable or non-DICOM files will be moved to the /nidb/data/problem directory.
Here's a sample section of import log file. Log files can be very detailed, but any errors will show up here. Problems
You may ask... where's my data? You can search, on the Search page, by ID, dates, protocol, and other information.
Potential problems
The global import method will group files by the method specified above. If one of those fields are blank for some or all of your data, that could cause the archiving process to create a subject/study/series hierarchy that does not match what you are expecting. Sometimes you will find that each series is placed in it's own study. Or each study is placed in a unique subject.
To troubleshoot these issues, try using the individual import method described below. This allows you to select different matching criteria and preview the data found before archiving it.
Step 2 - (b) Individual Import
This tutorial is based on the Importing data section of the User's guide, but the content on the current page is more detailed. See link to the user's guide:
Go to Data-->Import Imaging. Click the New Import button.
Fill out the required information. Choose if you are uploading a file, or if the data is located in an NFS path. Select the modality and project. Then select the matching criteria, which will determine how the data will structured into a subject/study/series hierarchy. When everything is all set, click Upload.
Check the status of the import by going to Data-->Import Imaging and finding the import that was just created. The current import step will be displayed, and you can click View Import to view more details. Details of the import will be displayed.
If the import has finished parsing, it will ask for your attention. You'll need to review the subjects, studies, and series that were found and then select which series you want to archive.
Finding & exporting data
Search
Finding Imaging Data
The search page helps to find the imaging data. The following are the parts of the search page that can be used to define and refine the search.
Subject
There are various subsections on the search screen, those are self-explanatory. The first section is “Subject” as shown in the following figure. A search in this section can be defined based on:
Subject Ids (UIDs or Alternate UIDs)
Name (First or Last)
Range on date of birth
Enrollment
The next section is enrollment where a search can be restricted based on projects. One can choose a single project or a list of projects from the drop down menu. Also a sub-group if defined can be specified.
Study
In this part search parameters / variables in a project / study can be defined to refine the search. A search can be restricted based on, study Ids, Alternative study IDs, range of study date, modality (MRI,EEG, etc.), Institution (In case of multiple institutions), equipment, Physician name, Operator name, visit type, and study group
Series
A more specific search based on protocol, MR sequence, image type. MR TR value, series number (if a specific series of images is needed) and series group can be defined.
Output
In this section, the structure of the search output can be defined. The output can be grouped based on study or all the series together. The output can be stored in “.csv” file using the summary tab. The Analysis tab is used to structure the pipeline analysis results.
Other Data Queries
Other than imaging data can also be quried using the similar way as mentioned above for the imaging data above. However the required non-imaging data modality can be selected from the modality dropdown menu in the study section as shown below
ID Mapping
The Ids can be mapped using the "Data" menu from the main menu. One can go to the Id-maper page by clicking on the "ID mapper" link as shown below or by selection the ID mapper sub-menu.
The following page will appear that is used to map various Ids.
A list of Ids to be mapped separated by space, tab, period, semicolon, colon, comma and newline can be typed in the box above. the mapping can be restricted to a certain project by selecting the project name from the dropdown menu. The search can only be restricted to the current instance, undeleted subjects and exact matches by selecting the approprriate selection box shown above.
Export
After searching the required data, it can be exported to various destinations.
For this purpose a section named "Transfer & Export Data" will appear at the end of a search as shown in a fiigure below.
Following are some destinations where the searched data can be exported:
Export to NFS
To export the data to a NFS location, you can select the "Linux NFS Mount" option and type the NFS path where you want to download the data.
Export to Remote FTP Site
To export the data to a remote FTP location, you can select the "Remote FTP Site" option and type the FTP information where you want to download the data.
Export to Remote NiDB Site
To export the data to a remote NiDB site, you can select the "Remote NiDB Site" option and select the NiDB site from a drop down menue where you want to download the data.
Export via Web Download
You can select the data to be downloased to the local http location. you can select "Web http download" option for this purpose as shown below.
Export to NDAR/ RDoCdb/NDA
NiDB has a unique ability to download the data that is required to submit to NDAR/RDoC/NDA. It automatically prepares the data according to the NDAR submission requirnments. Also one can download the data inforamation in terms of .csv that is required to submit NDAR data. The following the the two options to download the data accordigly.
Export status
After starting the transfer by clicking the transfer button at the end of the search, a transfer request will be send to NiDB. The status of a request can be seen via Search-->Export Status page as shown below. The status of 30 most recent serches will be shown by default. All the previoius searches can be seen by clicking on the "Show all" button on the left corner of the screen as shown below.
Public Downloads
This is another option in the "Transfer and Export" section to transfer "searched data" and to make it as public downloadable. There are options to describe briefly about the dataset, setting up a passowrd for secure tranmitability and making the public download updateable to the users having rights on the data. One can select "Required Registration" option to restrict the dowload to NiDB users only. An expiration date for the download can be set to 7, 30 and 90 days. One should select "No Expiration" if the public data should be available for longer than 90 days or for indefinite period.
The "public Download" will be created after pressing the "Transfer" button at the end of search page. The public downloads can be accessed via Data --> Public Download menue. The following is a a page with Public download information:
Request a Dataset
Sometimes you as a user have no idea how the data is stored for a particular project, or you don't have permissions to the project. If you are lucky enough to have a data manager, you can send a request for data to a data manager who can then follow your instructions to find the data and send it to them.
To request a dataset from NiDB-based database, select Data --> Request a Dataset. The following page will appear.
Click Submit New Dataset Request button, and fill the following form to request a dataset from the NiDB-databse.
Analysis Builder
Analysis builder is a report generating tool that can be used to generate various types of reports using the stored data in NiDB. This report generating tool builds on the base of various types of data variables that is being stored in the NiDB. This is different than the search tool where you can search different types of data and download it. In this tool you can search the variables those are generated and stored / imported in the NiDB (Example: You can query the variables generated from a task using MRI / EEG data, but not the actual EEG and MRI data). Analysis builder can be reached via Search --> Analysis Builder or you can go to a specific project front page and select the option (Analysis Builder) on the right from "Project tool and settings" and you will land on the following screen.
Usage
Analysis builder is designed to create reports based on various types of parameters from different types of measures. It has been categorized in the various types of measures like MR, EEG, ET, etc. as shown below.
After selecting the project from the drop down menu "Select Project", click "Use Project" button. Now the project just selected will be the current project for data retrieval.
Using the squirrel library
Overview of how to use the squirrel C++ library
The squirrel library is built using the Qt framework and gdcm. Both are available as open-source, and make development of the squirrel library much more efficient.
The Qt and gdcm libraries (or DLLs on Windows) will need to be redistributed along with any programs that use the squirrel library.
Including squirrel
The squirrel library can be included at the top of your program. Make sure the path to the squirrel library is in the INCLUDE path for your compiler.
Reading
Create an object and read an existing squirrel package
Iterating subject/study/series data
Functions are provided to retrieve lists of objects.
Finding data
How to get a copy of an object, for reading or searching a squirrel package.
How to modify existing objects in a package.
Experiments and Pipelines
Access to these objects is similar to accessing subjects
Writing
Create a new squirrel package and add a subject
Add a study to existing subject
Write package
package
JSON object
This object contains information about the squirrel package.
JSON variables
🔵 Primary key
🔴 Required
Variable
Type
Default
Description
Variable options
subjectDirFormat, studyDirFormat, seriesDirFormat
orig - Original subject, study, series directory structure format. Example S1234ABC/1/1
seq - Sequential. Zero-padded sequential numbers. Example 00001/0001/00001
dataFormat
orig - Original, raw data format. If the original format was DICOM, the output format should be DICOM. See for details.
anon - If original format is DICOM, write anonymized DICOM, removing most PHI, except dates. See for details.
Notes
Notes about the package are stored here. This includes import and export logs, and notes from imported files. This is generally a freeform object, but notes can be divided into sections.
Section
Description
Directory structure
Files associated with this section are stored in the following directory
/
subjects
JSON array
This object is an array of subjects, with information about each subject.
JSON variables
🔵 Primary key
🔴 Required
🟡 Computed (squirrel writer/reader should handle these variables)
Variable
Type
Default
Description (and possible values)
Directory structure
Files associated with this section are stored in the following directory
/data/<SubjectID>
series
JSON array
An array of series. Basic series information is stored in the main squirrel.json file. Extended information including series parameters such as DICOM tags are stored in a params.json file in the series directory.
JSON variables
🔵 Primary key
🔴 Required
🟡 Computed (squirrel writer/reader should handle these variables)
Variable
Type
Default
Description
Directory structure
Files associated with this section are stored in the following directory. subjectID, studyNum, seriesNum are the actual subject ID, study number, and series number. For example /data/S1234ABC/1/1.
/data/<SubjectID>/<StudyNum>/<SeriesNum>
Behavioral data is stored in
/data/<SubjectID>/<StudyNum>/<SeriesNum>/beh
data-steps
JSON array
dataSpec describes the criteria used to find data if searching a database (NiDB for example, since this pipeline is usually connected to a database). The dataSpec is a JSON array of the following variables. Search variables specify how to find data in a database, and Export variables specify how the data is exported.
JSON variables
🔵 Primary key
🔴 Required
interventions
JSON array
Interventions represent any substances or procedures administered to a participant; through a clinical trial or the participant’s use of prescription or recreational drugs. Detailed variables are available to record exactly how much and when a drug is administered. This allows searching by dose amount, or other variable.
JSON variables
🔵 Primary key
🔴 Required
Store clinical trial information (manage data across multiple days & dose times, etc)
Built-in DICOM receiver. Send DICOM data from PACS or MRI directly to NiDB
Bulk import of imaging data
User and project based permissions, with project admin roles
Search and manipulate data from subjects across projects
Automated imaging analysis pipeline system
"Mini-pipeline" module to process behavioral data files (extract timings)
All stored data is searchable. Combine results from pipelines, QC output, behavioral data, and more in one searchable
Export data to NFS, FTP, Web download, NDA (NIMH Data Archive format), or export to a remote NiDB server
Export to squirrel format
Project level checklists for imaging data
Automated motion correction and other QC for MRI data
Series - SeriesNumber (0020,0011) - this uniquely identifies the series. This will match to existing series in NiDB based on this series number, as well as the study and subject from the previous step.
/* iterate through the subjects */
QList<squirrelSubject> subjects = sqrl->GetSubjectList();
foreach (squirrelSubject subject, subjects) {
cout <<"Found subject [" + subject.ID + "]");
/* get studies */
QList<squirrelStudy> studies = sqrl->GetStudyList(subject.GetObjectID());
foreach (squirrelStudy study, studies) {
n->Log(QString("Found study [%1]").arg(study.StudyNumber));
/* get series */
QList<squirrelSeries> serieses = sqrl->GetSeriesList(study.GetObjectID());
foreach (squirrelSeries series, serieses) {
n->Log(QString("Found series [%1]").arg(series.SeriesNumber));
int numfiles = series.files.size();
}
}
}
/* get a subject by ID, the returned object is read-only */
qint64 subjectObjectID = FindSubject("12345");
squirrelSubject subject = GetSubject(subjectObjectID);
QString guid = subject.GUID;
subject.PrintDetails();
/* get a subject by SubjectUID (DICOM field) */
squirrelStudy study = GetStudy(FindSubjectByUID("08.03.21-17:51:10-STD-1.3.12.2.1107.5.3.7.20207"));
QString studyDesc = study.Description;
study.PrintDetails();
/* get study by subject ID, and study number */
squirrelStudy study = GetStudy(FindStudy("12345", 2));
QString studyEquipment = study.Equipment;
study.PrintDetails();
/* get series by seriesUID (DICOM field) */
squirrelSeries series = GetStudy(FindSeriesByUID("09.03.21-17:51:10-STD-1.3.12.2.1107.5.3.7.20207"));
QDateTime seriesDate = series.DateTime;
series.PrintDetails();
/* get series by subjectID 12345, study number 2, and series number 15 */
squirrelSeries series = GetStudy(FindSeries("12345", 2, 15));
QString seriesProtocol = series.Protocol;
series.PrintDetails();
/* get an analysis by subject ID 12345, study 2, and analysis 'freesurfer' */
squirrelAnalysis GetAnalysis(FindAnalysis("12345", 2, "freesurfer"));
/* get other objects by their names */
squirrelDataDictionary dataDictionary = GetDataDictionary(FindDataDictionary("MyDataDict"));
squirrelExperiment experiment = GetExperiment(FindExperiment("MyExperiment"));
squirrelGroupAnalysis groupAnalysis = GetGroupAnalysis(FindGroupAnalysis("MyGroupAnalysis"));
squirrelPipeline pipeline = GetPipeline(FindPipeline("MyPipeline"));
/* find a subject */
/* iterate by list to access copies of the objects(read only) */
foreach (squirrelExperiment exp, sqrl->experimentList) {
cout << exp.experimentName << endl;
}
foreach (squirrelPipeline pipe, sqrl->pipelineList) {
cout << pipe.pipelineName << endl;
}
/* iterate by index to change the original object (read/write) */
for (int i=0; i < sqrl->experimentList.size(); i++) {
sqrl->experimentList[i].numFiles = 0;
}
for (int i=0; i < sqrl->pipelineList.size(); i++) {
sqrl->pipelineList[i].numFiles = 0;
}
squirrel *sqrl = new squirrel();
/* set the package details */
sqrl->name = "LotsOfData";
sqrl->description = "My First squirrel package;
sqrl->datetime = QDateTime()::currentDateTime();
sqrl->subjectDirFormat = "orig";
sqrl->studyDirFormat = "orig";
sqrl->seriesDirFormat = "orig;
sqrl->dataFormat = "nifti";
/* create a subject */
squirrelSubject sqrlSubject;
sqrlSubject.ID = "123456";
sqrlSubject.alternateIDs = QString("Alt1, 023043").split(",");
sqrlSubject.GUID = "NDAR12345678";
sqrlSubject.dateOfBirth.fromString("2000-01-01", "yyyy-MM-dd");
sqrlSubject.sex = "O";
sqrlSubject.gender = "O";
sqrlSubject.ethnicity1 = subjectInfo->GetValue("ethnicity1");
sqrlSubject.ethnicity2 = subjectInfo->GetValue("ethnicity2");
/* add the subject. This subject has only demographics, there are no studies or */
sqrl->addSubject(sqrlSubject);
/* see if we can find a subject by ID */
int subjIndex = sqrl->GetSubjectIndex("123456");
if (subjIndex >= 0) {
/* build the study object */
squirrelStudy sqrlStudy;
sqrlStudy.number = 1;
sqrlStudy.dateTime.fromString("2023-06-19 15:34:56", "yyyy-MM-dd hh:mm:ss");
sqrlStudy.ageAtStudy = 34.5;
sqrlStudy.height = 1.5; // meters
sqrlStudy.weight = 75.9; // kg
sqrlStudy.modality = "MR";
sqrlStudy.description = "MJ and driving";
sqrlStudy.studyUID = "";
sqrlStudy.visitType = "FirstVisit";
sqrlStudy.dayNumber = 1;
sqrlStudy.timePoint = 1;
sqrlStudy.equipment = "Siemens 3T Prisma;
sqrl->subjectList[subjIndex].addStudy(sqrlStudy);
}
else {
cout << "Unable to find subject by ID [123456]" << endl;
}
QString outdir = "/home/squirrel/thedata" /* output directory of the squirrel package */
QString zippath; /* the full filepath of the written zip file */
sqrl->write(outdir, zippath);++
Range on age
Sex-based
Subject group
Datetime the package was created.
Description
string
Longer description of the package.
License
string
Any sharing or license notes, or LICENSE files.
NiDBVersion
string
The NiDB version which wrote the package.
Notes
JSON object
See details below.
PackageName
string
🔴🔵
Short name of the package.
PackageFormat
string
squirrel
Always squirrel.
Readme
string
Any README files.
SeriesDirectoryFormat
string
orig
orig, seq (see details below).
SquirrelVersion
string
Squirrel format version.
SquirrelBuild
string
Build version of the squirrel library and utilities.
StudyDirectoryFormat
string
orig
orig, seq (see details below).
SubjectDirectoryFormat
string
orig
orig, seq (see details below).
anonfull
- If original format is DICOM, the files will be fully anonymized, by removing dates, times, locations in addition to PHI. See
for details.
nifti3d - Nifti 3D format
Example file001.nii, file002.nii, file003.nii
nifti3dgz - gzipped Nifti 3D format
Example file001.nii.gz, file002.nii.gz, file003.nii.gz
nifti4d - Nifti 4D format
Example file.nii
nifti4dgz - gzipped Nifti 4D format
Example file.nii.gz
Changes
string
Any CHANGE files.
DataFormat
string
orig
Data format for imaging data to be written. Squirrel should attempt to convert to the specified format if possible. orig, anon, anonfull, nifti3d, nifti3dgz, nifti4d, nifti4dgz (see details below).
Datetime
datetime
import
Any notes related to import. BIDS files such as README and CHANGES are stored here.
merge
Any notes related to the merging of datasets. Such as information about renumbering of subject IDs
This is a list of common modalities available within squirrel. However, squirrel does not restrict modality codes, so any modality could be used in a dataset.
This section describes how to manage meta data and imaging data files for subjects enrolled in projects.
Managing Subjects
Editing IDs & Demographics
Find your subject by UID or other methods. On the subject's page, you'll see a demographic summary on the left, and the subject's enrollments and studies on the right. The demographics list may show a red box around the DOB if it appears to be a placeholder date like 1900-01-01 or 1776-07-04. On the left-hand side of the page, click the Edit subject button (#2 on the image below). This will show the form to edit demographics. If the edit button is missing, you can check your permissions for the subject by expanding the permissions listing (#1 on the image below).
When editing subject demographic information, required fields are highlighted. Most fields are optional. You can edit IDs on this page, which are reflected for the subject in all projects. The primary alternate ID should have an asterisk in front of it. The primary alternate ID will now be with the main ID for this subject in the specified project. See the ID note below. Click Update to save the demographic information. Confirm on the following page.
A Note About IDs - Identifiers help identify a subject. They're supposed to be unique, but a subject may be assigned IDs after being enrolled in multiple projects. Each project may uniquely identify the subject by the UID which is automatically generated by the system. Or the subject may be identified by an ID generated somewhere else. Maybe the ID is generated by RedCap, or you are given a list of IDs that you need to use for your subjects. If this subject is enrolled in multiple projects, they might have multiple IDs. NiDB is designed to handle this, but it can be a little complicated. Here are some definitions that may help make it simpler
Below are some terms used to describe IDs within NiDB
Term
Definition
Project Enrollments
On the subject's main page, you'll see a list of enrollments on the right hand side. To enroll the subject in a new project, select the project and click Enroll. This will create a new enrollment.
You can edit an existing enrollment by clicking the Edit Enrollment button. There isn't a whole of information available on this page, but enrollment checklists can be useful to check if a subject has completed all of the items for the project. Subjects can be marked as excluded, complete. Enrollment group can also be specified, such as CONTROL or PATIENT.
Timelines
For projects with a chronological component, you can view a timeline of series for this enrollment. Click the View Timeline button on the subject's page, for the enrollment. It will display a timeline of series. Bottom axis displays the date/time. You can change the parameters of the timeline by selecting date range or series.
Enroll in Different Project
If your subject is enrolled in a project, but you need to move the enrollment (and all of the imaging studies, enrollment info, assessments, measures, drugs, and vitals) into a different project, you can do that by expanding the Enroll in different project section. Select the new project, and click Move. You must be an admin to do this.
Merging
You must have admin permissions to merge subjects. To merge subjects, first go into one of the subject's main pages. On the lefthand side of the page, expand the Operations section. Click Merge with... and it will bring up the merge page. On the top of the page, you can add other UIDs you want to merge. Once all subjects are added (up to 4), they will be displayed side-by-side.
Select the UID to be the final merged UID. Enter all demographic information that will be in the final UID into that column. Once merged, only the information in that column will be saved for the final subject. All other subjects will be marked inactive. All of the imaging studies will be moved from the other subjects to the final subject. When all information is complete, click Merge. The merge will be queued and will be run in the background. Check the status of the merge under My Account → File IO.
Deleting
Only admins can delete subjects. To delete a subject, go to the subject's page. On the lefthand side, expand the Operations section and click the Delete button. It will confirm that you want to delete this subject. Confirm on the next page. Subjects are not actually removed from the NiDB system, but are instead marked as inactive. Inactive subjects do not appear in search results or summaries, but will show up in certain sections of the project page and if searching by UID directly. A subject can be undeleted if necessary.
Undeleting
Subjects can be undeleted by following the same process as deleting a subject, except the Undelete button will appear under the Operations section of the subject's page.
Managing Studies
MRI/DICOM vs non-MRI/DICOM Studies
DICOM Derived - Studies derived from DICOM data are displayed differently than other modalities because they contain detailed header files which are imported automatically. Because of the complex ways in which subject/study/series heirarchy are stored in DICOM files, archiving is done completely automatically.
MRI - MRI studies allow for storage of behavioral data associated with fMRI tasks. Other data such as eye tracking, simultaneous EEG, or other series specific data can be stored in the behavioral data section of MRI series.
All Other Modalities - Series information is less detailed, series can be created manually, and there is no option to store behavioral data for each series.
Editing Study Information
For any modality, edit a study by viewing the study page and clicking the Edit Study button on the lower left of the page. Depending on the modality, different study information may be available.
For non-MRI modalities, the Study date/time (and all series date/times), visit type, visit number, and visit timepoint can be edited directly on the study page without clicking the Edit Study button.
Merging Studies
Occasionally, weird things can happen when importing data such as each series of an MRI study being inserted into it's own study. If the single study had 15 series, it might create 15 seperate studies, each with one series. This can be fixed by merging all of the series into one study. To merge studies (of the same subject/enrollment/modality) together, go into the study page and click the Operations button. A sub-menu will pop up with a Merge Study with... button. A list of available studies will be displayed.
It will display a list of studies of the same modality that can be merged. Choose the study number you want as the final study, and the merge method. CLick Merge, and your merge will be queued. Check the status of the merge by going to My Account → File IO.
Moving Studies
Studies can be moved into different projects (different enrollment) or to different subjects. To move studies, click the Operations button on the bottom left of the study page which will display options for moving the study.
To move to an existing subject, enter the the UID and click Move. To move the study to an existing enrollment (a project the subject is already enrolled in) select the project and click Move.
Managing Series
Viewing series information
For DICOM derived series, most information will be displayed on the main study page. To view a thumbnail of the series, click the icon below the protocol name. To view DICOM header information, click the protocol name. To view detailed QA information, click the chart icon. To view or edit ratings, click the speech bubble icon. To download this series as a zip file, click the download icon under the Files column. To download the behavior data (if MR series) click the download icon under the Beh column. To view a list of files associated with the series, click View file list button.
Editing series information
Series information can only be edited for non-DICOM derived series. To edit the series information (protocol, datetime, notes) click the series number, edit the information, and click Update. To upload new files to the series, drag and drop them onto the Upload button. To manage the existing files, click the Manage n files button. This will display a list of the files associated with this series. Clicking the file name will download the file. Editing the filename in the Rename column will allow you to rename the file (press enter to finalize the rename). Delete the file by clicking the trash icon. Download the entire series as a .zip file by clicking the Download button.
If the study is an MR modality, you can upload behavioral data by dragging and dropping files onto the Upload button. Behavioral files can be edited by clicking on the number under the Beh column.
Series Operations
For non-DICOM series, you can delete series by selecting the series using the checkbox in the rightmost column and clicking the Delete button.
For DICOM-derived series, more operations are available. Select the series you want to perform an operation on and click With Selected.... A menu will pop up with options
Operation
Description
Groups
Groups can be created of existing items, such as subjects, studies, or series. This is useful if you need to group subjects together that are in different projects, or if you want to group a subset of studies from one or more projects. Groups can only contain one type of data, ie they can only contain subjects, studies, or series. It is a similar concept to a SQL database View. Groups can be used in the Search page, and pipelines.
Create new group
Under the Subjects menu item, click the Groups menu item. A list of existing groups will be displayed, and a small form to create a new group. To create a new group, enter a group name, select the group type (subject, study, series) and click Create Group.
Click on a group name to edit the group members, or add or delete group members.
pipelines
JSON array
Pipelines are the methods used to analyze data after it has been collected. In other words, the experiment provides the methods to collect the data and the pipelines provide the methods to analyze the data once it has been collected.
JSON Variables
🔵 Primary key
🔴 Required
🟡 Computed (squirrel writer/reader should handle these variables)
Variable
Type
Default
Description
Directory structure
Files associated with this section are stored in the following directory. PipelineName is the unique name of the pipeline.
/pipelines/<PipelineName>
Building squirrel library and utils
Overview
The following OS configurations have been tested to build squirrel with Qt 6.5
Compatible
Study Num
The unique number assigned by the system for each of a subject's studies. This number is unique within a subject, regardless of enrollment. For example, if a subject is enrolled in multiple projects, they may have studies 1,2,3 in project A and studies 5,6 in project B
StudyID
This ID basically concatenates the UID and the study num: for example S1234ABC8
Alternate StudyID
Sometimes an individual imaging session (study) has it's own unique ID. For example, some imaging centers will give a subject a new ID every time they go into the scanner. This is a place to store that ID
Hide
Hides the series from searches and summary displays. The series will still be visible in the study page
Un-hide
Does the opposite of hiding the series
Reset QC
This will delete all of the QC information and will requeue the series to have QC information calculated
Delete
Deletes the series. Completely remove the series from the database. The series files will not be deleted from disk, instead the series directory will be renamed on disk
UID
Unique ID, assigned by the system. This ID is unique to this installation of NiDB. If this subject is transferred to another NiDB installation, this ID will change
Alternate IDs
Comma separated list of IDs that are associated with this subject
Primary alternate ID
This is an alternate ID, which should be unique within the project.
For example, if the project uses IDs in the format 2xxx and the subject ID is 2382, then their ID should be labeled as *2382
Rename
Renames the protocol name of the series
Edit Notes
Edits the notes displayed on the study page for that series
Move to new study
This is useful if you need to move series out of this study into a new study. For example if multiple series were grouped as a single study, but some of those series should actually be separate, this is a good option to use to separate them. This is basically the opposite of merging studies
Submit username.
ClusterQueue
string
Queue to submit jobs.
ClusterSubmitHost
string
Hostname to submit jobs.
CompleteFiles
JSON array
JSON array of complete files, with relative paths to analysisroot.
CreateDate
datetime
🔴
Date the pipeline was created.
DataCopyMethod
string
How the data is copied to the analysis directory: cp, softlink, hardlink.
DependencyDirectory
string
DependencyLevel
string
DependencyLinkType
string
Description
string
Longer pipeline description.
DirectoryStructure
string
Directory
string
Directory where the analyses for this pipeline will be stored. Leave blank to use the default location.
Group
string
ID or name of a group on which this pipeline will run
GroupType
string
Either subject or study
Level
number
🔴
subject-level analysis (1) or group-level analysis (2).
MaxWallTime
number
Maximum allowed clock (wall) time in minutes for the analysis to run.
ClusterMemory
number
Amount of memory in GB requested for a running job.
PipelineName
string
🔴🔵
Pipeline name.
Notes
string
Extended notes about the pipeline
NumberConcurrentAnalyses
number
1
Number of analyses allowed to run at the same time. This number if managed by NiDB and is different than grid engine queue size.
ClusterNumberCores
number
1
Number of CPU cores requested for a running job.
ParentPipelines
string
Comma separated list of parent pipelines.
ResultScript
string
Executable script to be run at completion of the analysis to find and insert results back into NiDB.
SubmitDelay
number
Delay in hours, after the study datetime, to submit to the cluster. Allows time to upload behavioral data.
TempDirectory
string
The path to a temporary directory if it is used, on a compute node.
UseProfile
bool
true if using the profile option, false otherwise.
UseTempDirectory
bool
true if using a temporary directory, false otherwise.
Version
number
1
Version of the pipeline.
PrimaryScript
string
🔴
See details of
SecondaryScript
string
See details of .
DataStepCount
number
🟡
Number of data steps.
VirtualPath
string
🟡
Path of this pipeline within the squirrel package.
JSON array
See
ClusterType
string
Compute cluster engine (sge or slurm).
ClusterUser
string
RHEL compatible Linux 8 (not 8.6)
CentOS 8 (not CentOS 8 Stream)
CentOS 7
Windows 10/11
squirrel library and utils cannot be built on CentOS Stream 8 or Rocky Linux 8.6. There are kernel bugs which do not work correctly with Qt's QProcess library. This can lead to inconsistencies when running shell commands, and qmake build errors.
Other OS configurations may work to build squirrel, but have not been tested.
Make the installer executable chmod 777 qt-unified-linux-x64-x.x.x-online.run
Run ./qt-unified-linux-x64-x.x.x-online.run
The Qt Maintenance Tool will start. An account is required to download Qt open source.
On the components screen, select the checkbox for Qt 6.5.3 → Desktop gcc 64-bit
Install the following as root
Install Qt
Download Qt open-source from
Make the installer executable chmod 777 qt-unified-linux-x64-x.x.x-online.run
Install the following as root
Install Qt
Download Qt open-source from
Make the installer executable chmod 777 qt-unified-linux-x64-x.x.x-online.run
Install the following as root
Install Qt
Download Qt open-source from
Make the installer executable chmod 777 qt-unified-linux-x64-x.x.x-online.run
Install build environment
Install edition, available from Microsoft. Install the C++ extensions.
Install
Building the squirrel Library
Once the build environment is setup, the build process can be performed by script. The build.sh script will build the squirrel library files and the squirrel utils.
The first time building squirrel on this machine, perform the following
cd ~
wget https://github.com/gbook/squirrel/archive/main.zip
unzip main.zip
mv squirrel-main squirrel
cd squirrel
./build.sh
This will build gdcm (squirrel depends on GDCM for reading DICOM headers), squirrel lib, and squirrel-gui.
All subsequent builds on this machine can be done with the following
cd ~/squirrel
./build.sh
Using Github Desktop, clone the squirrel repository to C:\squirrel
Once you've been granted access to the squirrel project on github, you'll need to add your server's SSH key to your github account (github.com --> click your username --> Settings --> SSH and GPG keys). There are directions on the github site for how to do this. Then you can clone the current source code into your server.
Cloning a new repository with SSH
This will create a git repository called squirrel in your home directory.
Committing changes
Updating your repository
To keep your local copy of the repository up to date, you'll need to pull any changes from github.
Troubleshooting
Build freezes
This may happen if the build machine does not have enough RAM or processors. More likely this is happening inside of a VM in which the VM does not have enough RAM or processors allocated.
Build fails with "QMAKE_CXX.COMPILER_MACROS not defined"
This error happens because of a kernel bug in RHEL 8.6. Downgrade to 8.5 or upgrade to 8.7.
Library error
This example is from the nidb example. If you get an error similar to the following, you'll need to install the missing library
You can check which libraries are missing by running ldd on the nidb executable
Copy the missing library file(s) to /lib as root. Then run ldconfig to register any new libraries.
Virtual Machine Has No Network
If you are using a virtual machine to build, there are a couple of weird bugs in VMWare Workstation Player (possibly other VMWare products as well) where the network adapters on a Linux guest simply stop working. You can't activate them, you can't do anything with them, they just are offline and can't be activated. Or it's connected and network connection is present, but your VM is inaccessible from the outside.
Try these fixes to get the network back:
While the VM is running, suspend the guest OS. Wait for it to suspend and close itself. Then resume the guest OS. No idea why, but this should fix the lack of network adapter in Linux.
Open the VM settings. Go to network, and click the button to edit the bridged adapters. Uncheck the VM adapter. This is if you are using bridged networking only.
Switch to NAT networking. This may be better if you are connected to a public wifi.
Using the squirrel Library
Copy the squirrel library files to the lib directory. The libs will then be available for the whole system.
cd ~/squirrel
git commit -am "Comments about the changes"
git push origin main
cd ~/squirrel
git pull origin main
./nidb: error while loading shared libraries: libsquirrel.so.1: cannot open shared object file: No such file or directory./nidb: error while loading shared libraries: libsquirrel.so.1: cannot open shared object file: No such file or directory
cd ~/squirrel/bin/squirrel
sudo cp -uv libsquirrel* /lib/
Importing data
Data Hierarchy
Data within NiDB is stored in a hierarchy:
The top level data item is a subject.
Subjects are enrolled in projects
Each subject has imaging studies, associated with an enrollment
Each study has series
Each series has files
See diagrams and examples of the hierarchy .
Create Subject
On the main menu, find the Subjects tab. A page will be displayed in which you can search for existing subjects, and a button to create a new subject
Subjects page menu item
Create Subject button
Obliterate subjects button: an intimidating sounding button that only appears for NiDB admins
Fill out as much information as you need. Name, Sex, DOB are required to ensure a unique subject. Most other information is optional. While fields for contact information are available, be mindful and consider whether you really need to fill those out. Chances are that contact information for research participants is already stored in a more temporary location and does not need to exist for as long as the imaging data does.
The subject will now be assigned a UID, but will not be enrolled in any projects. Enroll the subject in the next section.
Importing Subjects from Recap
For a project, subjects can be imported from redcap using an option on the project page as shown below:
Fill the following form requiring information for API connection to redcap and required redcap field names. After providing the required fields click "Subjects Information" button.
If all the above information is correct, then the list of the subjects from redcap will be shown as follows:
There can be four types of subjects in the list. Those are:
Ready to Import: are the one those are in redcap and can be imported.
Found in an other project: these are present in another project under inthe NiDB database. They can also be imported, but need to be selected to get import.
Processing: these are already in the process of being imported and cannot be selected to import.
After selecting the required subjects click "Import Selected Subjects" to start the import process.
Enroll Subject in a Project
In the enrollments section, select the project you want to enroll in, and click Enroll. The subject will now be enrolled in the project. Permissions within NiDB are determined by the project, which is in theory associated with an IRB approved protocol. If a subject is not enrolled in a project, the default is to have no permissions to view or edit the subject. Now that the subject is part of a project, you will have permissions to edit the subject's details. Once enrolled, you can edit the enrollment details and create studies.
Create Imaging Study
There are three options for creating studies
Create a single empty study for a specific modality
Create a single study prefilled with empty series, from a template
Create a group of studies with empty series, from a template
Click Create new imaging studies to see these options. To create study templates or project templates, see Study Templates.
Once the study is created, it will appear in the list of imaging studies. Studies are given a unique number starting at 1 in order in which they are created. The studies are sorted by date in this list. While studies will often appear sequential by date and study number, this is because study numbers are incremented by each new study date added, and each new study often occurs at a later date. However, studies may be numbered in any order, regardless of date. If you create several studies for previous dates, if importing older data, if deleting or merging studies, this will cause study numbers to appear random. This is the normal behavior.
Create Single Series/Upload data
MRI and non-MRI data are handled differently, because of the substantial amount of information contained in MRI headers. MRI series are created automatically during import, while all other imaging data can be imported automatically or manually.
MRI
MRI series cannot be created manually, they must be imported as part of a dataset. See Bulk Import of Large Datasets or Automatic Import via DICOM receiver. MRI series can be managed individually after automatic importing has occured.
Non-MRI
Non-MRI data be imported automatically or manually. To manually import non-MRI data, first go into the imaging study. Then fill out the series number, protocol, date, notes. Series number and date are automatically filled, so change these if you need to. When done filling out the fields, click Create Series.
The series will be created, with an option to create another series below it. Upload files by clicking the Upload button, or by dragging and dropping onto the Upload button. If you need to delete or rename files, click the Manage files button. This will display a list of files in that series, and you can rename the file by typing in the filename box.
Bulk Import of Large Datasets
The imaging import page can be accessed by the Data → Import Imaging menu. Because datasets can be large and take hours to days to completely import and archive, they are queued in import jobs. To import a dataset, click the New Import button.
This will bring up the new import page.
Data Location
Data Location Criteria
Notes
Data Modality
Data Modality Criteria
Notes
Destination Project - Data must be imported into an existing project.
Matching Criteria - DICOM data only
Matching Field
Notes
After all of the import information is filled out, click Upload. You can view the import by clicking on it. The import has 5 stages, described below.
Import Stage
Possible Status & Description
Once the parsing stage is complete, you will need to select which series you want to import. This step gives you the opportunity to see exactly what datasets were identified in the import. If you were expecting a dataset to be in the import, but it wasn't found, this is a chance to find out why. Parsing issues such as missing data or duplicate datasets are often related to the matching criteria options. Sometimes the uniquely identifying information is not contained in the DICOM field it is supposed to be. That can lead to all series being put into one subject, or a new subject/study created for each series. There are so many ways in which data is organized and uniquely identified, so careful inspection of your data headers is important to select the right options.
If you find that none of the available matching options work for your data, contact the NiDB development team because we want to cover all import formats!
After you've selected the series you want to archive, click the Archive button. This will move the import to the next stage and queue the data to be archived.
At the end of archiving, the import should have a complete status. If there are any errors, the import will be marked error and you can view the error messages.
Automatic Import via DICOM receiver
NiDB was originally designed to automatically import MRI data as it is collected on the scanner, so this method of import is the most robust. After each series is reconstructed on the MRI, it is automatically sent to a DICOM node (DICOM receiver running on NiDB). From there, NiDB parses incoming data and will automatically create the subject/enrollment/study/series for each DICOM file it receives.
How to make DICOM imports more efficient
Write mosaic images - Depending on the MRI scanner, the option to write one DICOM file per slice or per volume may be available. On Siemens MRIs, there should be an option for EPI data to write mosaic images. For example, if your EPI volume has 36 slices, the scanner would normally write out 36 separate files, each with an entire DICOM header. If you select write mosaic images, it will write one DICOM file with one header for all 36 slices. If you have 1000 BOLD reps in a timeseries, this time savings can be significant.
Bulk Upload of non-MRI data
For non-MRI data, you can upload data in bulk to existing series. For example, if you have a directory full of task files, but each file belongs to a different subject. Rather than go into each subject/study and upload the file individually, you can upload the files as a batch. This method is best when used in conjunction with study templates.
This upload method assumes that you have already created all of the subjects, studies, and series. The series can be empty, or not. To create empty studies by template, see the Create Imaging Study section on use of templates.
Start by searching on the Search page for the series you are interested in uploading data into. For example, search for all 'GoNoGo' TASKs in a particular project. This will show a list of just the series from that project, from the TASK modality, and for existing GoNoGo series. Select the series you want, and go toward the bottom of the page, in the Operations section, click the Batch Upload button.
This will display a list of just those series, with an area to drag&drop files onto. Existing files for each series are displayed on the right side of the page.
Drag and drop files onto those series, and click Refresh Page to view the newly uploaded files.
Pipeline scripts
Details about how pipeline scripts are formatted for squirrel and NiDB
Pipeline scripts are meant to run in bash. They are traditionally formatted to run with a RHEL distribution such as CentOS or Rocky Linux. The scripts are bash compliant, but have some nuances that allow them to run more effectively under an NiDB pipeline setup.
The bash script is interpreted to run on a cluster. Some commands are added to your script to allow it to check in and give status to NiDB as it is running.
The script
There is no need for a at the beginning (for example #!/bin/sh) because this script is only interested in the commands being run.
Example script...
Before being submitted to the cluster, the script is passed through the NiDB interpreter, and the actual bash script will look like below. This script is running on subject S2907GCS, study 8, under the freesurferUnified6 pipeline. This script will then be submitted to the cluster.
... script is submitted to the cluster
How to interpret the altered script
Details for the grid engine are added at the beginning
This includes max wall time, output directories, run-as user, etc
Pipeline Variables
There are a few pipeline variables that are interpreted by NiDB when running. The variable is replaced with the value before the final script is written out. Each study on which a pipeline runs will have a different script, with different paths, IDs, and other variables listed below.
Each command is changed to include logging and check-ins
nidb cluster -u pipelinecheckin checks in to the database the current step. This is displayed on the Pipelines --> Analysis webpage
Each command is also echoed to the grid engine log file so you can check the log file for the status
The output of each command is echoed to a separate log file in the last line using the >>
{analysisrootdir}
The full path to the analysis root directory. ex /home/user/thePipeline/S1234ABC/1/
{subjectuid}
The UID of the subject being analyzed. Ex S1234ABC
{studynum}
The study number of the study being analyzed. ex 2
{uidstudynum}
UID and studynumber together. ex S1234ABC2
{pipelinename}
The pipeline name
{studydatetime}
The study datetime. ex 2022-07-04 12:34:56
{first_ext_file}
Replaces the variable with the first file (alphabetically) found with the ext extension
{first_n_ext_files}
Replaces the variable with the first N files (alphabetically) found with the ext extension
{last_ext_file}
Replaces the variable with the last file (alphabetically) found with the ext extension
{all_ext_files}
Replaces the variable with all files (alphabetically) found with the ext extension
{command}
The command being run. ex ls -l
{workingdir}
The current working directory
{description}
The description of the command. This is anything following the #, also called a comment
{analysisid}
The analysisID of the analysis. This is useful when inserting analysis results, as the analysisID is required to do that
{subjectuids}
[Second level analysis] List of subjectIDs
{studydatetimes}
[Second level analysis] List of studyDateTimes in the group
{analysisgroupid}
[Second level analysis] The analysisID
{uidstudynums}
[Second level analysis] List of UIDStudyNums
{numsubjects}
[Second level analysis] Total number of subjects in the group analysis
{groups}
[Second level analysis] List of group names contributing to the group analysis. Sometimes this can be used when comparing groups
{numsubjects_groupname}
[Second level analysis] Number of subjects within the specified groupname
{uidstudynums_groupname}
[Second level analysis] Number of studies within the specified groupname
{NOLOG}
This does not append >> to the end of a command to log the output
{NOCHECKIN}
This does not prepend a command with a check in, and does not echo the command being run. This is useful (necessary) when running multi-line commands like for loops and if/then statements
{PROFILE}
This prepends the command with a profiler to output information about CPU and memory usage.
/opt/pipeline/nidb/nidb cluster -u pipelinecheckin -a 3151385 -s processing -m 'processing step 1 of 10'
# The Freesurfer home directory (version) you want to use
echo Running export FREESURFER_HOME=/opt/freesurfer-6.0
export FREESURFER_HOME=/opt/freesurfer-6.0 >> /home/pipeline/onrc/data/pipeline/S2907GCS/8/freesurferUnified6/pipeline/Step1
export FREESURFER_HOME=/opt/freesurfer-6.0 # The Freesurfer home directory (version) you want to use
export FSFAST_HOME=/opt/freesurfer-6.0/fsfast # Not sure if these next two are needed but keep them just in case
export MNI_DIR=/opt/freesurfer-6.0/mni # Not sure if these next two are needed but keep them just in case
source $FREESURFER_HOME/SetUpFreeSurfer.sh # MGH's shell script that sets up Freesurfer to run
export SUBJECTS_DIR={analysisrootdir} # Point to the subject directory you plan to use - all FS data will go there
freesurfer > {analysisrootdir}/version.txt # {NOLOG} get the freesurfer version
perl /opt/pipeline/ImportFreesurferData.pl {analysisrootdir}/data analysis # import data. the perl program allows importing of multiple T1s
recon-all -hippocampal-subfields-T1 -no-isrunning -all -notal-check -subjid analysis # Autorecon all {PROFILE}
if tail -n 1 {analysisrootdir}/analysis/scripts/recon-all-status.log | grep 'finished without error' ; then touch {analysisrootdir}/reconallsuccess.txt; fi # {NOLOG} {NOCHECKIN}
recon-all -subjid analysis -qcache # do the qcache step {PROFILE}
#!/bin/sh
#$ -N freesurferUnified6
#$ -S /bin/bash
#$ -j y
#$ -o /home/pipeline/onrc/data/pipeline/S2907GCS/8/freesurferUnified6/pipeline/
#$ -V
#$ -u onrc
#$ -l h_rt=72:00:00
LD_LIBRARY_PATH=/opt/pipeline/nidb/; export LD_LIBRARY_PATH;
echo Hostname: `hostname`
echo Username: `whoami`
/opt/pipeline/nidb/nidb cluster -u pipelinecheckin -a 3151385 -s started -m 'Cluster processing started'
cd /home/pipeline/onrc/data/pipeline/S2907GCS/8/freesurferUnified6;
/opt/pipeline/nidb/nidb cluster -u pipelinecheckin -a 3151385 -s processing -m 'processing step 1 of 10'
# The Freesurfer home directory (version) you want to use
echo Running export FREESURFER_HOME=/opt/freesurfer-6.0
export FREESURFER_HOME=/opt/freesurfer-6.0 >> /home/pipeline/onrc/data/pipeline/S2907GCS/8/freesurferUnified6/pipeline/Step1
/opt/pipeline/nidb/nidb cluster -u pipelinecheckin -a 3151385 -s processing -m 'processing step 2 of 10'
# Not sure if these next two are needed but keep them just in case
echo Running export FSFAST_HOME=/opt/freesurfer-6.0/fsfast
export FSFAST_HOME=/opt/freesurfer-6.0/fsfast >> /home/pipeline/onrc/data/pipeline/S2907GCS/8/freesurferUnified6/pipeline/Step2
/opt/pipeline/nidb/nidb cluster -u pipelinecheckin -a 3151385 -s processing -m 'processing step 3 of 10'
# Not sure if these next two are needed but keep them just in case
echo Running export MNI_DIR=/opt/freesurfer-6.0/mni
export MNI_DIR=/opt/freesurfer-6.0/mni >> /home/pipeline/onrc/data/pipeline/S2907GCS/8/freesurferUnified6/pipeline/Step3
/opt/pipeline/nidb/nidb cluster -u pipelinecheckin -a 3151385 -s processing -m 'processing step 4 of 10'
# MGH's shell script that sets up Freesurfer to run
echo Running source $FREESURFER_HOME/SetUpFreeSurfer.sh
source $FREESURFER_HOME/SetUpFreeSurfer.sh >> /home/pipeline/onrc/data/pipeline/S2907GCS/8/freesurferUnified6/pipeline/Step4
/opt/pipeline/nidb/nidb cluster -u pipelinecheckin -a 3151385 -s processing -m 'processing step 5 of 10'
# Point to the subject directory you plan to use - all FS data will go there
echo Running export SUBJECTS_DIR=/home/pipeline/onrc/data/pipeline/S2907GCS/8/freesurferUnified6
export SUBJECTS_DIR=/home/pipeline/onrc/data/pipeline/S2907GCS/8/freesurferUnified6 >> /home/pipeline/onrc/data/pipeline/S2907GCS/8/freesurferUnified6/pipeline/Step5
/opt/pipeline/nidb/nidb cluster -u pipelinecheckin -a 3151385 -s processing -m 'processing step 6 of 10'
# get the freesurfer version
echo Running freesurfer > /home/pipeline/onrc/data/pipeline/S2907GCS/8/freesurferUnified6/version.txt
freesurfer > /home/pipeline/onrc/data/pipeline/S2907GCS/8/freesurferUnified6/version.txt
/opt/pipeline/nidb/nidb cluster -u pipelinecheckin -a 3151385 -s processing -m 'processing step 7 of 10'
# import data. the perl program allows importing of multiple T1s
echo Running perl /opt/pipeline/ImportFreesurferData.pl /home/pipeline/onrc/data/pipeline/S2907GCS/8/freesurferUnified6/data analysis
perl /opt/pipeline/ImportFreesurferData.pl /home/pipeline/onrc/data/pipeline/S2907GCS/8/freesurferUnified6/data analysis >> /home/pipeline/onrc/data/pipeline/S2907GCS/8/freesurferUnified6/pipeline/Step7
/opt/pipeline/nidb/nidb cluster -u pipelinecheckin -a 3151385 -s processing -m 'processing step 8 of 10'
# Autorecon all {PROFILE}
echo Running recon-all -hippocampal-subfields-T1 -no-isrunning -all -notal-check -subjid analysis
/usr/bin/time -v recon-all -hippocampal-subfields-T1 -no-isrunning -all -notal-check -subjid analysis >> /home/pipeline/onrc/data/pipeline/S2907GCS/8/freesurferUnified6/pipeline/Step8
if tail -n 1 /home/pipeline/onrc/data/pipeline/S2907GCS/8/freesurferUnified6/analysis/scripts/recon-all-status.log | grep 'finished without error' ; then touch /home/pipeline/onrc/data/pipeline/S2907GCS/8/freesurferUnified6/reconallsuccess.txt; fi
/opt/pipeline/nidb/nidb cluster -u pipelinecheckin -a 3151385 -s processing -m 'processing step 10 of 10'
# do the qcache step {PROFILE}
echo Running recon-all -subjid analysis -qcache
/usr/bin/time -v recon-all -subjid analysis -qcache >> /home/pipeline/onrc/data/pipeline/S2907GCS/8/freesurferUnified6/pipeline/Step10
/opt/pipeline/nidb/nidb cluster -u pipelinecheckin -a 3151385 -s processing -m 'Processing result script'
# Running result script
echo Running perl /opt/pipeline/ParseFreesurferResults.pl -r /home/pipeline/onrc/data/pipeline/S2907GCS/8/freesurferUnified6 -p /home/pipeline/onrc/data/pipeline/S2907GCS/8/freesurferUnified6/analysis/stats -a 3151385 # dump results back into ado2 > /home/pipeline/onrc/data/pipeline/S2907GCS/8/freesurferUnified6/pipeline/stepResults.log 2>&1
perl /opt/pipeline/ParseFreesurferResults.pl -r /home/pipeline/onrc/data/pipeline/S2907GCS/8/freesurferUnified6 -p /home/pipeline/onrc/data/pipeline/S2907GCS/8/freesurferUnified6/analysis/stats -a 3151385 # dump results back into ado2 > /home/pipeline/onrc/data/pipeline/S2907GCS/8/freesurferUnified6/pipeline/stepResults.log 2>&1
chmod -Rf 777 /home/pipeline/onrc/data/pipeline/S2907GCS/8/freesurferUnified6
/opt/pipeline/nidb/nidb cluster -u pipelinecheckin -a 3151385 -s processing -m 'Updating analysis files'
/opt/pipeline/nidb/nidb cluster -u updateanalysis -a 3151385
/opt/pipeline/nidb/nidb cluster -u pipelinecheckin -a 3151385 -s processing -m 'Checking for completed files'
/opt/pipeline/nidb/nidb cluster -u checkcompleteanalysis -a 3151385
/opt/pipeline/nidb/nidb cluster -u pipelinecheckin -a 3151385 -s complete -m 'Cluster processing complete'
chmod -Rf 777 /home/pipeline/onrc/data/pipeline/S2907GCS/8/freesurferUnified6
Already exist in the project: these already exist in the current project and cannot be duplicated.
Archive
Archiving - The data is being archived. Depending on the size of the dataset, this could be minutes, hours, or days
Archived - The data is finished archiving
Complete
The entire import process has finished
Ignore phase encoding direction - To read the phase encoding direction information from a Siemens DICOM file can require 3 passes to read the file, using 3 different parsers. Siemens contain a special section called the CSA header which contains information about phase encoding direction, and an ASCII text section which includes another phase encoding element, and the regular DICOM header information. Disabling the parsing of phase encoding direction can significantly speed up the archiving of DICOM files.
Local computer
Upload files via the web browser. 'Local computer' is basically the computer from which the browser is being run, so this may be a Windows PC, Mac, or other browser based computer
NFS path
This is a path accessible from NiDB. The NiDB admin will need to configure access to NFS shares
Automatically detect
This option will detect data modality based on the DICOM header. If you are importing DICOM data, use this option
Specific modality
If you definitely know the data being imported is all of one modality, chose this. Non-DICOM files are not guaranteed to have any identifying information, so the imported files must be named to encode the information in the name.
Unknown
This is a last ditch option to attempt to figure out the modality of the data by filename extension. It probably won't work
Subject
PatientID - match the DICOM PatientID field to an existing UID or alternate UID
Specific PatientID - this ID will be applied to all imported data, ex S0001 will be the ID used for all data in the entire import
PatientID from directory name - get the subject ID from the parent directory of the DICOM file. This will be the highest level directory name, ex for 12345/1/data/MRI the subject ID will be 12345
Study
Default is to match studies by the DICOM fields Modality/StudyDate/StudyTime. Sometimes anonymized DICOM files have these fields blank, so StudyInstanceUID or StudyID must be used instead. If data is not importing as expected, check your DICOM tags and see if these study tags are valid
Series
The default is to match series by the DICOM field SeriesNumber. But sometimes this field is blank, and SeriesDate/SeriesTime or SeriesUID must be used instead. If data is not importing as expected, check your DICOM tags to see if these series tags are valid
Started
The upload has been submitted. You will likely see this status if you are importing data via NFS, rather than through local web upload
Upload
Uploading - The data is being uploaded
Uploaded - Data has finished uploading
Parsing
Parsing - The data is being parsed. Depending on the size of the dataset, this could be minutes, hours, or days
Parsed - The data has been parsed, meaning the IDs, series, and other information have been read and the data organized into a Subject→Study→Series heirarchy. Once parsing is complete, you must select the data to be archived
How to build NiDB and contribute to its development
Compatible Linux Distributions
The following OS configurations have been tested to build nidb. It may be possible to build NiDB on other OS configurations, but only the below environments have been tested.
Tested & Compatible
RHEL 9 compatible (Rocky Linux 9, AlmaLinux 9, RHEL 9)
Windows 10/11 - NiDB will compile and build on Windows, but NiDB uses Linux system calls to perform many background operations, and thus would not work on Windows.
NiDB cannot be built on CentOS Stream 8 or Rocky Linux 8.6. These distros contain kernel bugs which are incompatible with the QProcess library.
Prepare Build Environment
Step 1 - Install development tools
Run these commands as root (or sudo) based on your distribution
Unzip the source code to a directory such as ~/dcmtk-source. Make sure the source code exists at the root of that directory and is not unzipped into a sub-directory.
Open CMake (GUI)
Set source code directory to to ~/dcmtk-source
Set binary directory to ~/dcmtk-bin
From the command line, run the following
cd ~/dcmtk-bin
make
DCMTK files will be installed in the following locations
RHEL
include - /usr/local/include
Install CMake -
Download dcmtk source code
Unzip the source code to a directory such as C:/dcmtk-source. Make sure the source code exists at the root of that directory and is not unzipped into a sub-directory.
Make the installer executable chmod 777 qt-unified-linux-x64-x.x.x-online.run
Run ./qt-unified-linux-x64-x.x.x-online.run
The Qt Maintenance Tool will start. An account is required to download Qt open source
On the components screen, select the checkbox for Qt 6.9.3 → Desktop gcc 64-bit
Optional - Build MySQL/MariaDB driver for Qt
Sometimes the MySQL/MariaDB driver supplied with Qt will not work correctly, and needs to be built manually. This happens on Debian 12, for example. If building is successful, the path to the driver should eventually be ~/Qt/6.9.3/gcc_64/plugins/sqldrivers/libqsqlmysql.so
On step 2 above (using the Qt MaintenanceTool), also select the checkbox for Qt 6.9.3 → Sources
# need to fix this, don't use it yet.
sudo apt install ninja-build
sudo apt install libmariadb-dev*
sudo apt install libglib2*
cd ~
mkdir build-sqldrivers
cd build-sqldrivers
~/Qt/6.9.3/gcc_64/bin/qt-cmake -G Ninja ~/Qt/6.9.3/Src/qtbase/src/plugins/sqldrivers -DCMAKE_INSTALL_PREFIX=~/Qt/6.9.3/gcc_64 -DMySQL_INCLUDE_DIR="/usr/include/mariadb" -DMySQL_LIBRARY="/usr/lib/x86_64-linux-gnu/libmariadbclient.so"
cmake --build .
cmake --install .
# install in the system
sudo mkdir -p /usr/local/bin/sqldrivers
sudo cp -uv ~/Qt/6.9.3/gcc_64/plugins/sqldrivers/* /usr/local/bin/sqldrivers/
Building the NiDB executable
Once the build environment is setup, the builds can be done by script. The build.sh script will build only the nidb executable, this is useful when testing. The rpmbuildx.sh scripts will build the rpm which will create releases.
First time build on this machine, perform the following
cd ~
wget https://github.com/gbook/nidb/archive/master.zip
unzip master.zip
mv nidb-master nidb
cd nidb
./build.sh # build only the NiDB executable
./rpmbuild9.sh # build the nidb .rpm
All subsequent builds on this machine can be done with the following
cd ~/nidb
./build.sh # build only the executable
./rpmbuild9.sh # build the .rpm
First time build on this machine, perform the following
cd ~
wget https://github.com/gbook/nidb/archive/master.zip
unzip master.zip
mv nidb-master nidb
cd nidb
./build.sh # build only the NiDB executable
./rpmbuild8.sh # build the nidb .rpm
All subsequent builds on this machine can be done with the following
cd ~/nidb
./build.sh # build only the executable
./rpmbuild8.sh # build the .rpm
First time build on this machine, perform the following
cd ~
wget https://github.com/gbook/nidb/archive/master.zip
unzip master.zip
mv nidb-master nidb
cd nidb
./build.sh # build only the NiDB executable
./rpmbuild7.sh # build the nidb .rpm
All subsequent builds on this machine can be done with the following
First time build on this machine, perform the following
All subsequent builds on this machine can be done with the following
First time build on this machine, perform the following
All subsequent builds on this machine can be done with the following
Contributing to the NiDB Project
Setting up a development server
A development server can be a full server, a VM, or any installation of one of the supported Linux operating systems. Once you've been granted access to the nidb project on github, you'll need to add your SSH key under your account (github.com --> click your username --> Settings --> SSH and GPG keys). There are directions on the github site for how to do this. Then you can clone the current source code into your .
Cloning a new repository with SSH
This will create a git repository called nidb in your home directory.
Committing changes
Updating your repository
To keep your local copy of the repository up to date, you'll need to pull any changes from github.
Troubleshooting
Build freezes
This may happen if the build machine does not have enough RAM or processors. More likely, this is happening inside of a VM if the VM does not have enough RAM or processors allocated.
Build fails with "QMAKE_CXX.COMPILER_MACROS not defined"
This error happens because of a kernel bug in Rocky Linux 8.6 and any qmake built with Qt 6.3. Downgrade or use a lower version kernel until this kernel bug is fixed.
Library error when running nidb executable
If you get an error similar to the following, you'll need to install the missing library
You can check which libraries are missing by running ldd on the nidb executable
Copy the missing library file(s) to /lib as root. Then run ldconfig to register any new libraries.
Virtual Machine Has No Network
If you are using a virtual machine to build NiDB, there are a couple of weird bugs in VMWare Workstation Player (possibly other VMWare products as well) where the network adapters on a Linux guest simply stop working. You can't activate them, you can't do anything with them, they just are offline and can't be activated. Or it's connected and network connection is present, but your VM is inaccessible from the outside.
Try these two fixes to get the network back:
1) While the VM is running, suspend the guest OS. Wait for it to suspend and close itself. Then resume the guest OS. No idea why, but this should fix the lack of network adapter in Linux
2) (This is if you are using bridged networking only) Open the VM settings. Go to network, and click the button to edit the bridged adapters. Uncheck the VM adapter.
cd ~/nidb
# copy IN any webpage changes. Be careful not to overwrite uncommitted edits
cp -uv /var/www/html/*.php ~/nidb/src/web/
git commit -am "Comments about the changes"
git push origin master
cd ~/nidb
git pull origin master
# copy OUT any webpage changes. Be careful not to overwrite uncommitted edits
cp -uv ~/nidb/src/web/*.php /var/www/html/
./nidb: error while loading shared libraries: libsquirrel.so.1: cannot open shared object file: No such file or directory./nidb: error while loading shared libraries: libsquirrel.so.1: cannot open shared object file: No such file or directory
cd ~/nidb
./build.sh # build only the executable
./rpmbuild7.sh # build the .rpm
cd ~
wget https://github.com/gbook/nidb/archive/master.zip
unzip master.zip
mv nidb-master nidb
cd nidb
./build.sh # build only the NiDB executable
cd ~/nidb
./build.sh # build only the executable
cd ~
wget https://github.com/gbook/nidb/archive/master.zip
unzip master.zip
mv nidb-master nidb
cd nidb
./build.sh # build only the NiDB executable
cd ~/nidb
./build.sh # build only the executable
JSON full listing
Full listing of JSON fields in alphbetical order
JSON variables
🔵 Primary key
🔴 Required
🟡 Computed (squirrel writer/reader should handle these variables)
analysis
data-dictionary
Variable
Type
Default
Description
data-dictionary-item
Variable
Type
Default
Description
group-analysis
Variable
Type
Default
Description
experiments
Variable
Type
Default
Description
interventions
Variable
Type
Default
Description
observations
Variable
Type
Default
Description
package
Variable
Type
Default
Description
pipelines
Variable
Type
Default
Description
series
Variable
Type
Default
Description
studies
Variable
Type
Default
Description
subjects
Variable
Type
Default
Description (and possible values)
Datetime of the end of the analysis.
DateClusterStart
date
Datetime the job began running on the cluster.
DateClusterEnd
date
Datetime the job finished running on the cluster.
Hostname
string
If run on a cluster, the hostname of the node on which the analysis run.
PipelineName
string
🔴🔵
Name of the pipeline used to generate these results.
PipelineVersion
number
1
Version of the pipeline used.
RunTime
number
0
Elapsed wall time, in seconds, to run the analysis after setup.
SeriesCount
number
0
Number of series downloaded/used to perform analysis.
SetupTime
number
0
Elapsed wall time, in seconds, to copy data and set up analysis.
Status
string
Status, should always be ‘complete’.
StatusMessage
string
Last running status message.
Successful
bool
Analysis ran to completion without error and expected files were created.
Size
number
🟡
Size in bytes of the analysis.
VirtualPath
string
🟡
Relative path to the data within the package.
🟡
Number of files contained in the experiment.
Size
number
🟡
Size, in bytes, of the experiment files.
VirtualPath
string
🟡
Path to the data-dictionary within the squirrel package.
data-dictionary-item
JSON array
Array of data dictionary items. See next table.
🔴🔵
Name of the variable.
Description
string
Description of the variable.
KeyValueMapping
string
List of possible key/value mappings in the format key1=value1, key2=value2. Example 1=Female, 2=Male
ExpectedTimepoints
number
Number of expected timepoints. Example, the study is expected to have 5 records of a variable.
RangeLow
number
For numeric values, the lower limit.
RangeHigh
number
For numeric values, the upper limit.
Description.
GroupAnalysisName
string
🔴🔵
Name of this group analysis.
Notes
string
Notes about the group analysis.
FileCount
number
🟡
Number of files in the group analysis.
Size
number
🟡
Size in bytes of the analysis.
VirtualPath
string
🟡
Path to the group analysis data within the squirrel package.
🟡
Number of files contained in the experiment.
Size
number
🟡
Size, in bytes, of the experiment files.
VirtualPath
string
🟡
Path to the experiment within the squirrel package.
Date the record was created in the current database. The original record may have been imported from another database.
DateRecordEntry
string
Date the record was first entered into a database.
DateRecordModify
string
Date the record was modified in the current database.
DateEnd
datetime
Datetime the intervention was stopped.
DateStart
datetime
🔴
Datetime the intervention was started.
Description
string
Longer description.
DoseString
string
🔴
Full dosing string. Examples tylenol 325mg twice daily by mouth, or 5g marijuana inhaled by volcano
DoseAmount
number
In combination with other dose variables, the quantity of the drug.
DoseFrequency
string
Description of the frequency of administration.
DoseKey
string
For clinical trials, the dose key.
DoseUnit
string
mg, g, ml, tablets, capsules, etc.
InterventionClass
string
Drug class.
InterventionName
string
🔴🔵
Name of the intervention.
Notes
string
Notes about drug.
Rater
string
Rater/experimenter name.
Date the record was created in the current database. The original record may have been imported from another database.
DateRecordEntry
datetime
Date the record was first entered into a database.
DateRecordModify
datetime
Date the record was modified in the current database.
DateStart
datetime
🔴
Start datetime of the observation.
Description
string
Longer description of the measure.
Duration
number
Duration of the measure in seconds, if known.
InstrumentName
string
Name of the instrument associated with this measure.
ObservationName
string
🔴🔵
Name of the observation.
Notes
string
Detailed notes.
Rater
string
Name of the rater.
Value
string
🔴
Value (string or number).
orig
Data format for imaging data to be written. Squirrel should attempt to convert to the specified format if possible. orig, anon, anonfull, nifti3d, nifti3dgz, nifti4d, nifti4dgz (see details below).
Datetime
datetime
🔴
Datetime the package was created.
Description
string
Longer description of the package.
License
string
Any sharing or license notes, or LICENSE files.
NiDBVersion
string
The NiDB version which wrote the package.
Notes
JSON object
See details below.
PackageName
string
🔴🔵
Short name of the package.
PackageFormat
string
squirrel
Always squirrel.
Readme
string
Any README files.
SeriesDirectoryFormat
string
orig
orig, seq (see details below).
SquirrelVersion
string
Squirrel format version.
SquirrelBuild
string
Build version of the squirrel library and utilities.
StudyDirectoryFormat
string
orig
orig, seq (see details below).
SubjectDirectoryFormat
string
orig
orig, seq (see details below).
Submit username.
ClusterQueue
string
Queue to submit jobs.
ClusterSubmitHost
string
Hostname to submit jobs.
CompleteFiles
JSON array
JSON array of complete files, with relative paths to analysisroot.
CreateDate
datetime
🔴
Date the pipeline was created.
DataCopyMethod
string
How the data is copied to the analysis directory: cp, softlink, hardlink.
DependencyDirectory
string
DependencyLevel
string
DependencyLinkType
string
Description
string
Longer pipeline description.
DirectoryStructure
string
Directory
string
Directory where the analyses for this pipeline will be stored. Leave blank to use the default location.
Group
string
ID or name of a group on which this pipeline will run
GroupType
string
Either subject or study
Level
number
🔴
subject-level analysis (1) or group-level analysis (2).
MaxWallTime
number
Maximum allowed clock (wall) time in minutes for the analysis to run.
ClusterMemory
number
Amount of memory in GB requested for a running job.
PipelineName
string
🔴🔵
Pipeline name.
Notes
string
Extended notes about the pipeline
NumberConcurrentAnalyses
number
1
Number of analyses allowed to run at the same time. This number if managed by NiDB and is different than grid engine queue size.
ClusterNumberCores
number
1
Number of CPU cores requested for a running job.
ParentPipelines
string
Comma separated list of parent pipelines.
ResultScript
string
Executable script to be run at completion of the analysis to find and insert results back into NiDB.
SubmitDelay
number
Delay in hours, after the study datetime, to submit to the cluster. Allows time to upload behavioral data.
TempDirectory
string
The path to a temporary directory if it is used, on a compute node.
UseProfile
bool
true if using the profile option, false otherwise.
UseTempDirectory
bool
true if using a temporary directory, false otherwise.
Version
number
1
Version of the pipeline.
PrimaryScript
string
🔴
See details of
SecondaryScript
string
See details of .
DataStepCount
number
🟡
Number of data steps.
VirtualPath
string
🟡
Path of this pipeline within the squirrel package.
JSON array
See
BIDS suffix
BIDSTask
string
BIDS Task name
BIDSRun
number
BIDS run number
BIDSPhaseEncodingDirection
string
BIDS PE direction
Description
string
Description of the series
ExperimentName
string
Experiment name associated with this series. Experiments link to the section of the squirrel package
Protocol
string
🔴
Protocol name
Run
number
The run identifies order of acquisition in cases of multiple identical series.
SeriesDatetime
date
🔴
Date of the series, usually taken from the DICOM header
SeriesNumber
number
🔴🔵
Series number. May be sequential, correspond to NiDB assigned series number, or taken from DICOM header
SeriesUID
string
From the SeriesUID DICOM tag
BehavioralFileCount
number
🟡
Total number of beh files (including files in subdirs)
BehavioralSize
number
🟡
Size of beh data, in bytes
FileCount
number
🟡
Total number of files (including files in subdirs)
Size
number
🟡
Size of the data, in bytes
JSON file
data/subjectID/studyNum/seriesNum/params.json
JSON object
🔴
Date of the study.
DayNumber
number
For repeated studies and clinical trials, this indicates the day number of this study in relation to time 0.
Description
string
🔴
Study description.
Equipment
string
Equipment name, on which the imaging session was collected.
Height
number
Height in meters of the subject at the time of the study.
Modality
string
🔴
Defines the type of data. See table of supported .
Notes
string
Any notes about the study
StudyNumber
number
🔴🔵
Study number. May be sequential or correspond to NiDB assigned study number.
StudyUID
string
DICOM field StudyUID.
TimePoint
number
Similar to day number, but this should be an ordinal number.
VisitType
string
Type of visit. ex: Pre, Post.
Weight
number
Weight in kilograms of the subject at the time of the study.
AnalysisCount
number
🟡
Number of analyses for this study.
SeriesCount
number
🟡
Number of series for this study.
VirtualPath
string
🟡
Relative path to the data within the package.
JSON array
Array of series.
JSON array
Array of analyses.
🔴
Subject’s date of birth. Used to calculate age-at-study. Value can be YYYY-00-00 to store year only, or YYYY-MM-00 to store year and month only.
Gender
char
Gender.
GUID
string
Globally unique identifier, from the NIMH Data Archive ().
Ethnicity1
string
NIH defined ethnicity: Usually hispanic, non-hispanic
Ethnicity2
string
NIH defined race: americanindian, asian, black, hispanic, islander, white
Notes
string
Notes about this subject
Sex
char
🔴
Sex at birth (F,M,O,U).
SubjectID
string
🔴🔵
Unique ID of this subject. Each subject ID must be unique within the package.