Loading...
Loading...
Loading...
Loading...
Loading...
Loading...
Loading...
NiDB is a multi-project database. Data from multiple projects can be managed in one database instance. Each project can have different attributes according to the needs of the project.
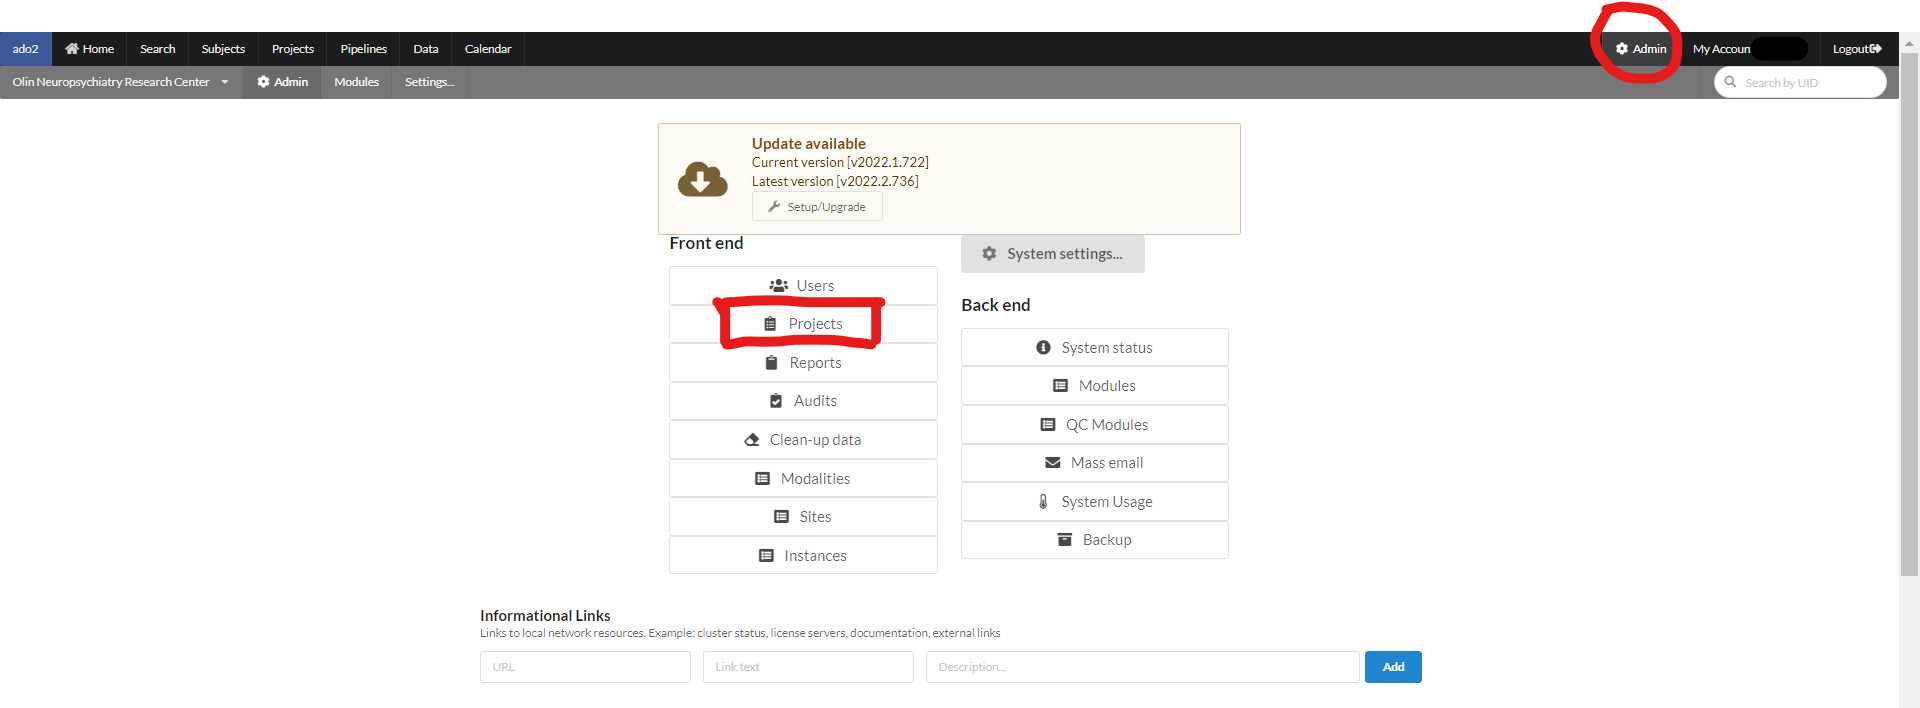
A user with admin rights can create, and manage a project in NiDB. A user with Admin rights will have an extra menu option "Admin". To create a new project in NiDB, click "Admin" from the main menu and then click "Projects" as shown in the figure below.
The following page with the option "Create Project" will appear. This page also contains a list of all the current projects. To create a new project, click on the "Create Project" button on the left corner of the screen as shown in the figure below.
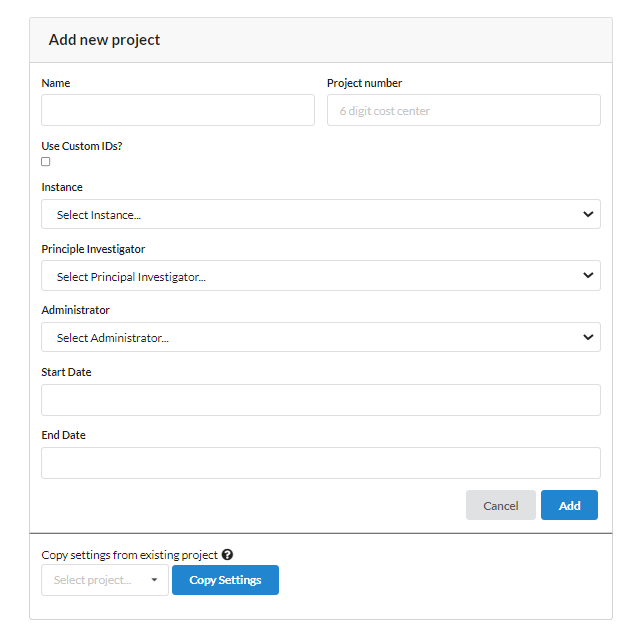
On the next page, fill the following form related to the new project. Name the new project, fill the project number. Select the option "Use Custom IDs" if project need to use its own ID system. Select the Principal Investigator (PI) and project administrator (PA) from the existing NiDB users. The PI and PA can be the same subject. Mention the start and end date if they are known. Also there is an option if you want to copy an existing setting from one of your projects.
After clicking "Add" button, a new project will be added to the project list and it will be shown in the list of existing projects as shown in the figure below.
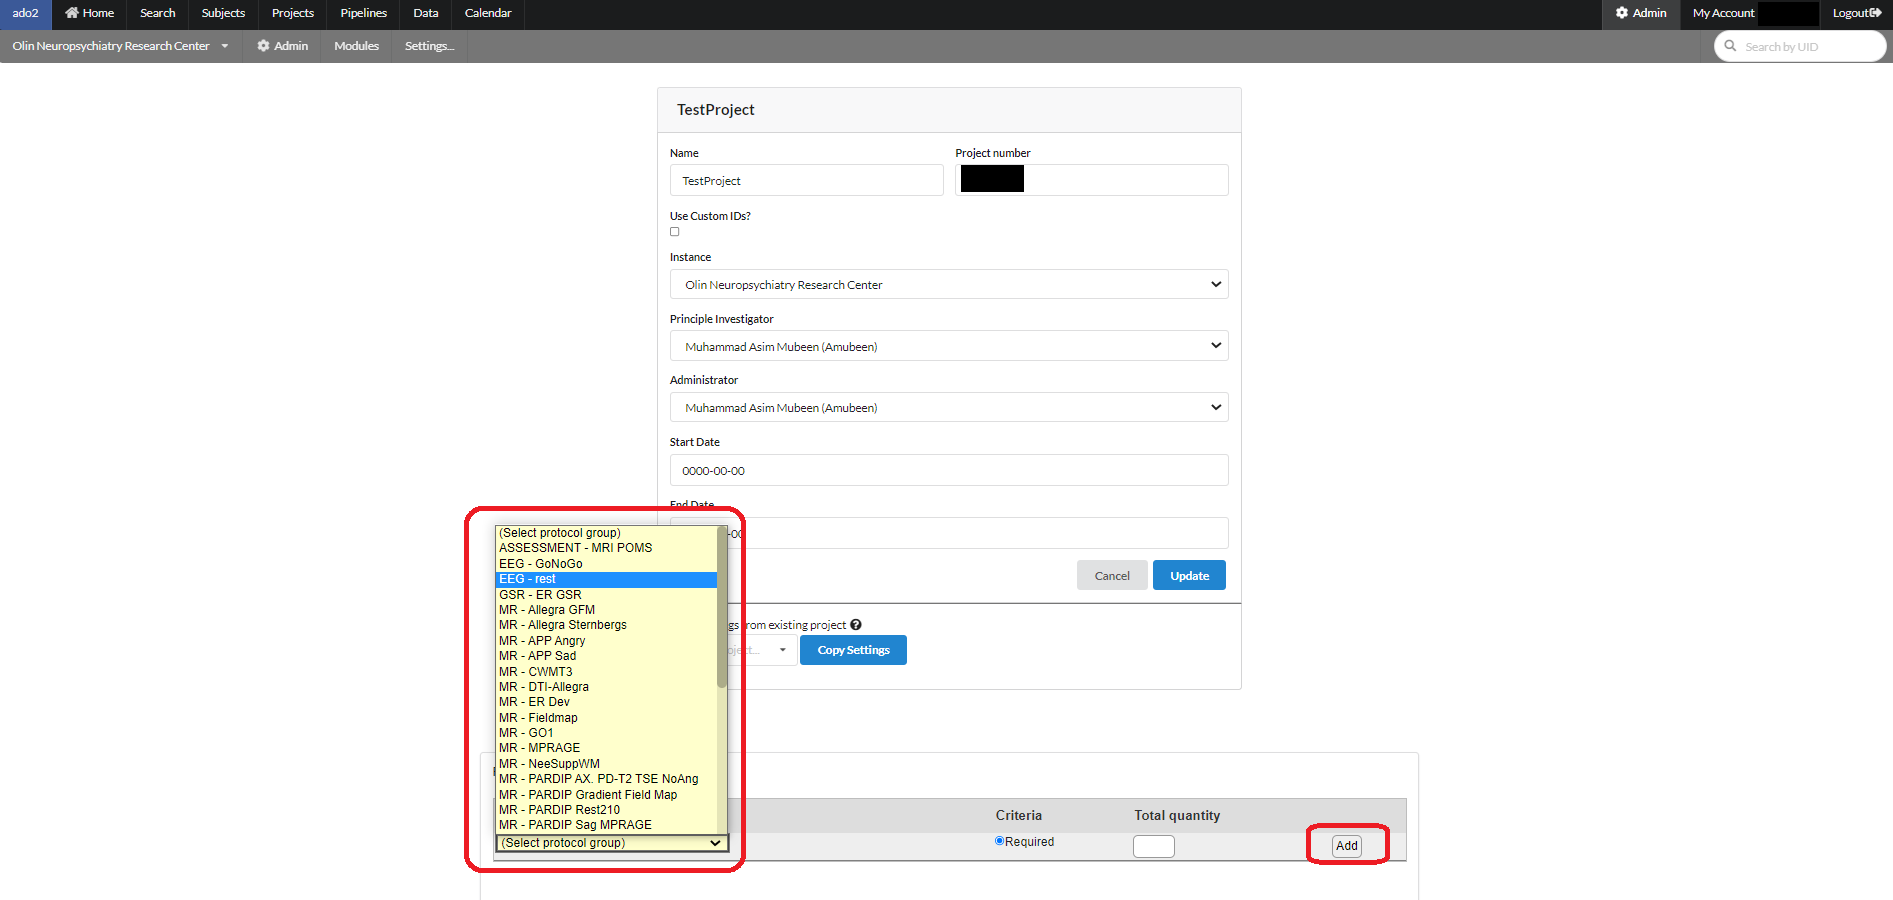
To setup the project for collecting data click the name of the project on the above page and the following page can be used to add the right set of protocols.
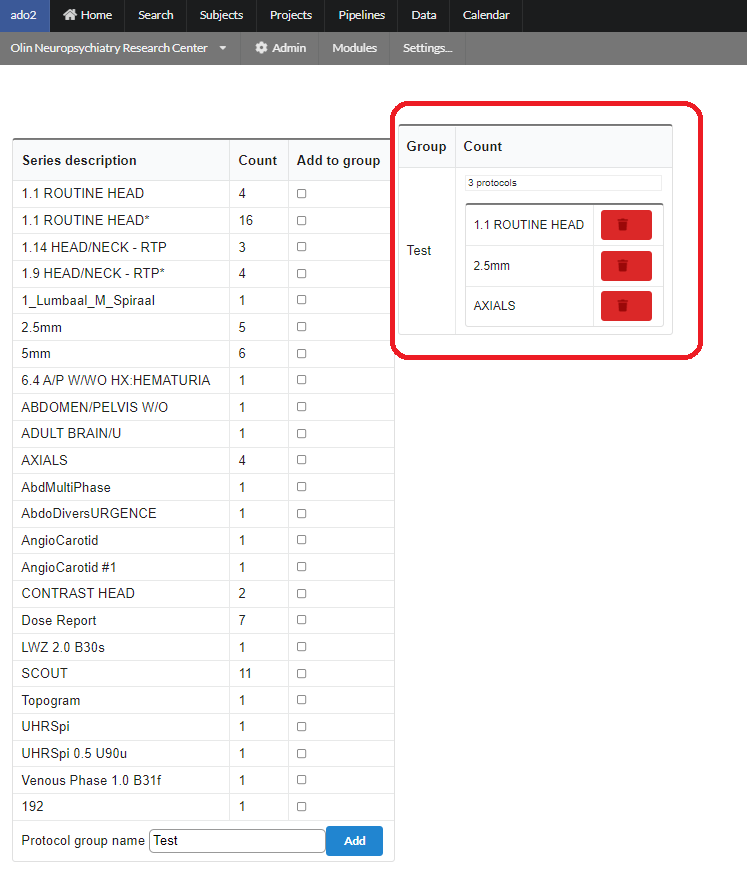
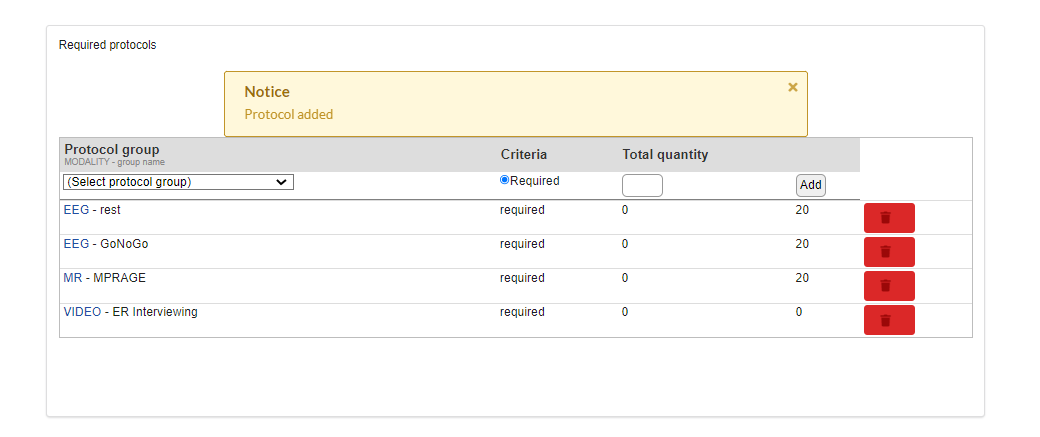
After adding the required set of protocols, a list of protocols will be shown as follow. A protocol can be deleted by clicking the "delete" button in front of an added protocol as shown in the figure below.
To define a protocol, click on the name of a protocol in the above list. For example if we click on EEG-Rest, the following page will appear with the existing list of EEG-series being already used in various projects. You can pick any of those to add to your own protocol group. A group name can be assigned by using the "Protocol group name" box at the end of the page as shown. After clicking the "Add" button the selected series in the group will be added to the group and will be shown on the right.
After setting up project accordingly, the project can be accessed by users having its rights. A user can access a project via "Projects" menu from the main menu. A list of existing projects will be displayed. TO search a specific project, type the name of a project and the list will reduced to the projects containing the search phrase.
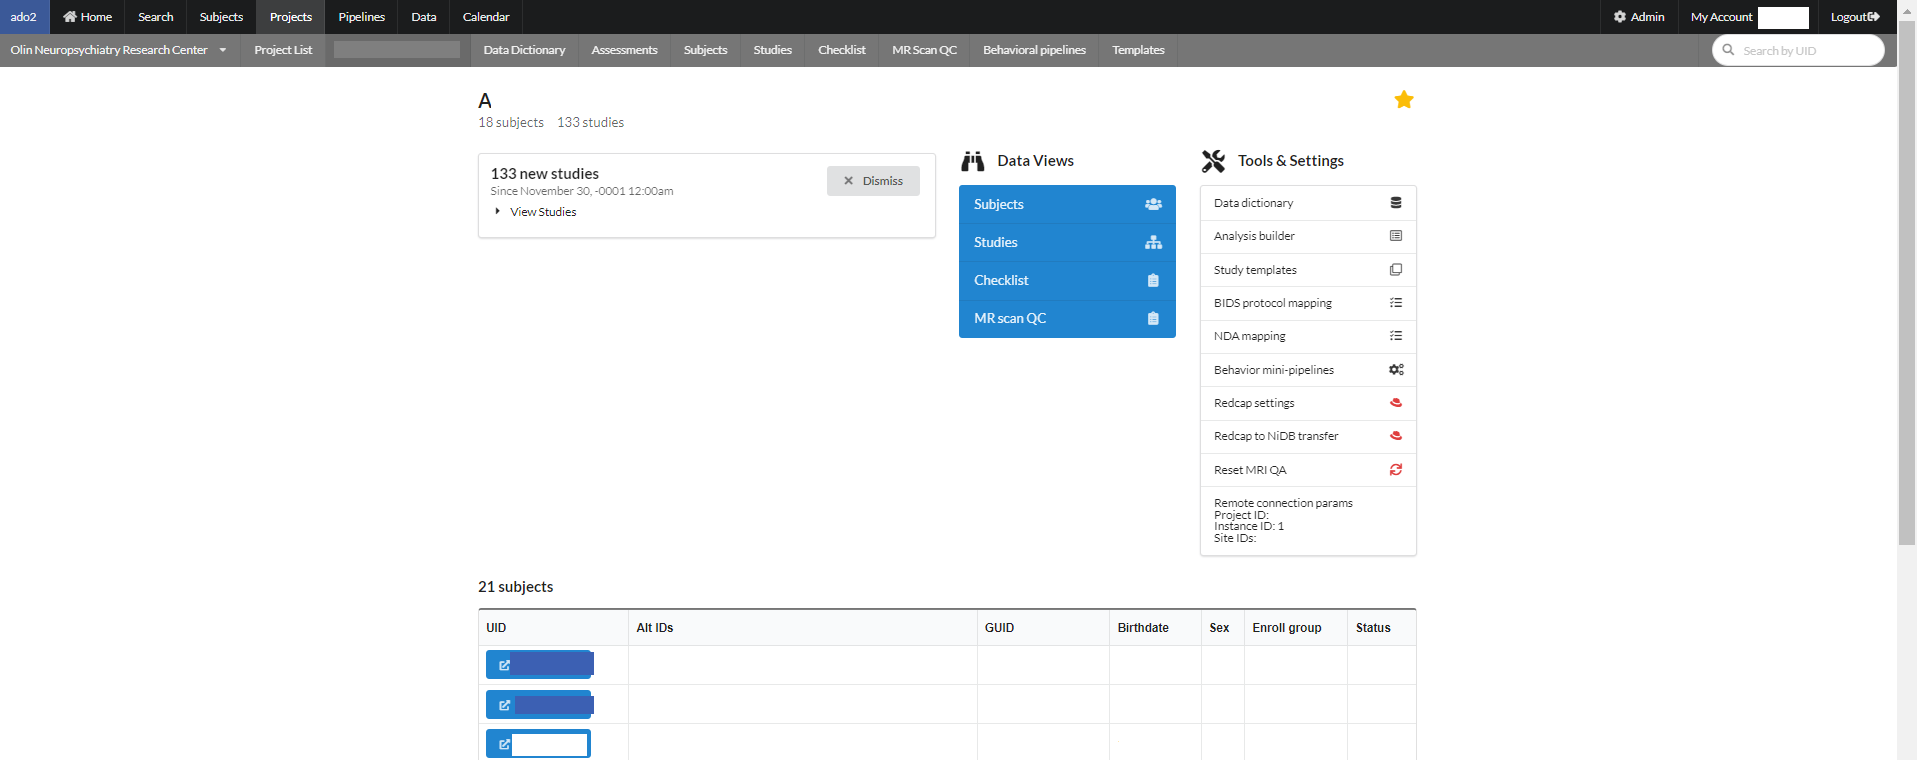
Click the name of the project from the list as shown above. A project specific page will appear as seen below.
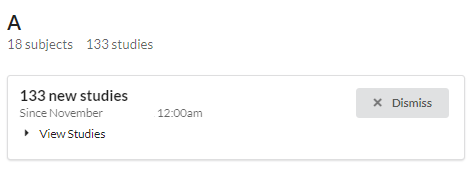
A project page consists of some information regarding the current project. Under the project name there is total number of subjects and studies. Undeneath that is a message box consists of number of studies. One can dismiss this message box by clicking "dismiss" button or view all the studies inside the message box.
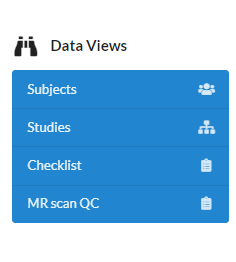
In the middle of a project page is "Data Views" for subjects, studies, checklist for subjects and an option to QC the MR scans.
To update information regarding the subjects in the current project, click on the "Subjects" button in the data view, a page will appear where the information can be updated for all the subjects and can be saved at once by clicking "Save" button at the end.
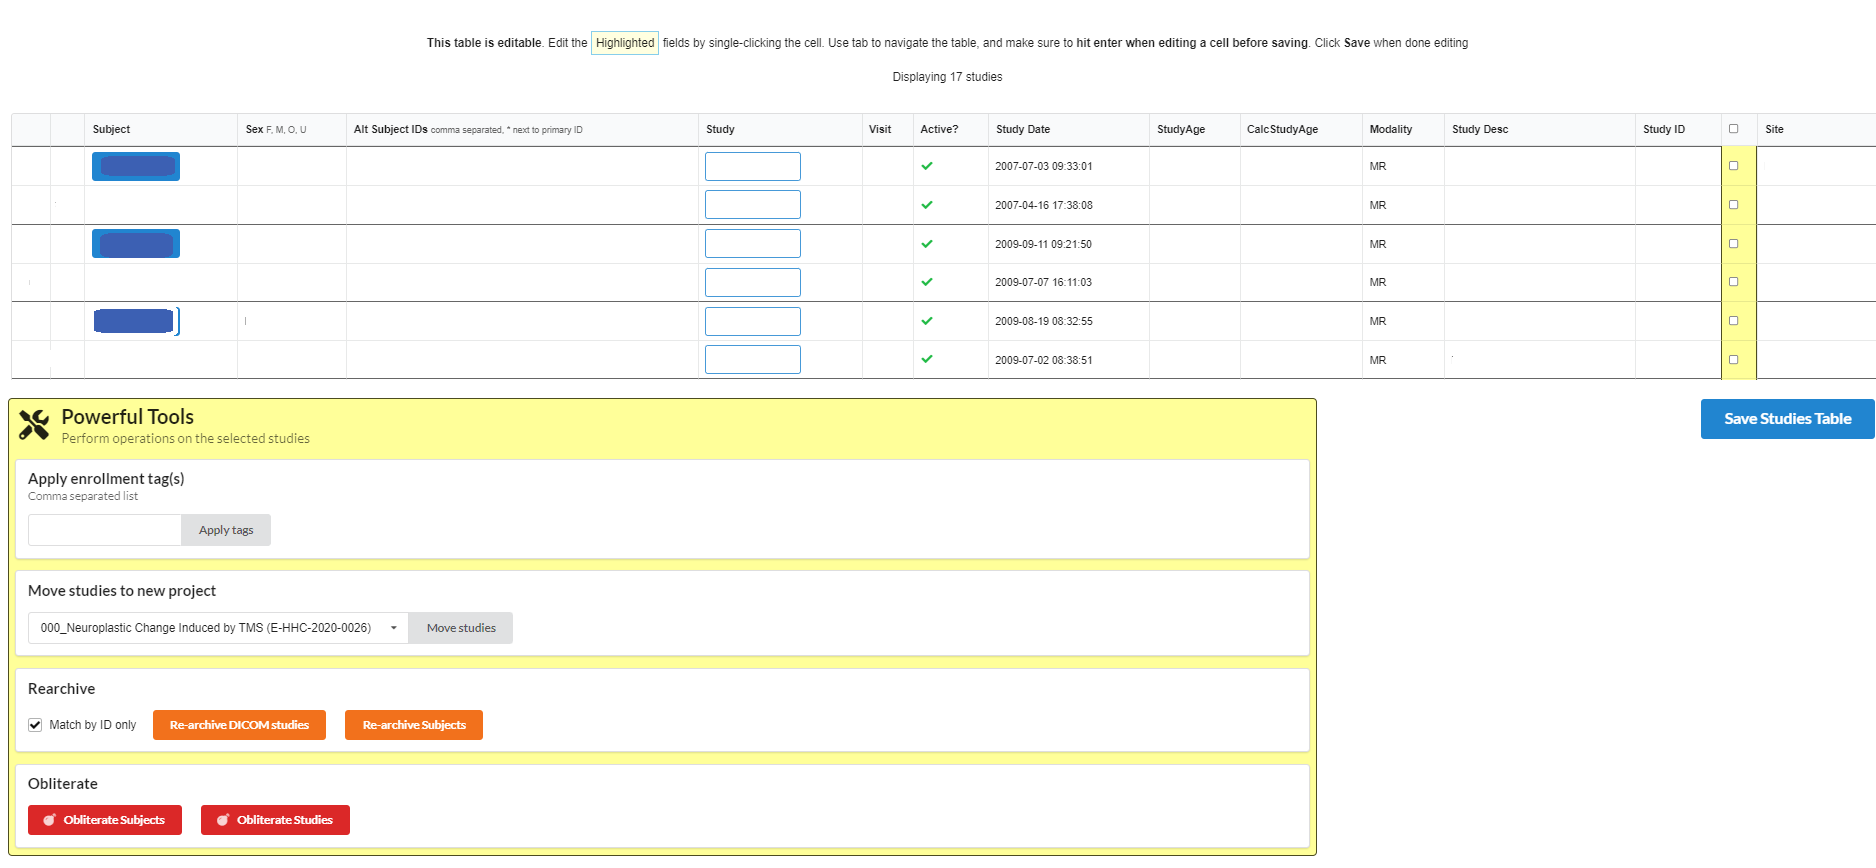
By clicking the Studies button from Data Views section, following page will appear. The studies can be selected to perform various operations like adding enrollment tags, moving studies to another project.
If you are an NiDB system admin, you may see the Powerful Tools box at the bottom of the page. This allows you to perform maintenance on the data in batches. Select the studies, and then click one of the options. This is a powerful tool, so use with caution!
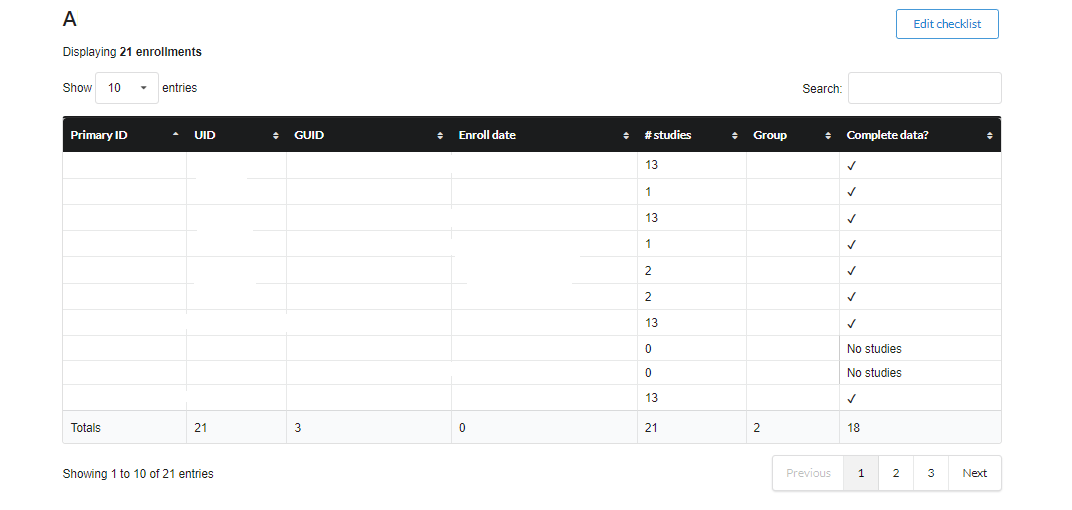
Checklist provides a brief summary on the subjects, studies and their status as shown below.
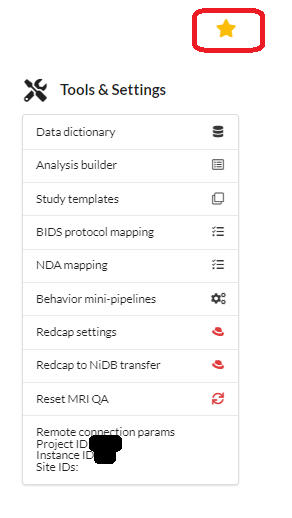
On the right side of the project page is a star that can be selected to make this project "favorite" that will show this project on the main page of NiDB to access it easily from there. Also there are links to the project related tools and their settings. This section is named as "Project tools & settings". This section includes:
Data Dictionary
Analysis Builder
Study Templates
BIDS Protocol Mapping
NDA Mapping
Behavioral Minipipelines
Recap-> NiDB Transfer
Reset MRI QA
It also possess the parameters required to connect this project remotely.
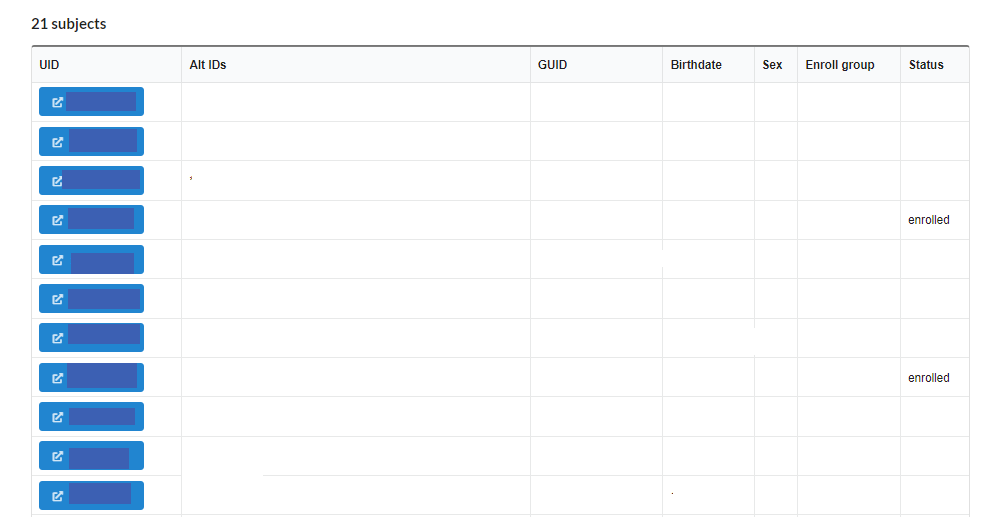
The last section of a project page consists of a list of subjects registtered, with its alternate Ids, GUID, DOB, Sex, and status as shown below:
The projects main-menu also has a sub-menu to navigate through various project related tools. The sub-menu includes links to Data Dictionary, Assessments, Subjects, Studies, Checklist, MR Scan QC, Behavioral pipeline and Templates. Also "Project List" can navigate back to the list of all the projects in the current database instance.
This section describes how to manage meta data and imaging data files for subjects enrolled in projects.
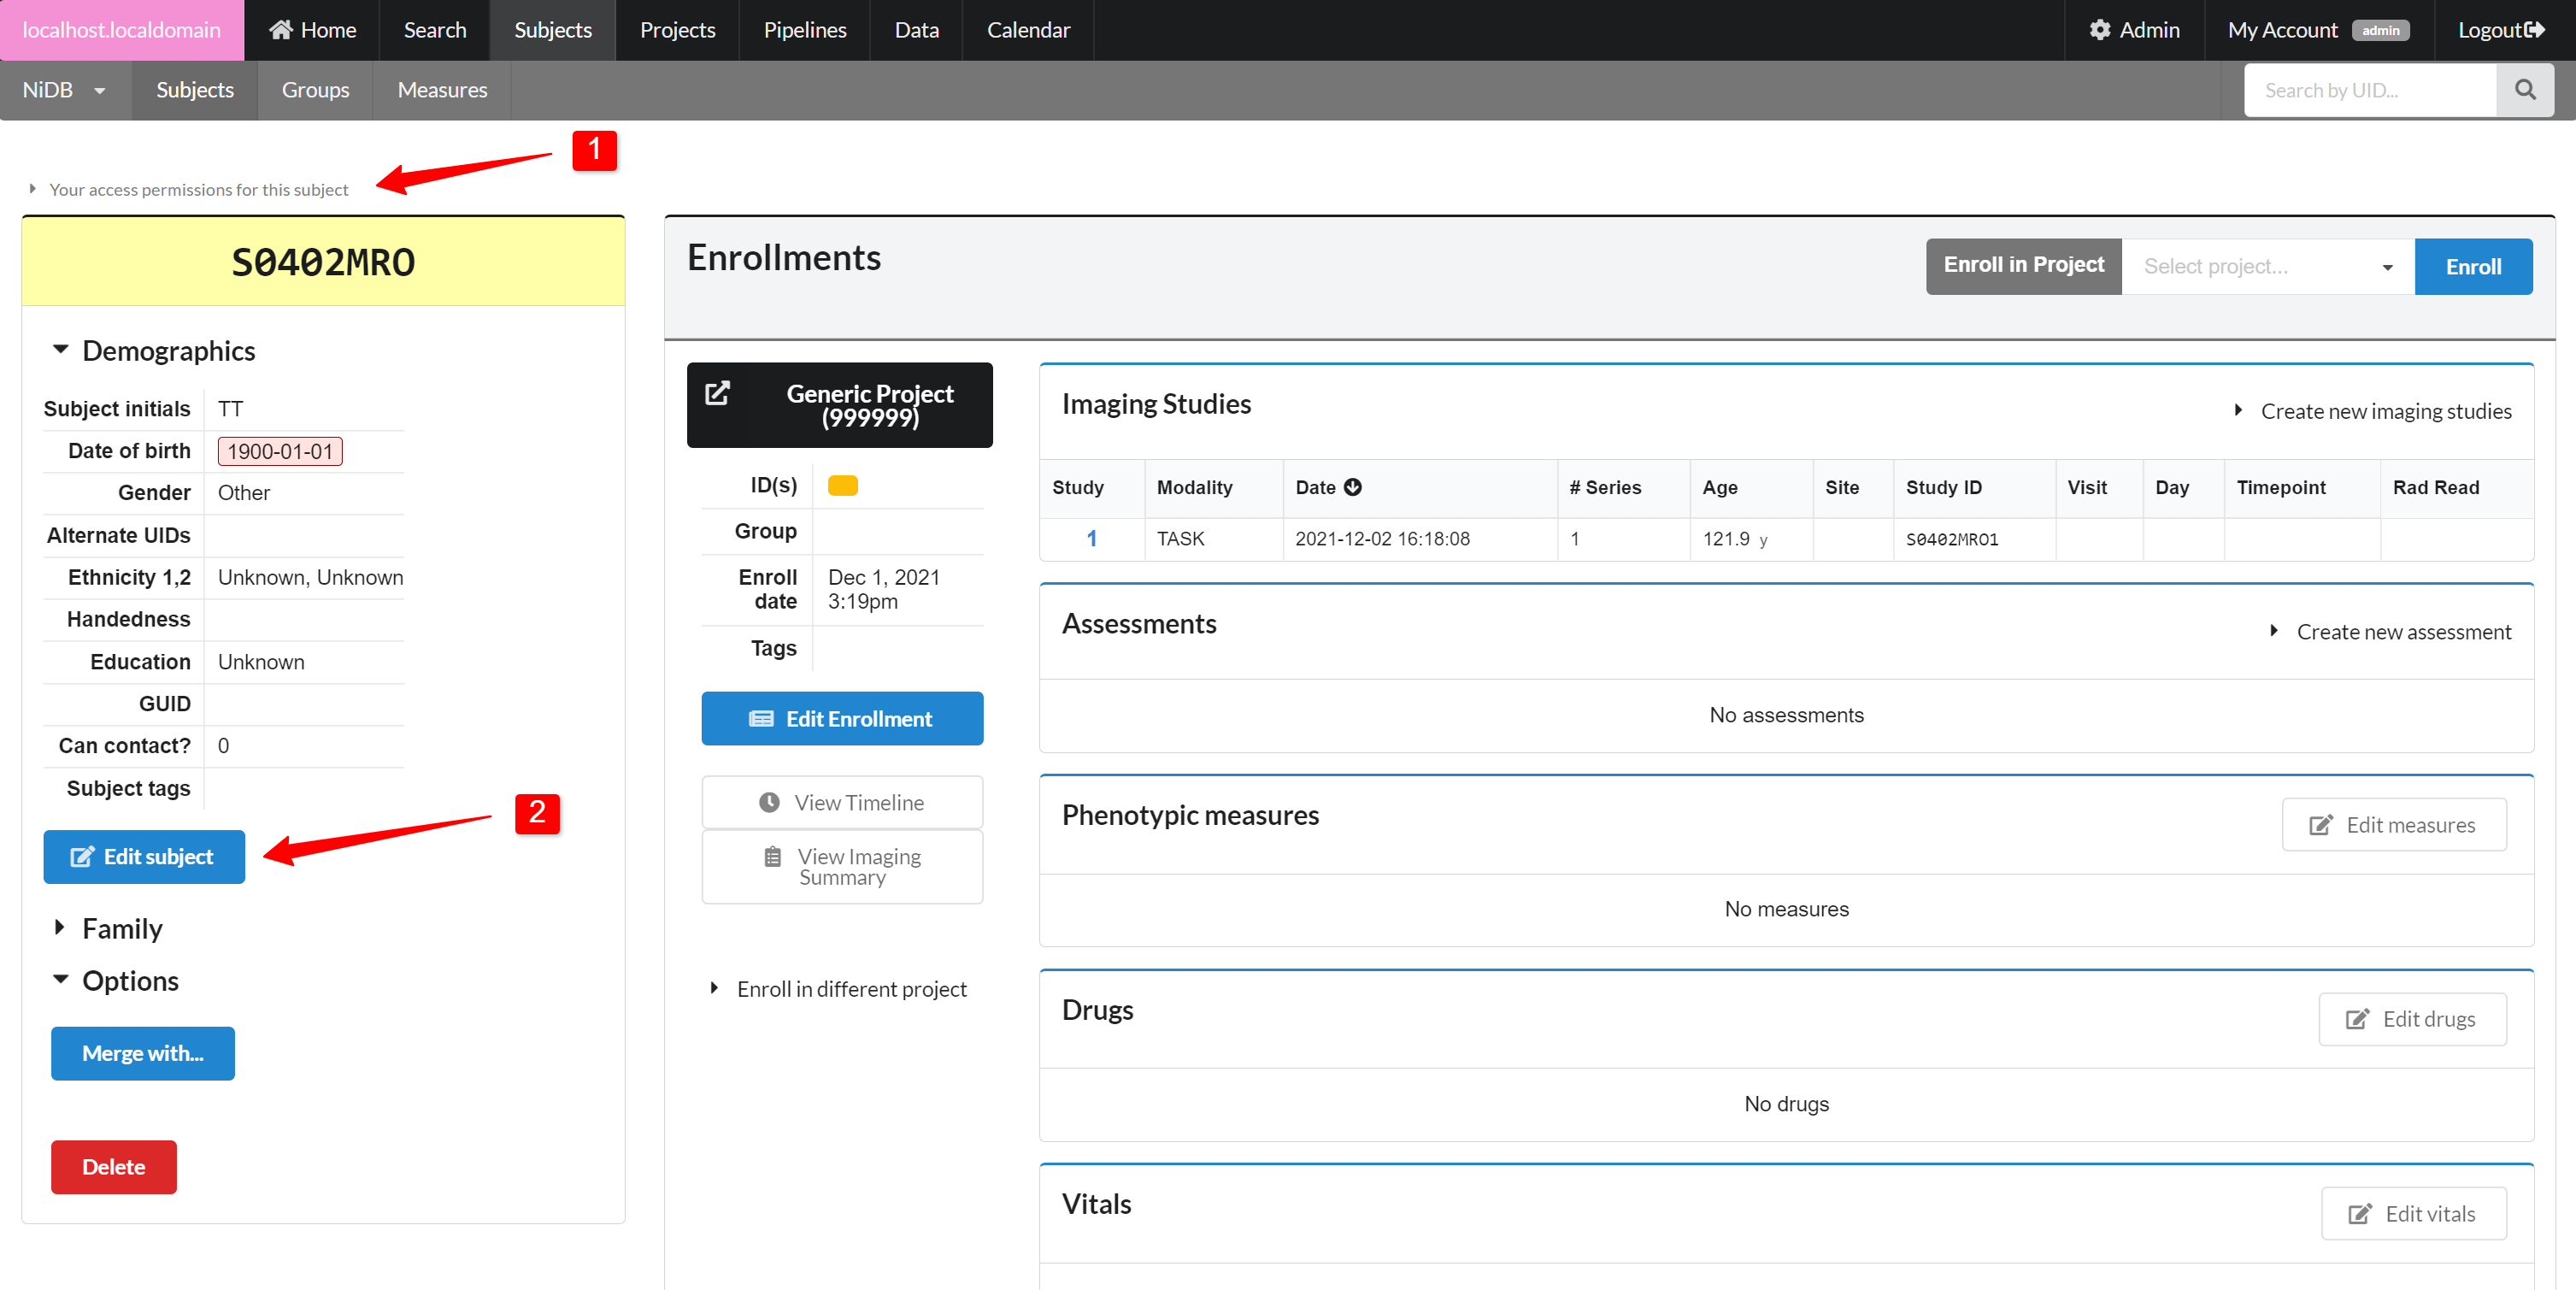
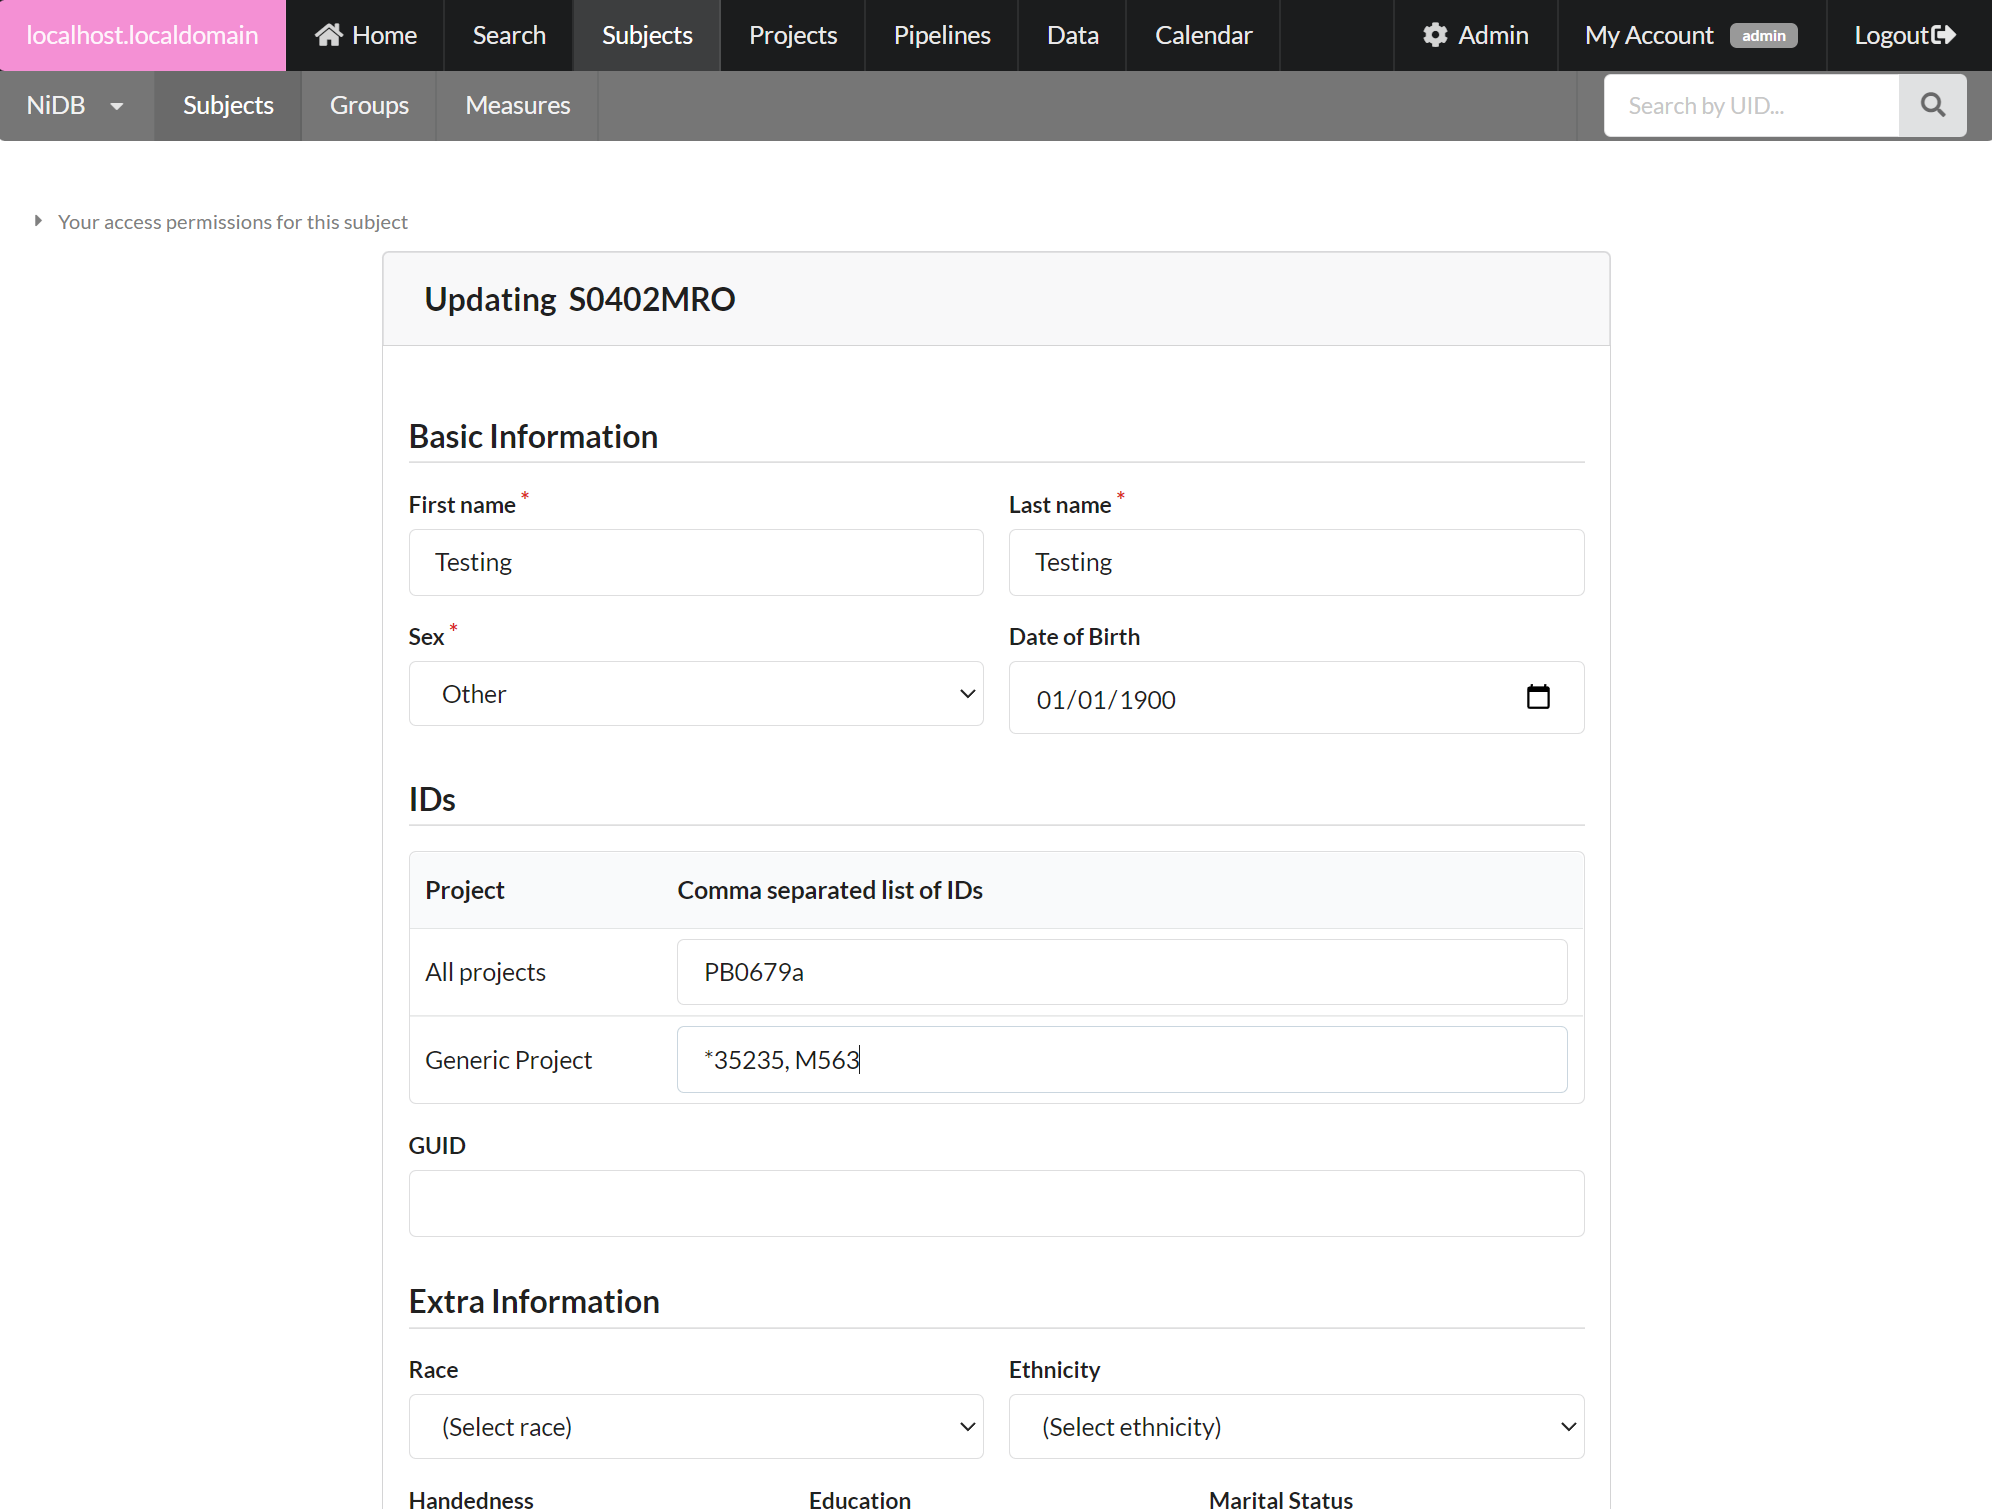
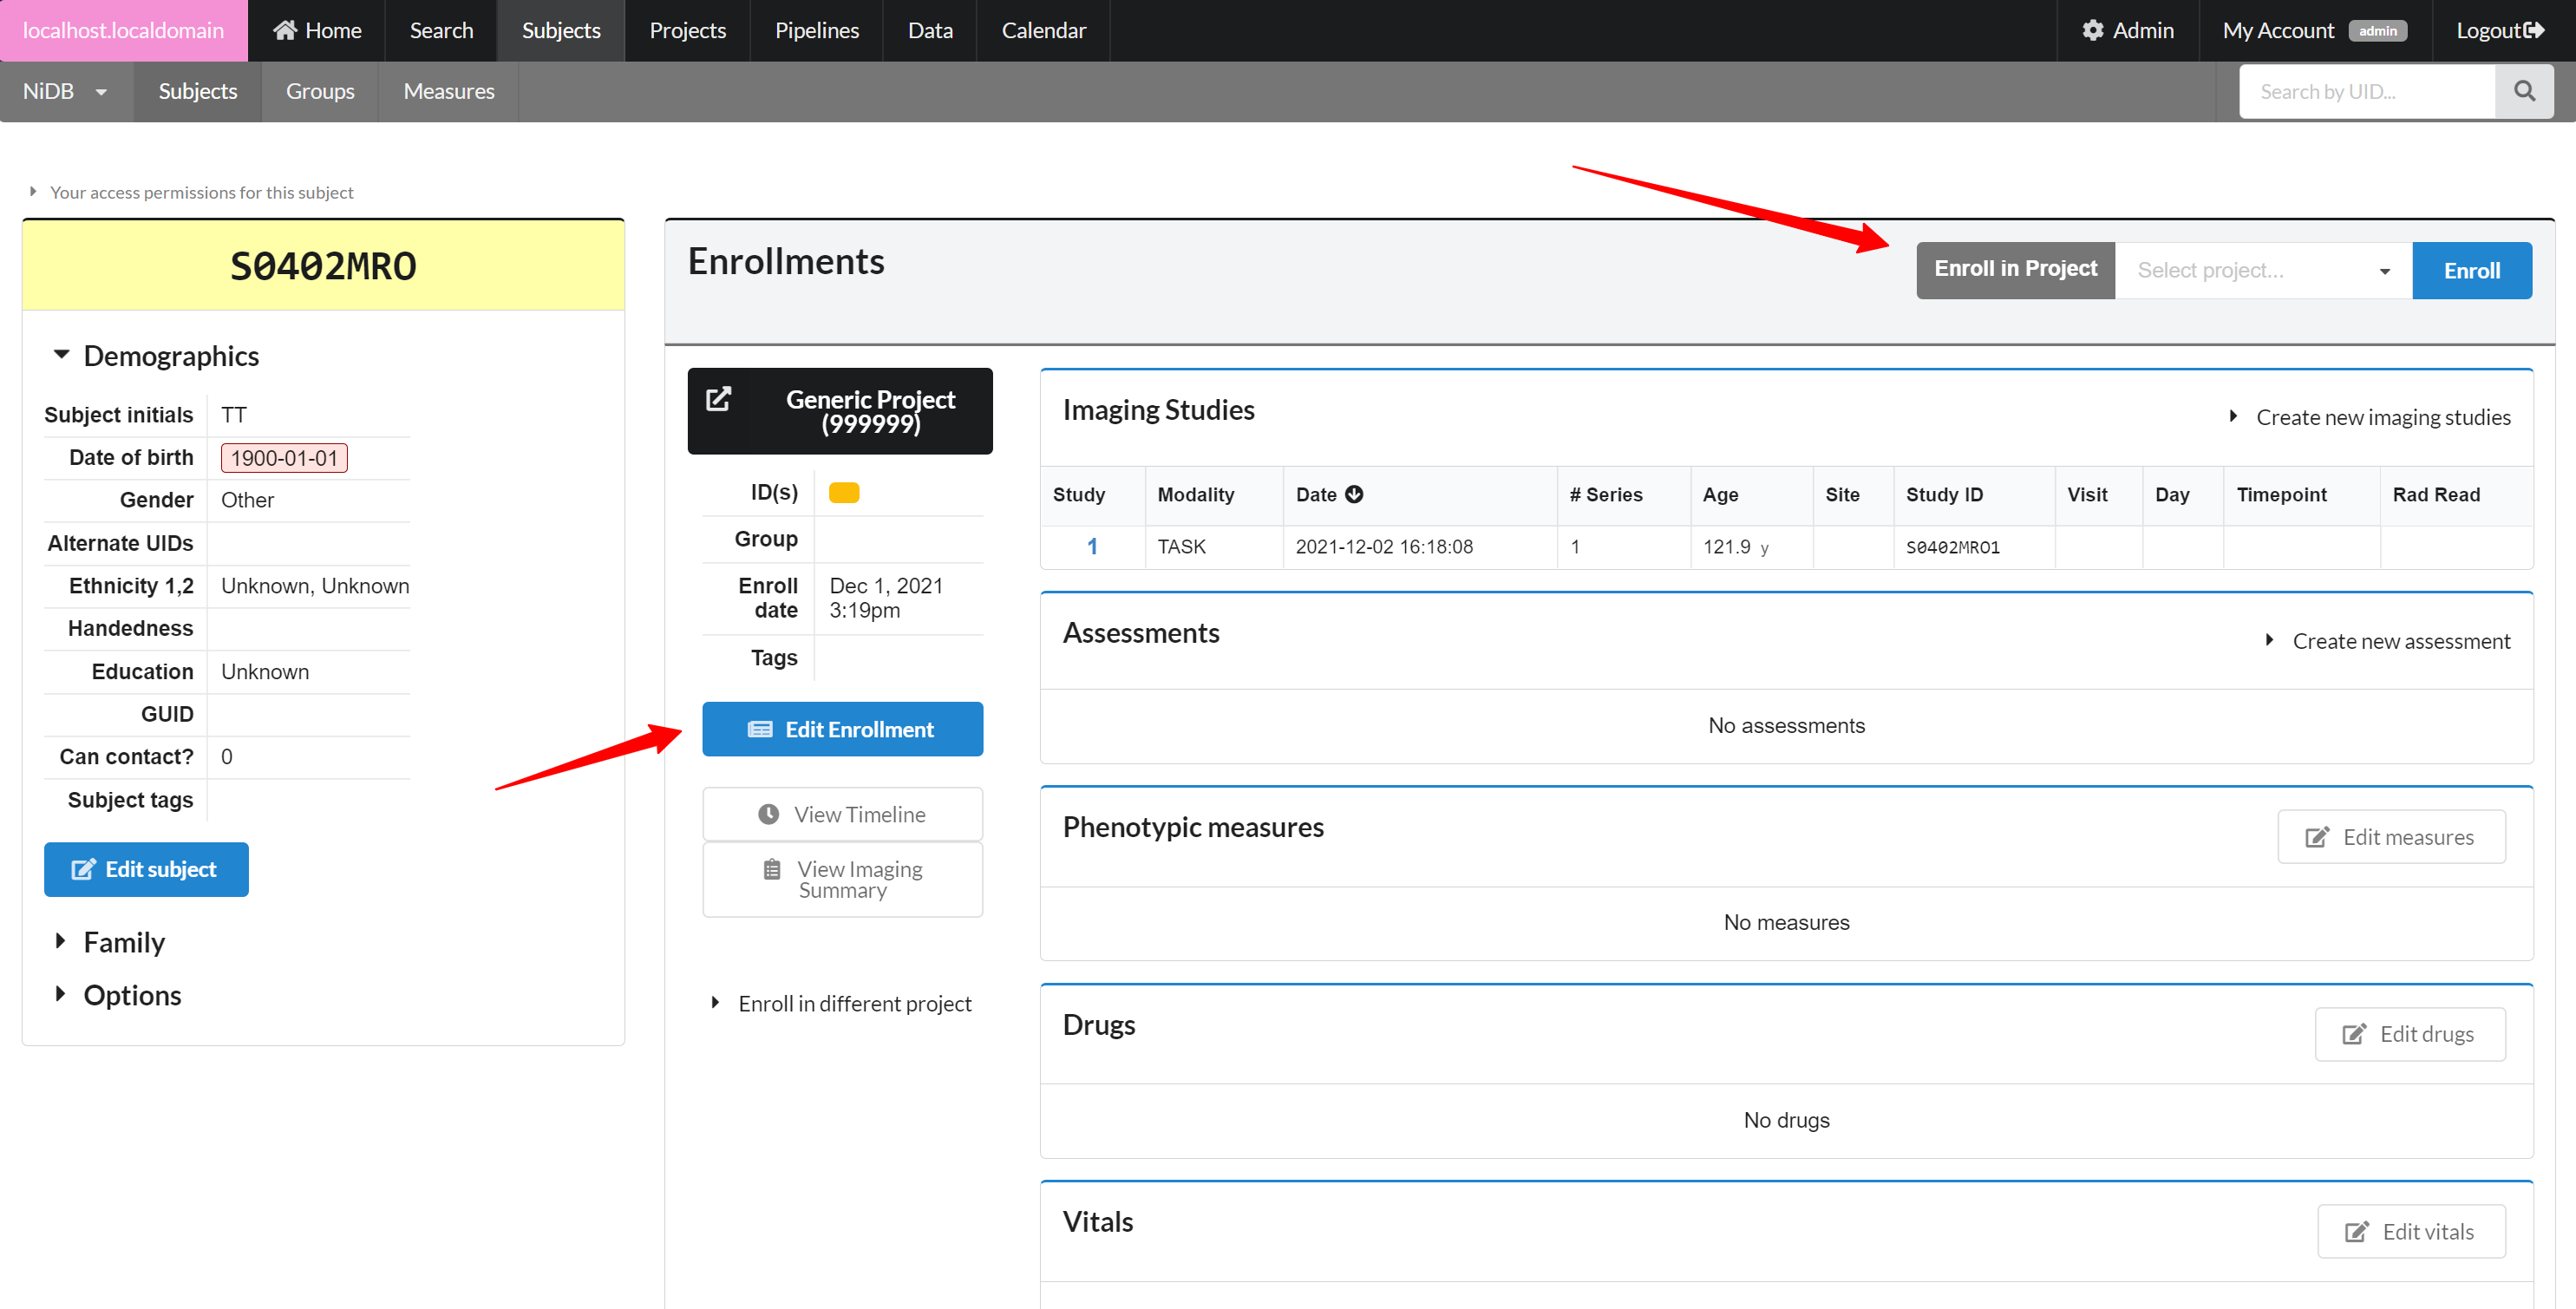
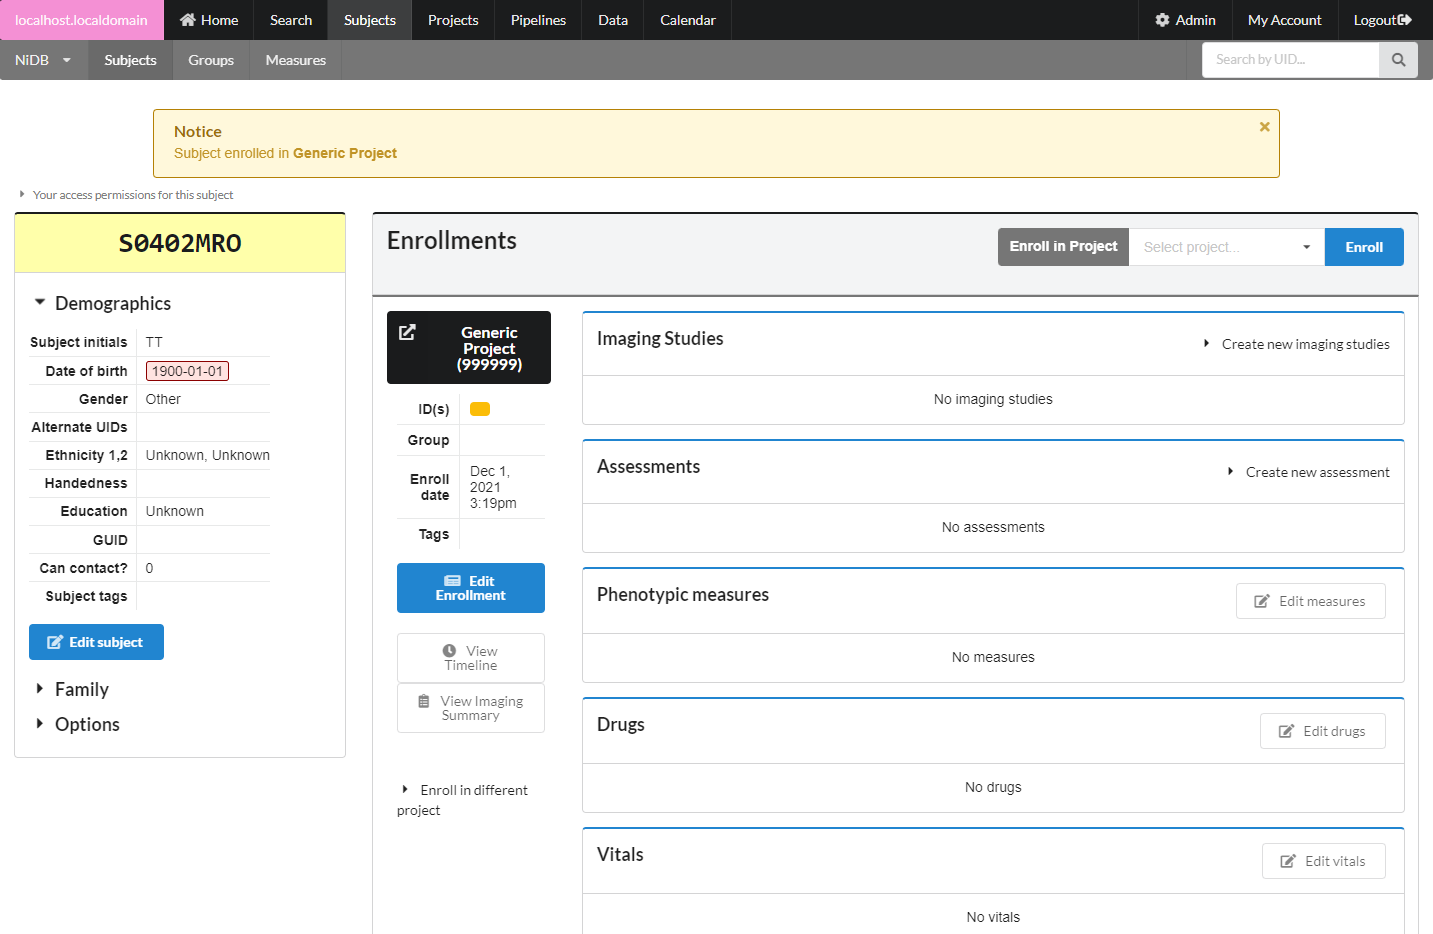
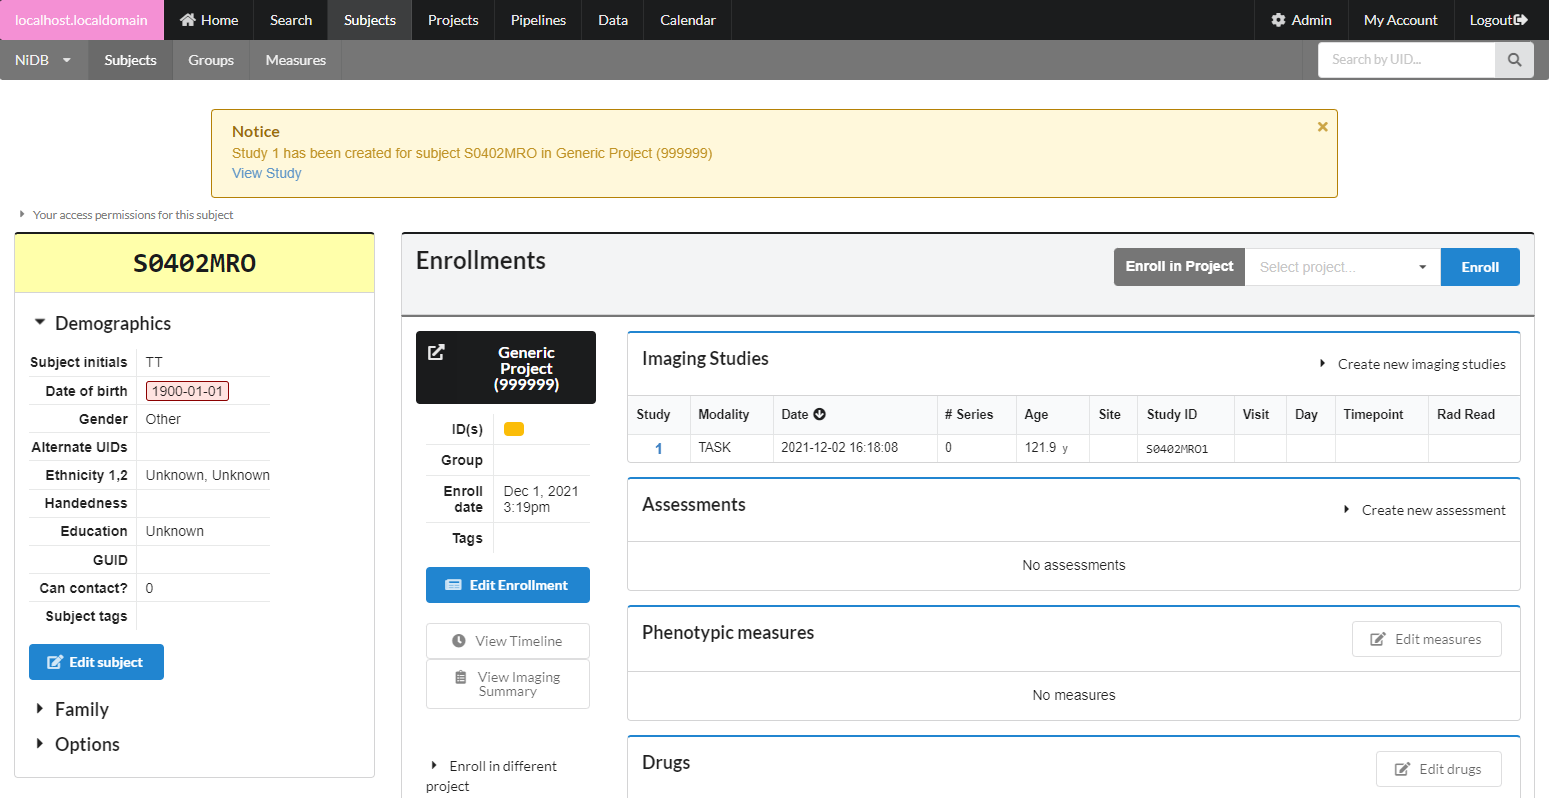
Find your subject by UID or other methods. On the subject's page, you'll see a demographic summary on the left, and the subject's enrollments and studies on the right. The demographics list may show a red box around the DOB if it appears to be a placeholder date like 1900-01-01 or 1776-07-04. On the left-hand side of the page, click the Edit subject button (#2 on the image below). This will show the form to edit demographics. If the edit button is missing, you can check your permissions for the subject by expanding the permissions listing (#1 on the image below).
When editing subject demographic information, required fields are highlighted. Most fields are optional. You can edit IDs on this page, which are reflected for the subject in all projects. The primary alternate ID should have an asterisk in front of it. The primary alternate ID will now be with the main ID for this subject in the specified project. See the ID note below. Click Update to save the demographic information. Confirm on the following page.
A Note About IDs - Identifiers help identify a subject. They're supposed to be unique, but a subject may be assigned IDs after being enrolled in multiple projects. Each project may uniquely identify the subject by the UID which is automatically generated by the system. Or the subject may be identified by an ID generated somewhere else. Maybe the ID is generated by RedCap, or you are given a list of IDs that you need to use for your subjects. If this subject is enrolled in multiple projects, they might have multiple IDs. NiDB is designed to handle this, but it can be a little complicated. Here are some definitions that may help make it simpler
Below are some terms used to describe IDs within NiDB
On the subject's main page, you'll see a list of enrollments on the right hand side. To enroll the subject in a new project, select the project and click Enroll. This will create a new enrollment.
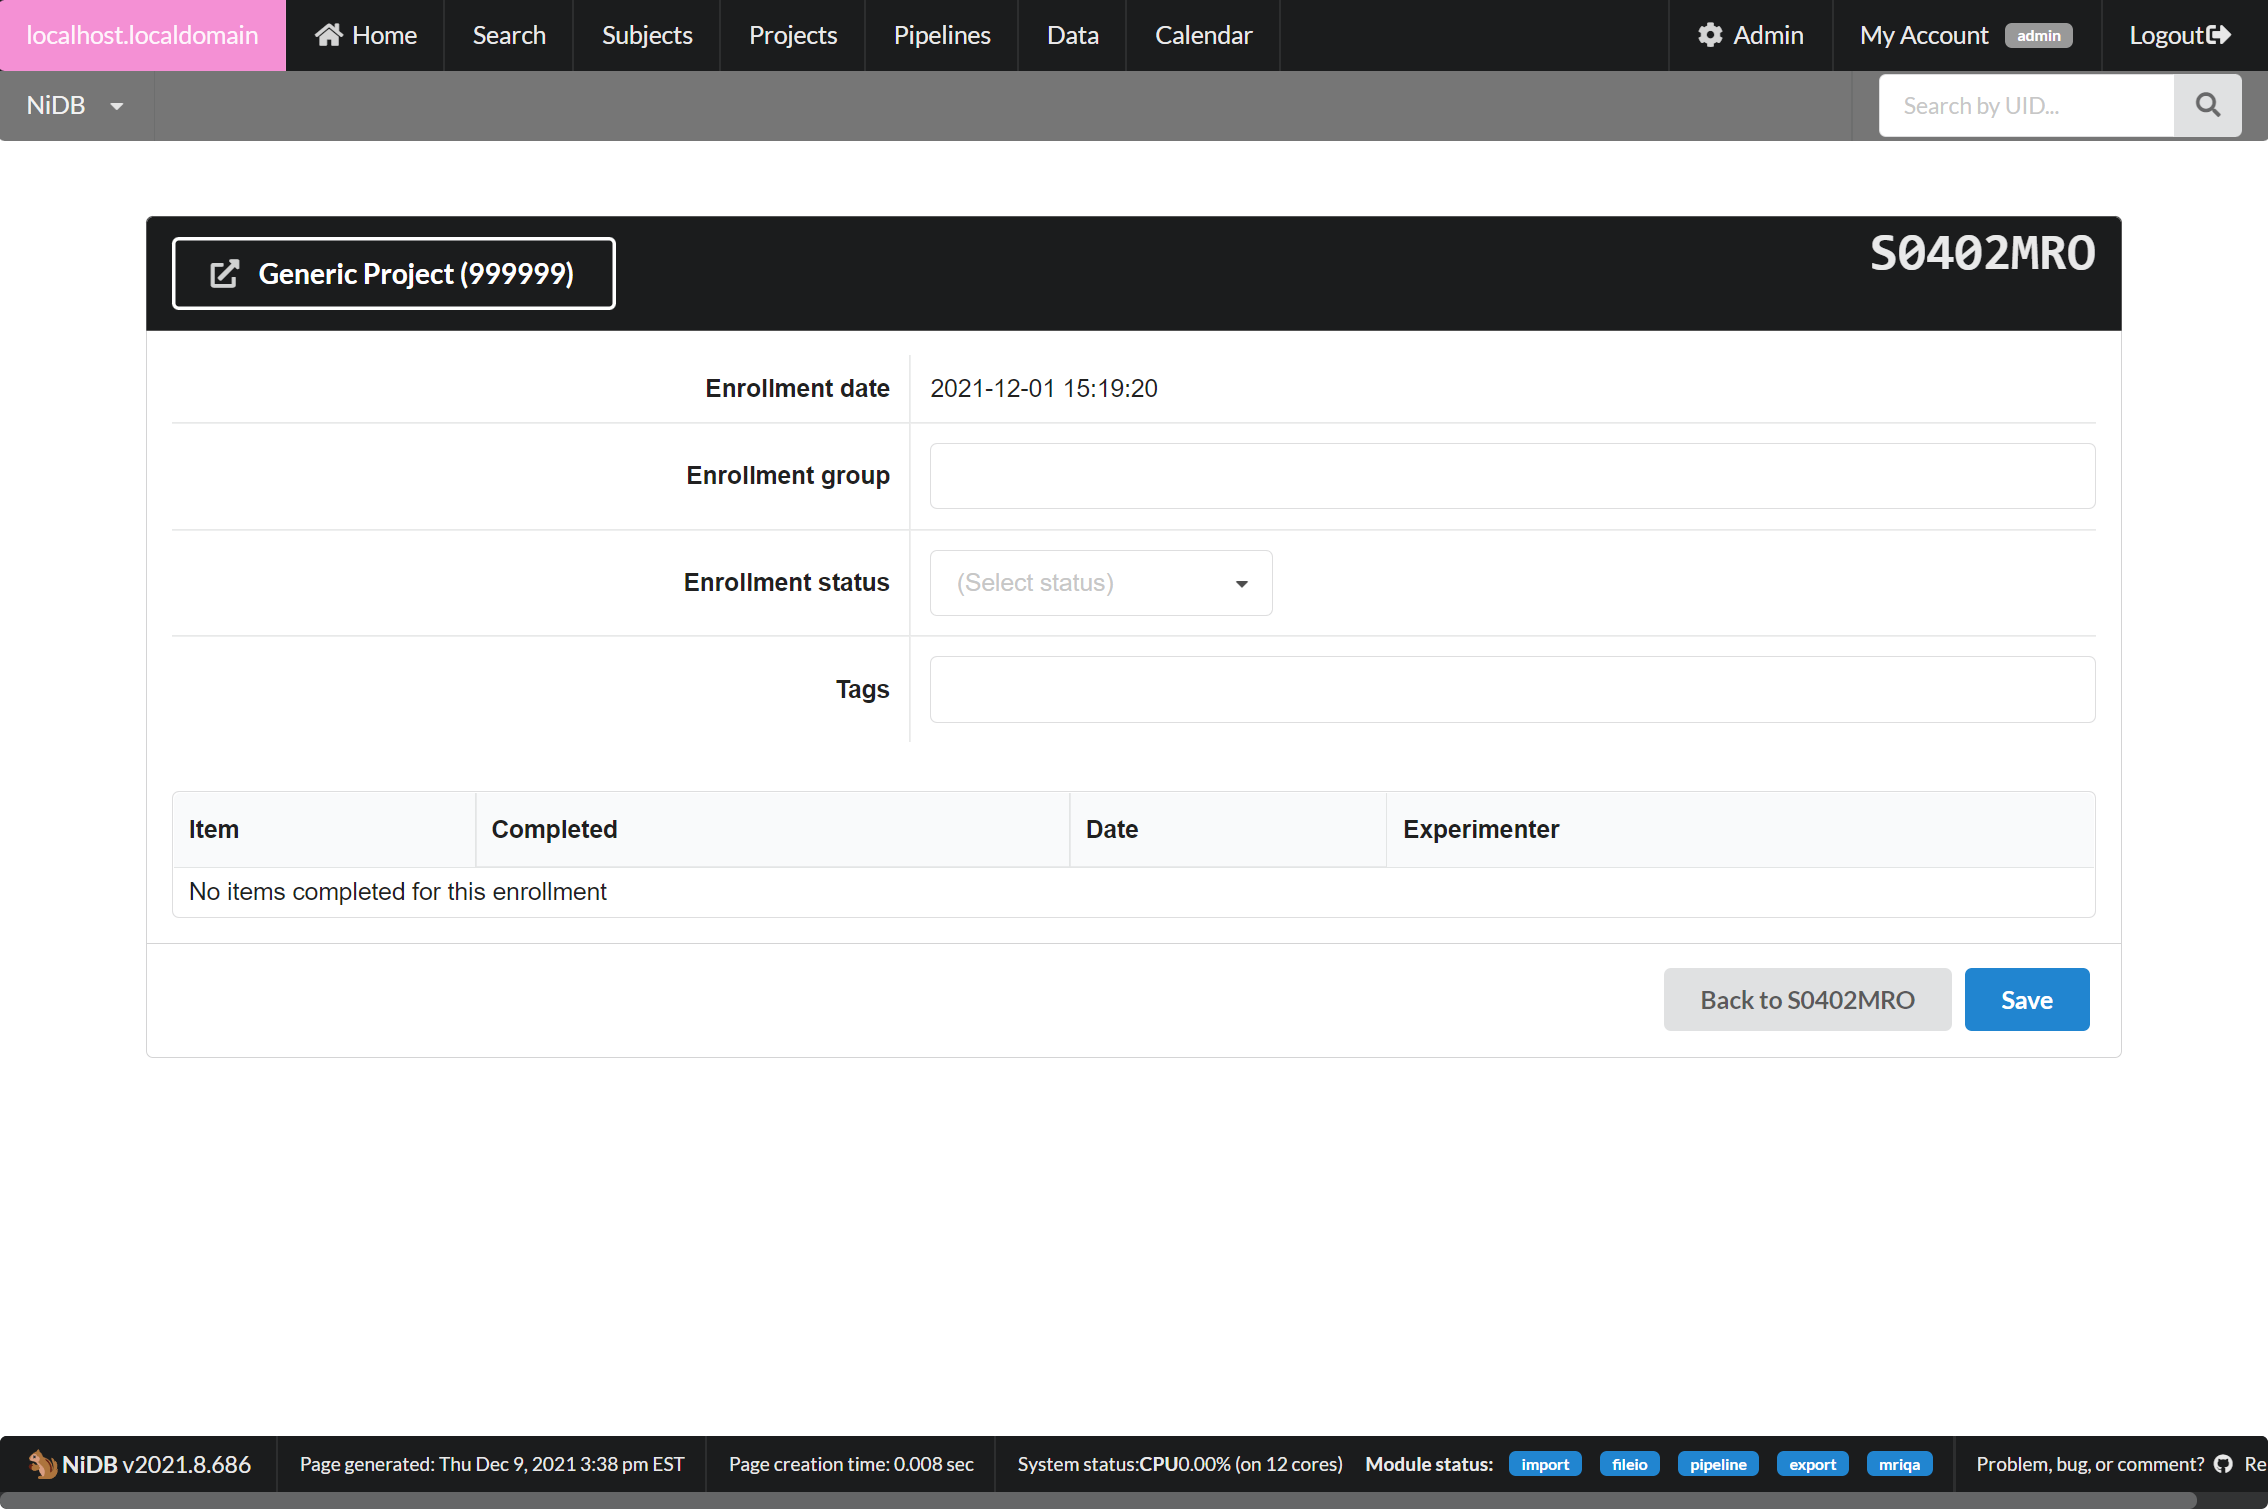
You can edit an existing enrollment by clicking the Edit Enrollment button. There isn't a whole of information available on this page, but enrollment checklists can be useful to check if a subject has completed all of the items for the project. Subjects can be marked as excluded, complete. Enrollment group can also be specified, such as CONTROL or PATIENT.
Timelines
For projects with a chronological component, you can view a timeline of series for this enrollment. Click the View Timeline button on the subject's page, for the enrollment. It will display a timeline of series. Bottom axis displays the date/time. You can change the parameters of the timeline by selecting date range or series.
Enroll in Different Project
If your subject is enrolled in a project, but you need to move the enrollment (and all of the imaging studies, enrollment info, assessments, measures, drugs, and vitals) into a different project, you can do that by expanding the Enroll in different project section. Select the new project, and click Move. You must be an admin to do this.
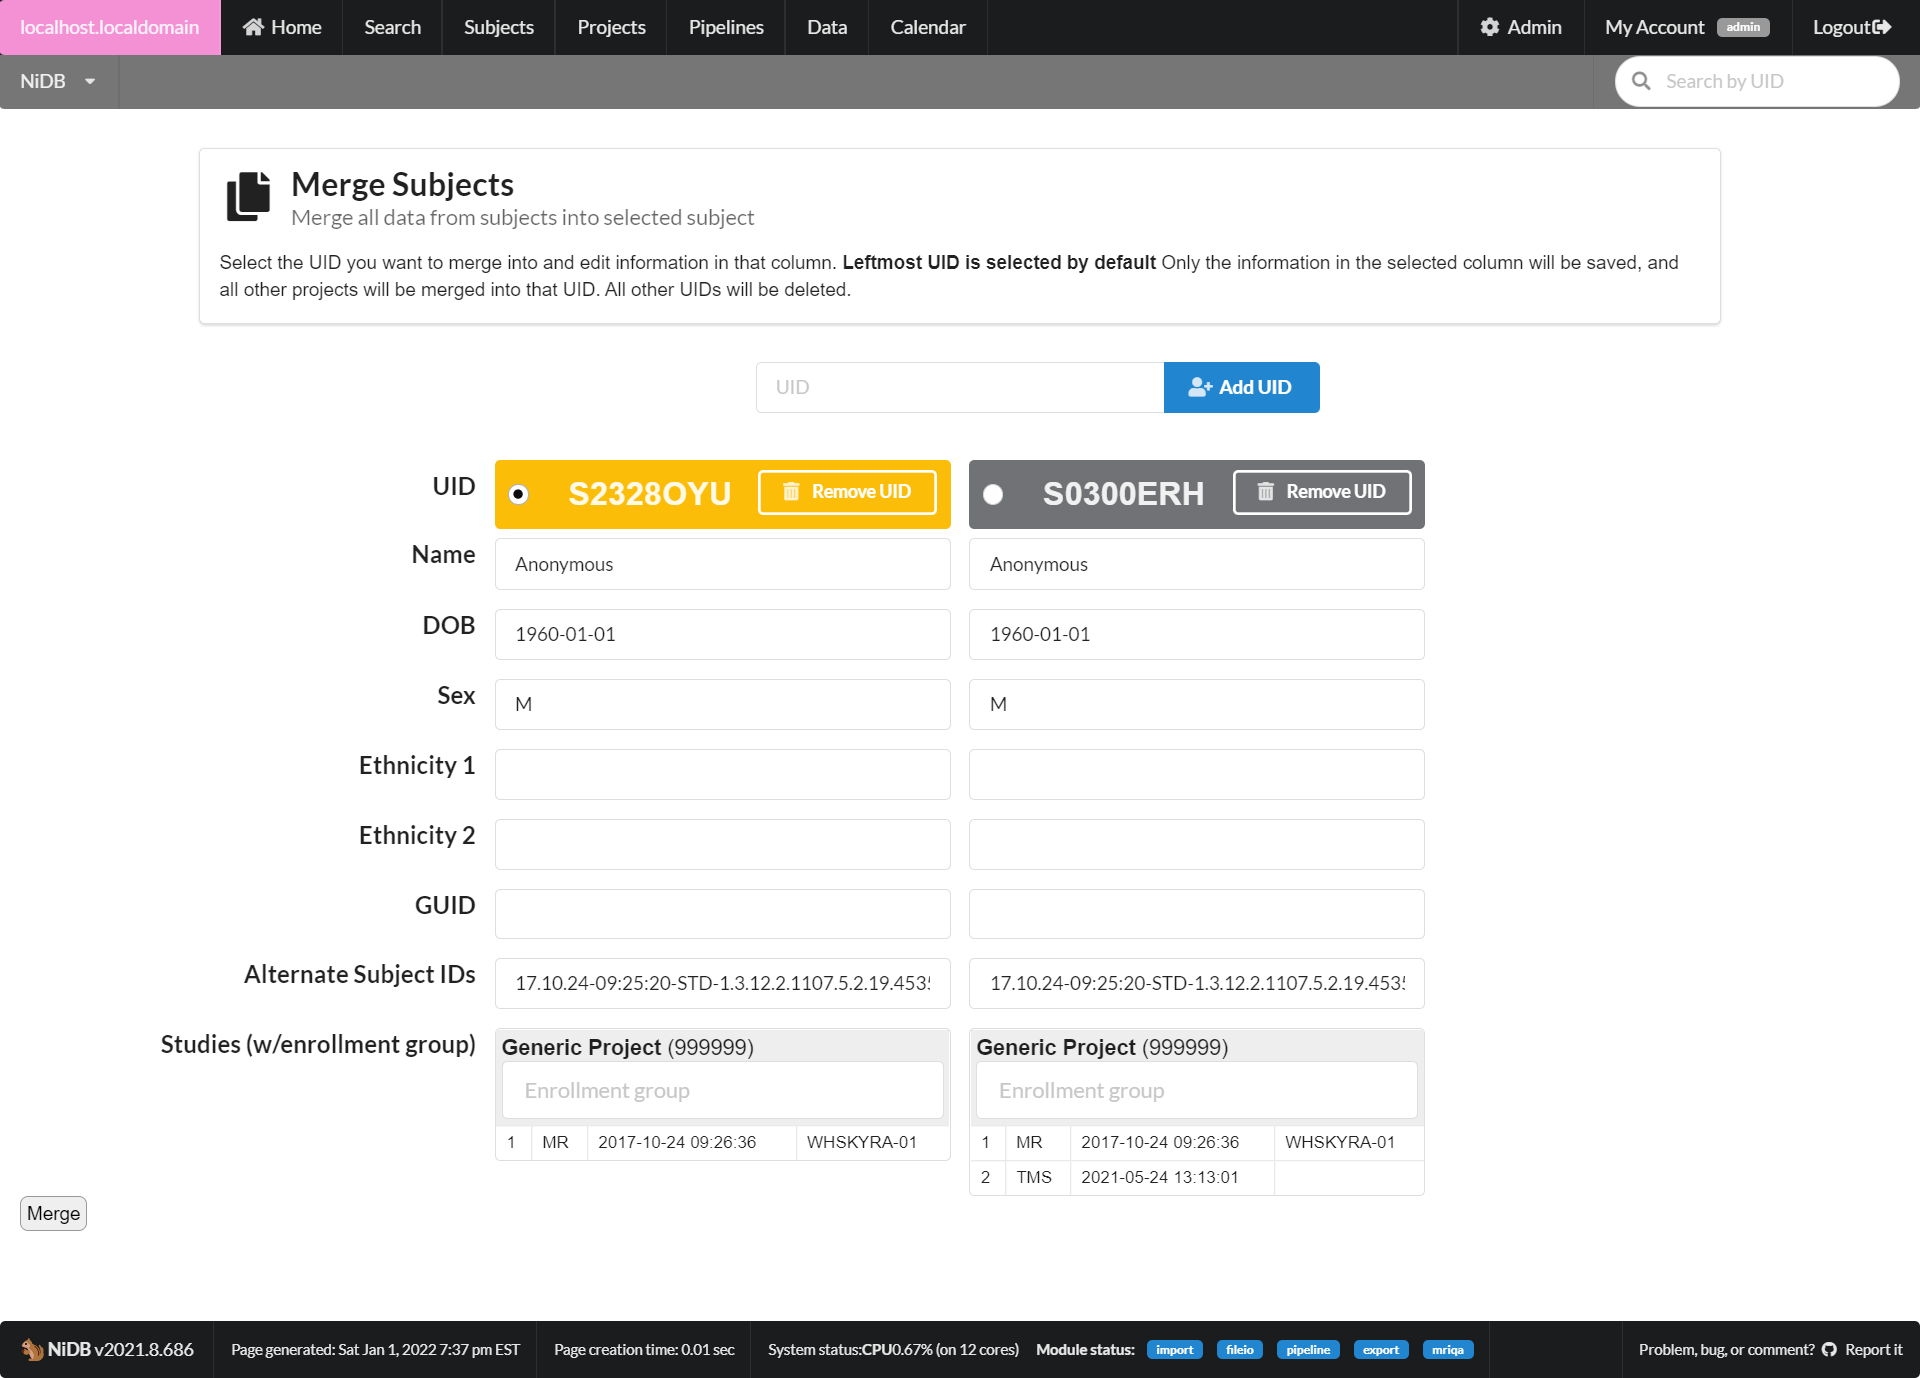
You must have admin permissions to merge subjects. To merge subjects, first go into one of the subject's main pages. On the lefthand side of the page, expand the Operations section. Click Merge with... and it will bring up the merge page. On the top of the page, you can add other UIDs you want to merge. Once all subjects are added (up to 4), they will be displayed side-by-side.
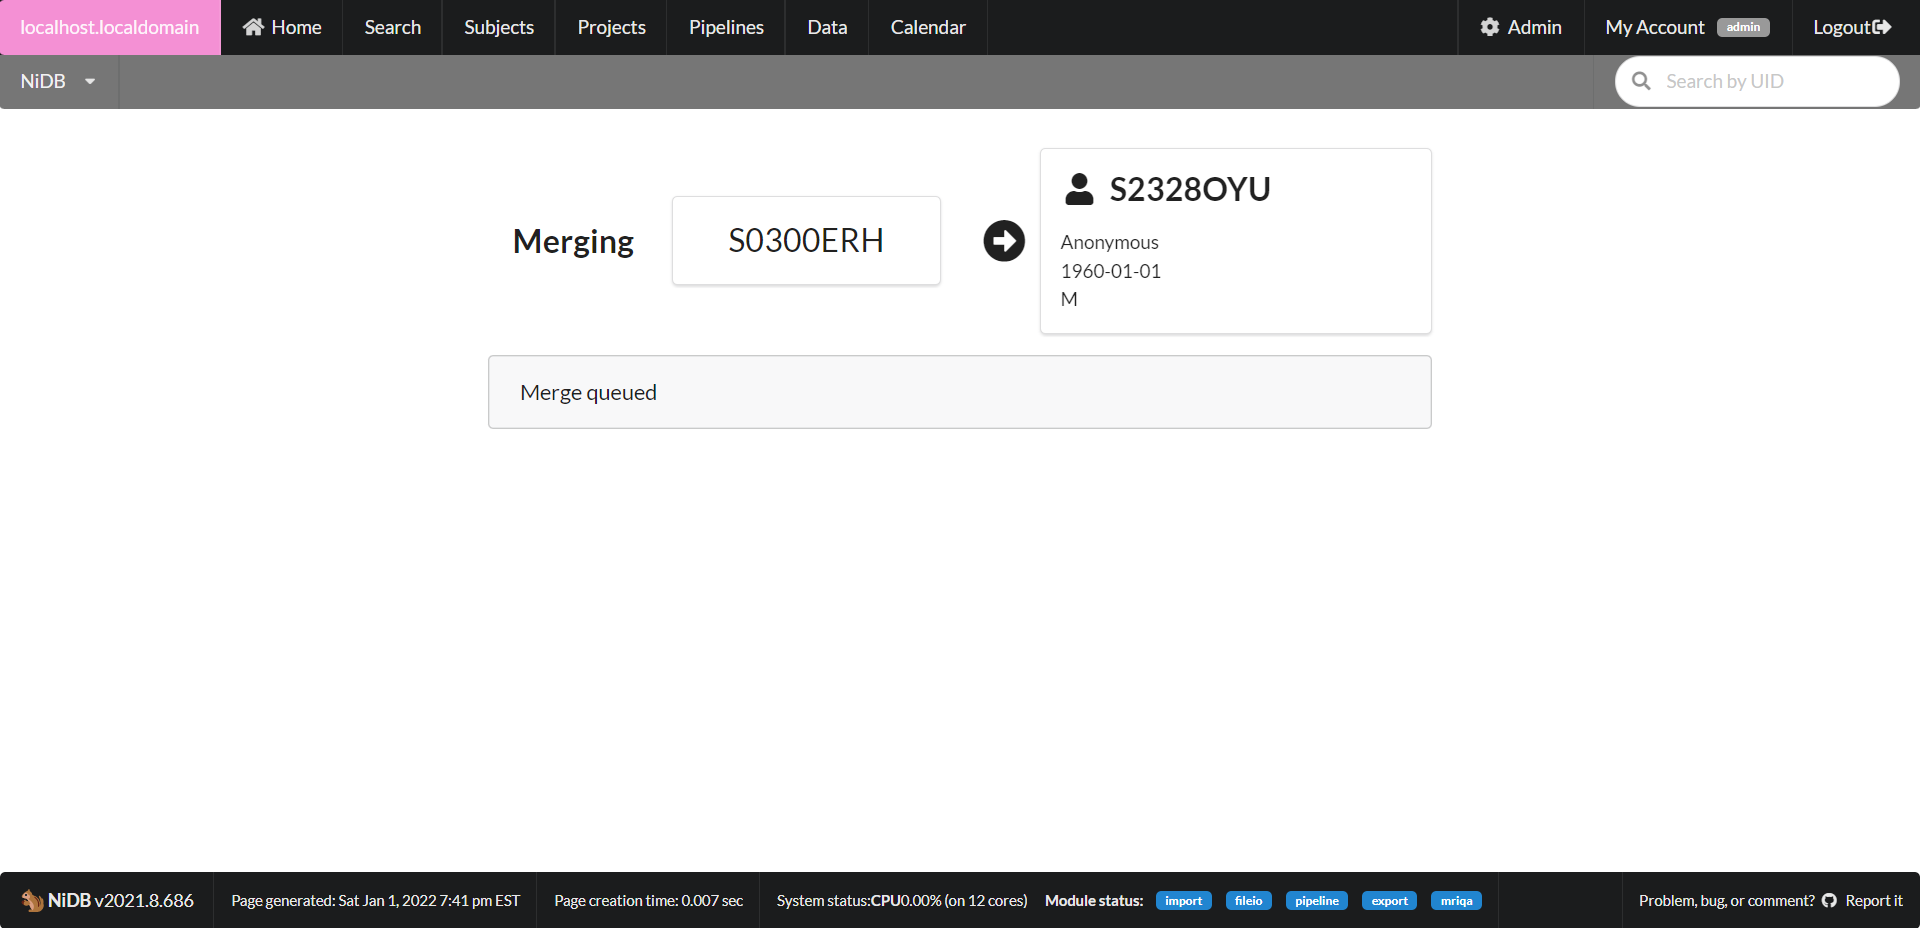
Select the UID to be the final merged UID. Enter all demographic information that will be in the final UID into that column. Once merged, only the information in that column will be saved for the final subject. All other subjects will be marked inactive. All of the imaging studies will be moved from the other subjects to the final subject. When all information is complete, click Merge. The merge will be queued and will be run in the background. Check the status of the merge under My Account → File IO.
Only admins can delete subjects. To delete a subject, go to the subject's page. On the lefthand side, expand the Operations section and click the Delete button. It will confirm that you want to delete this subject. Confirm on the next page. Subjects are not actually removed from the NiDB system, but are instead marked as inactive. Inactive subjects do not appear in search results or summaries, but will show up in certain sections of the project page and if searching by UID directly. A subject can be undeleted if necessary.
Subjects can be undeleted by following the same process as deleting a subject, except the Undelete button will appear under the Operations section of the subject's page.
DICOM Derived - Studies derived from DICOM data are displayed differently than other modalities because they contain detailed header files which are imported automatically. Because of the complex ways in which subject/study/series heirarchy are stored in DICOM files, archiving is done completely automatically.
MRI - MRI studies allow for storage of behavioral data associated with fMRI tasks. Other data such as eye tracking, simultaneous EEG, or other series specific data can be stored in the behavioral data section of MRI series.
All Other Modalities - Series information is less detailed, series can be created manually, and there is no option to store behavioral data for each series.
For any modality, edit a study by viewing the study page and clicking the Edit Study button on the lower left of the page. Depending on the modality, different study information may be available.
For non-MRI modalities, the Study date/time (and all series date/times), visit type, visit number, and visit timepoint can be edited directly on the study page without clicking the Edit Study button.
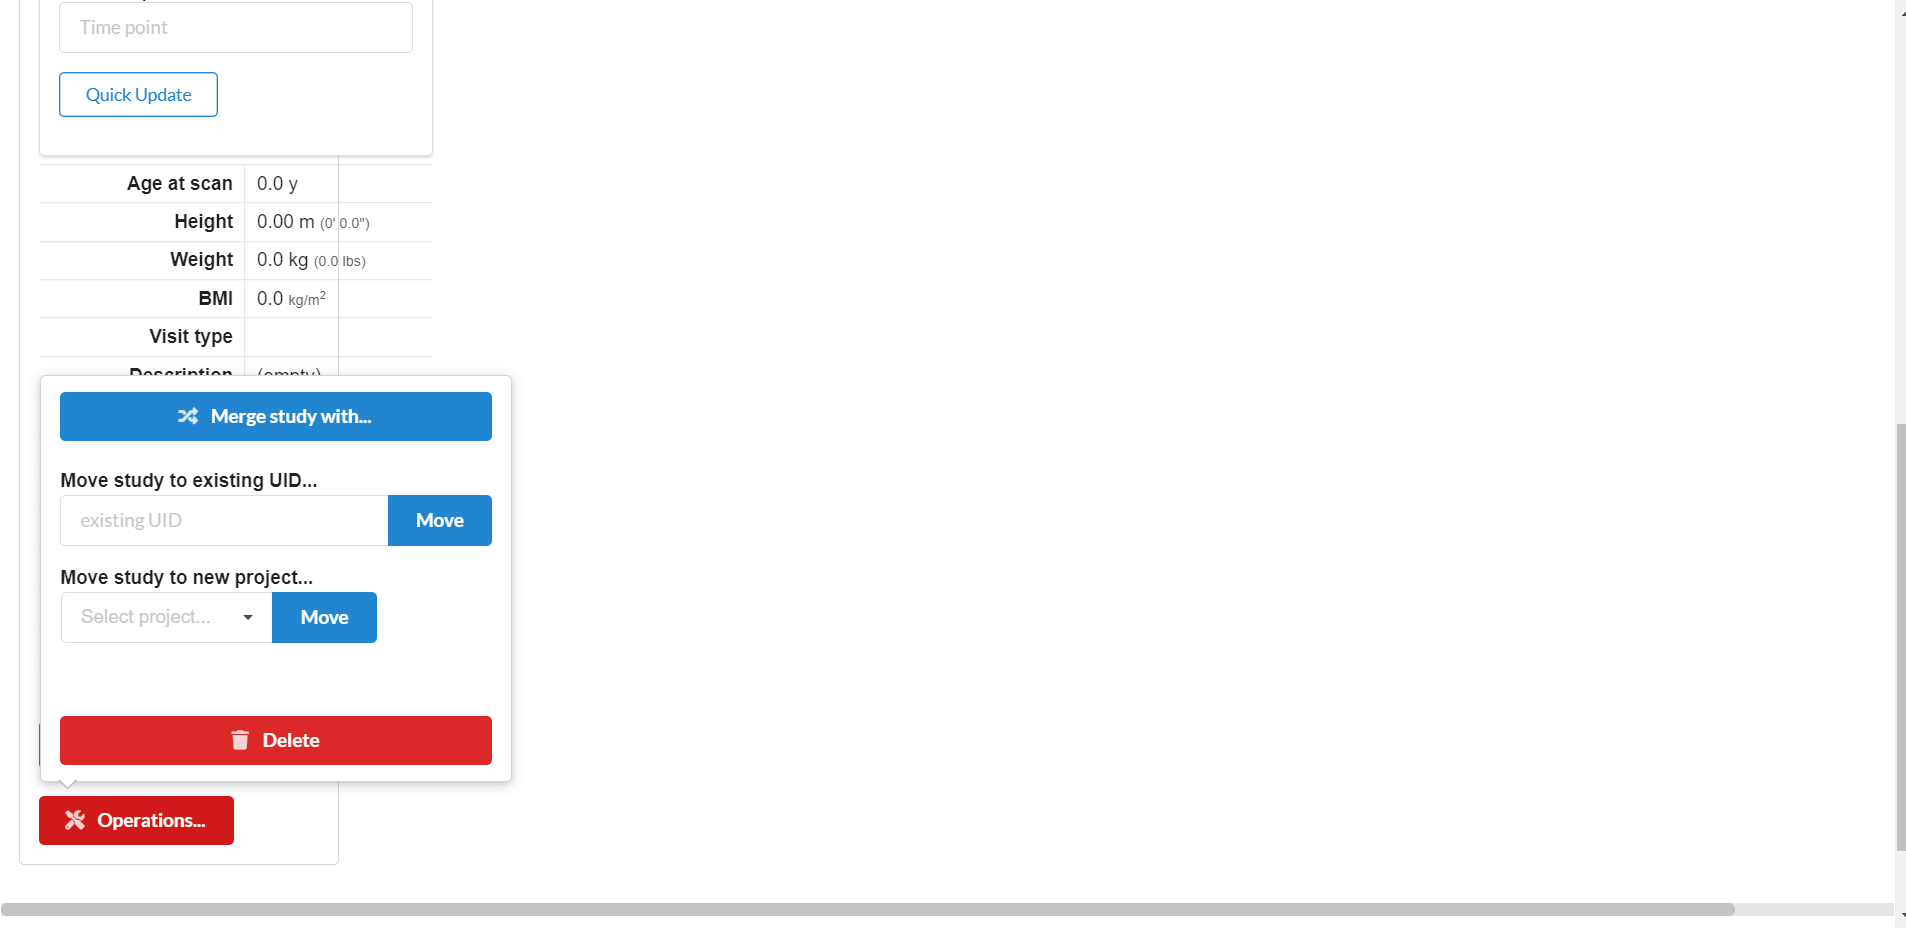
Occasionally, weird things can happen when importing data such as each series of an MRI study being inserted into it's own study. If the single study had 15 series, it might create 15 seperate studies, each with one series. This can be fixed by merging all of the series into one study. To merge studies (of the same subject/enrollment/modality) together, go into the study page and click the Operations button. A sub-menu will pop up with a Merge Study with... button. A list of available studies will be displayed.
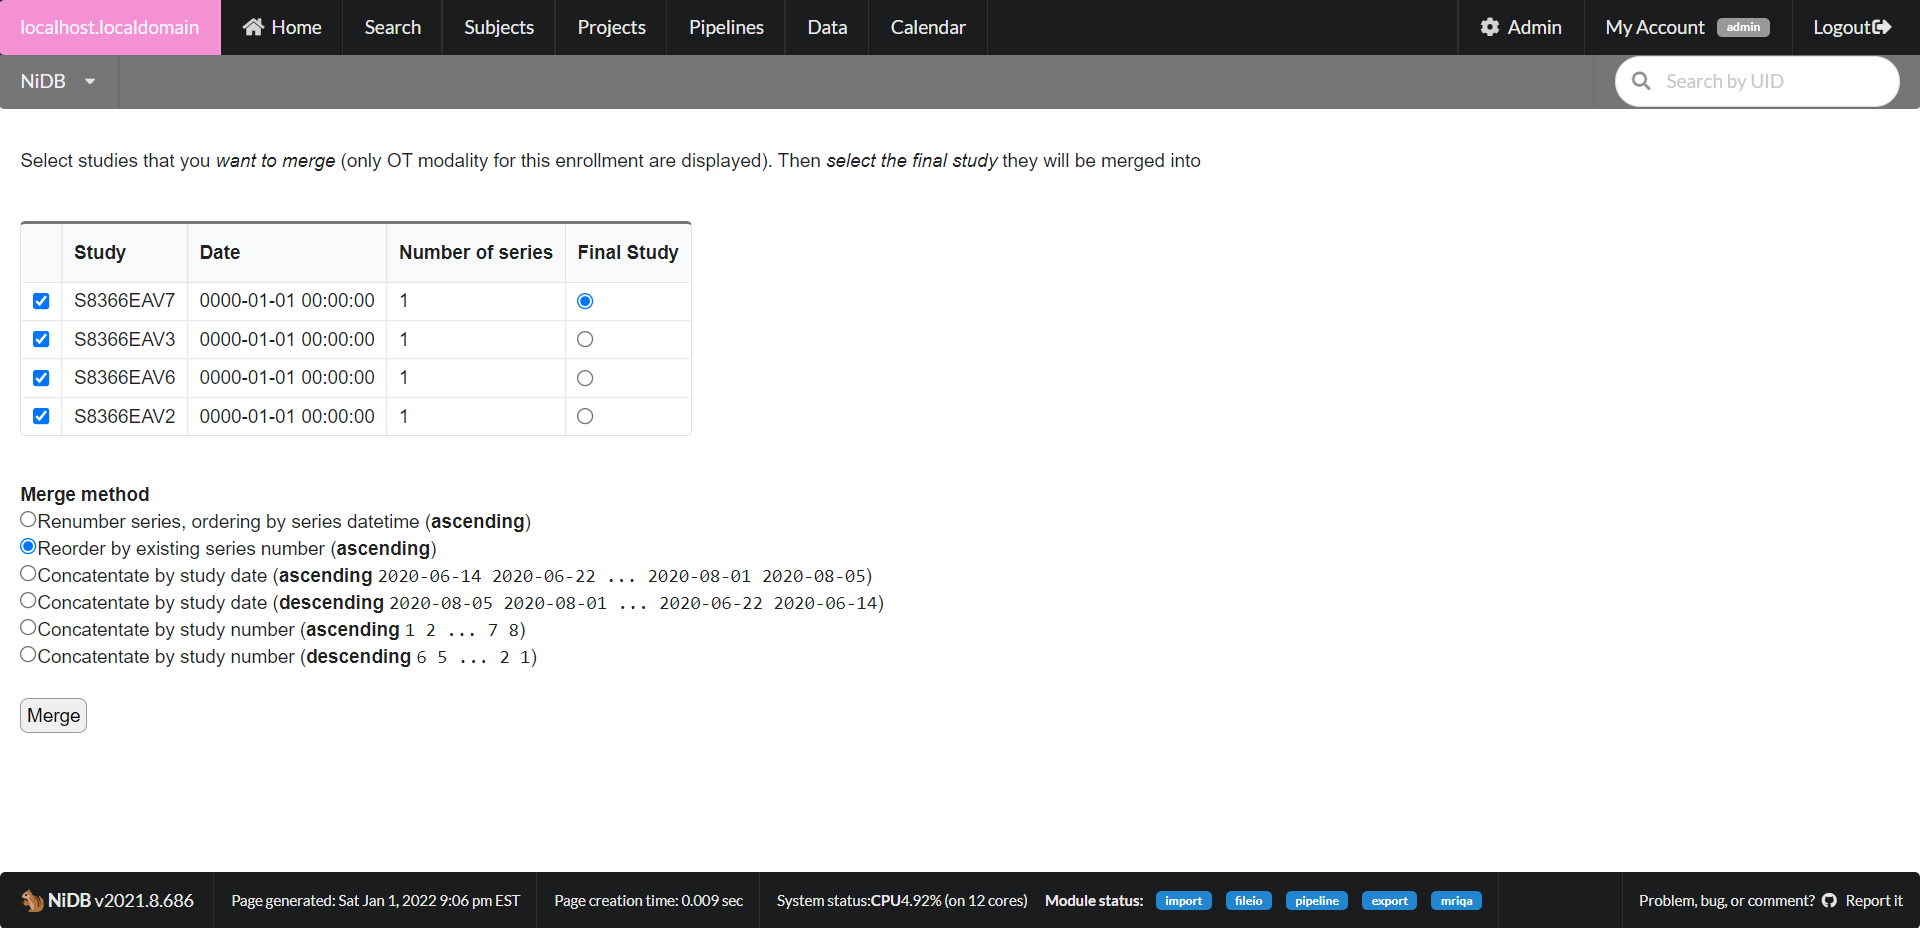
It will display a list of studies of the same modality that can be merged. Choose the study number you want as the final study, and the merge method. CLick Merge, and your merge will be queued. Check the status of the merge by going to My Account → File IO.
Studies can be moved into different projects (different enrollment) or to different subjects. To move studies, click the Operations button on the bottom left of the study page which will display options for moving the study.
To move to an existing subject, enter the the UID and click Move. To move the study to an existing enrollment (a project the subject is already enrolled in) select the project and click Move.
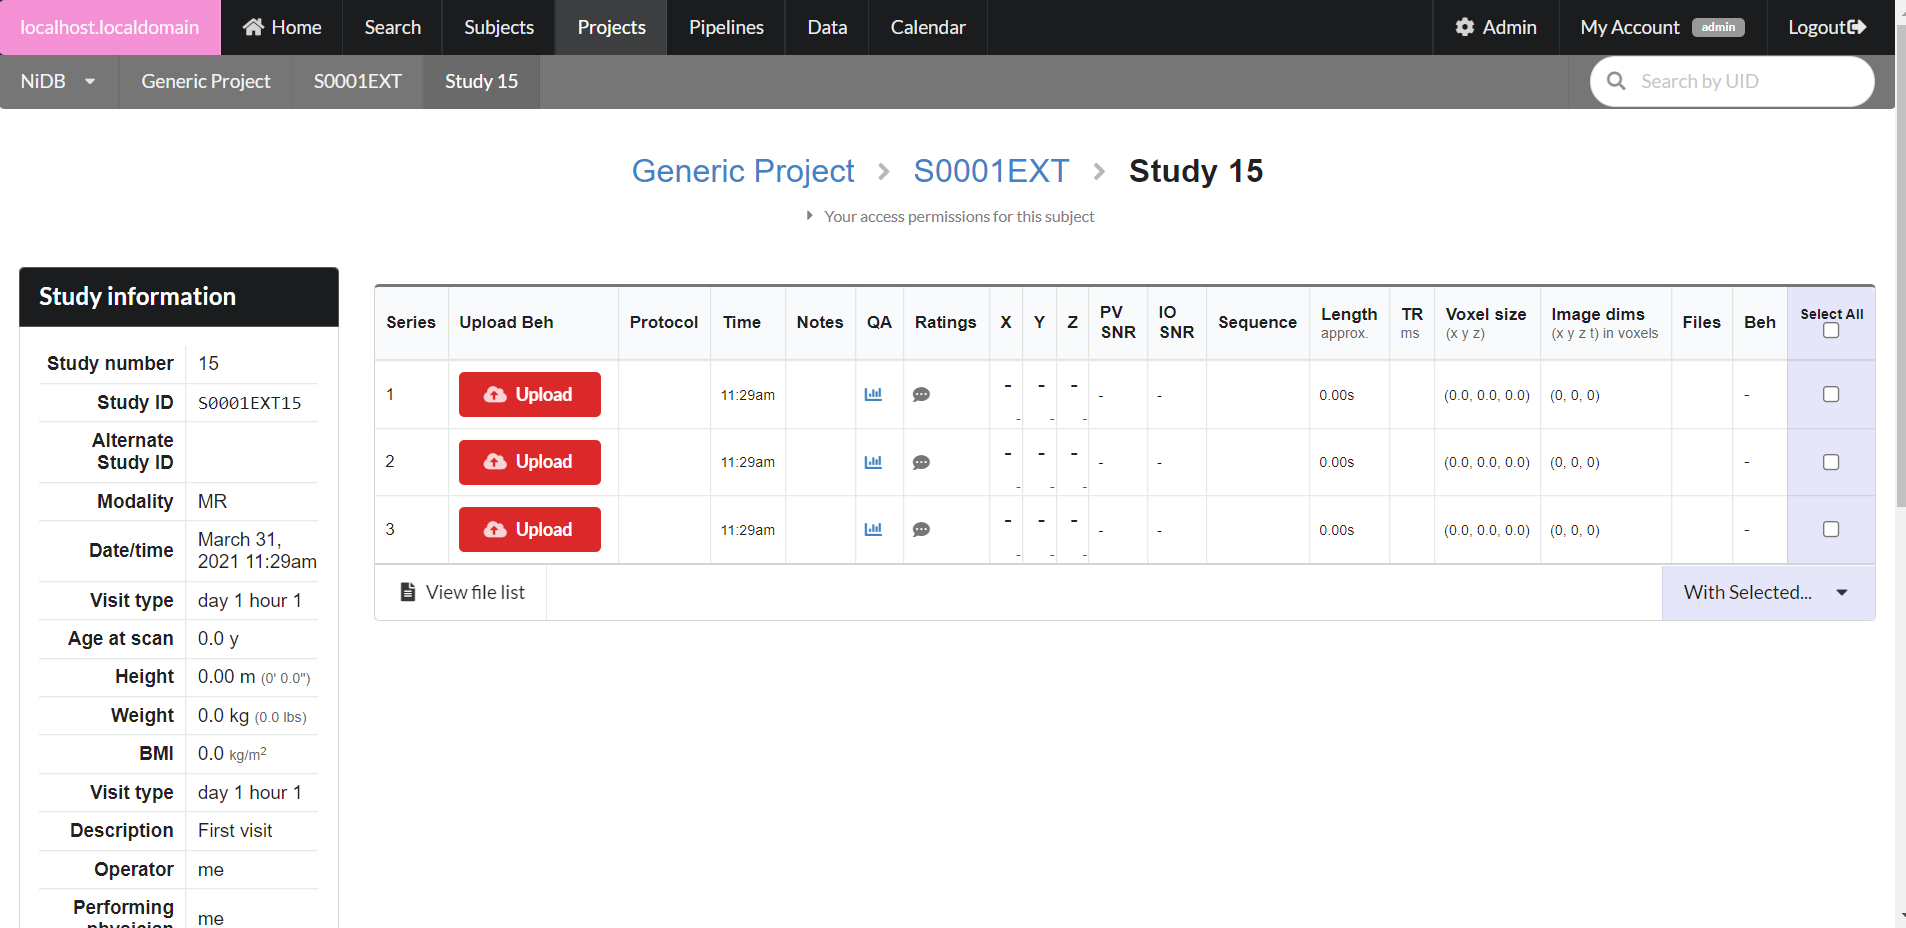
For DICOM derived series, most information will be displayed on the main study page. To view a thumbnail of the series, click the icon below the protocol name. To view DICOM header information, click the protocol name. To view detailed QA information, click the chart icon. To view or edit ratings, click the speech bubble icon. To download this series as a zip file, click the download icon under the Files column. To download the behavior data (if MR series) click the download icon under the Beh column. To view a list of files associated with the series, click View file list button.
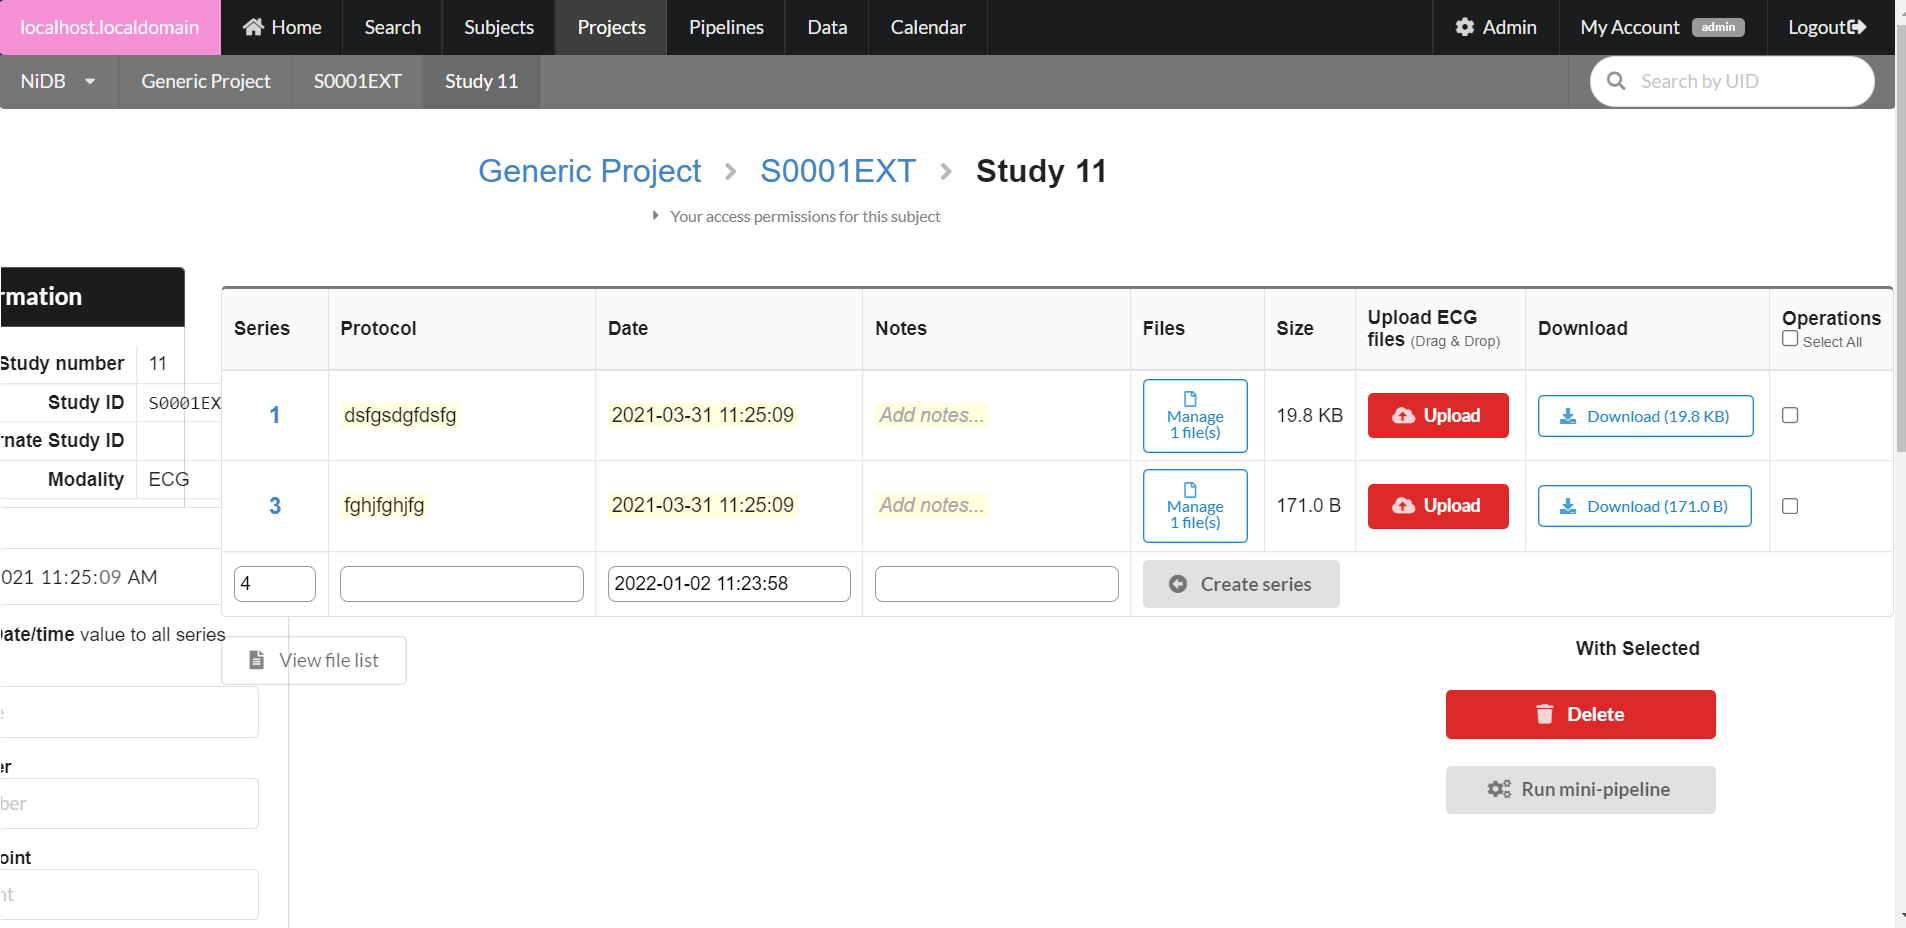
Series information can only be edited for non-DICOM derived series. To edit the series information (protocol, datetime, notes) click the series number, edit the information, and click Update. To upload new files to the series, drag and drop them onto the Upload button. To manage the existing files, click the Manage n files button. This will display a list of the files associated with this series. Clicking the file name will download the file. Editing the filename in the Rename column will allow you to rename the file (press enter to finalize the rename). Delete the file by clicking the trash icon. Download the entire series as a .zip file by clicking the Download button.
If the study is an MR modality, you can upload behavioral data by dragging and dropping files onto the Upload button. Behavioral files can be edited by clicking on the number under the Beh column.
For non-DICOM series, you can delete series by selecting the series using the checkbox in the rightmost column and clicking the Delete button.
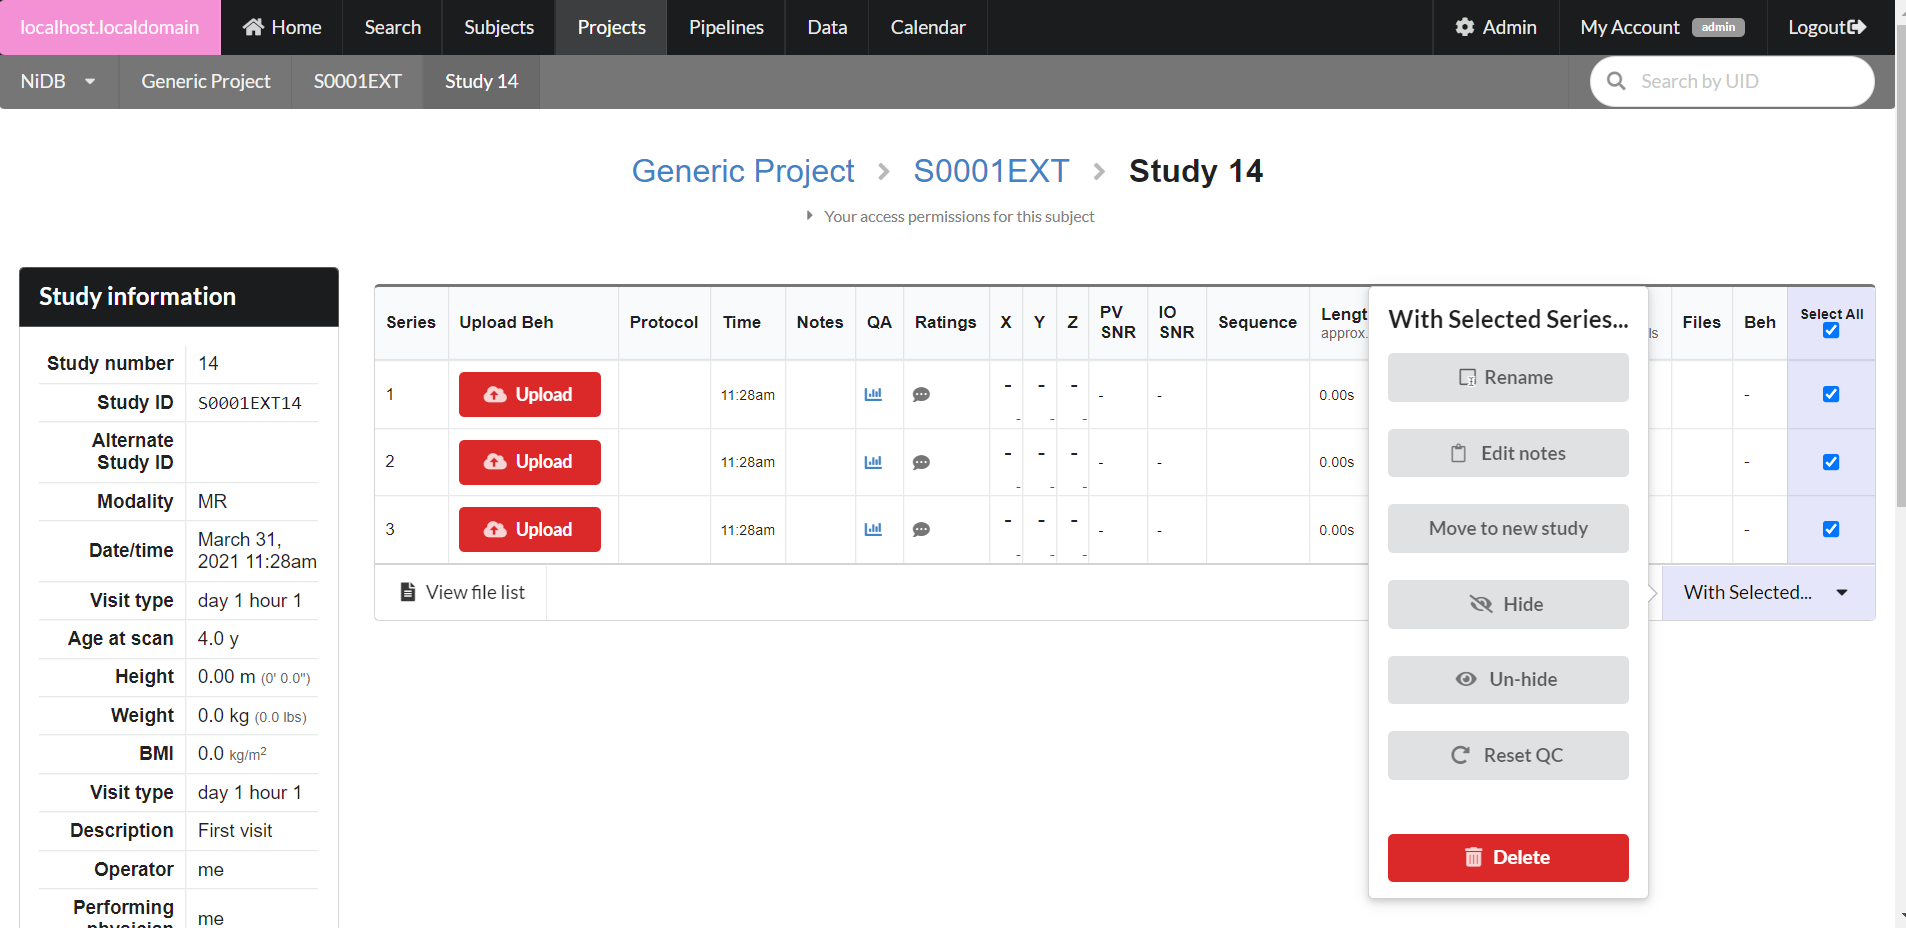
For DICOM-derived series, more operations are available. Select the series you want to perform an operation on and click With Selected.... A menu will pop up with options
Groups can be created of existing items, such as subjects, studies, or series. This is useful if you need to group subjects together that are in different projects, or if you want to group a subset of studies from one or more projects. Groups can only contain one type of data, ie they can only contain subjects, studies, or series. It is a similar concept to a SQL database View. Groups can be used in the Search page, and pipelines.
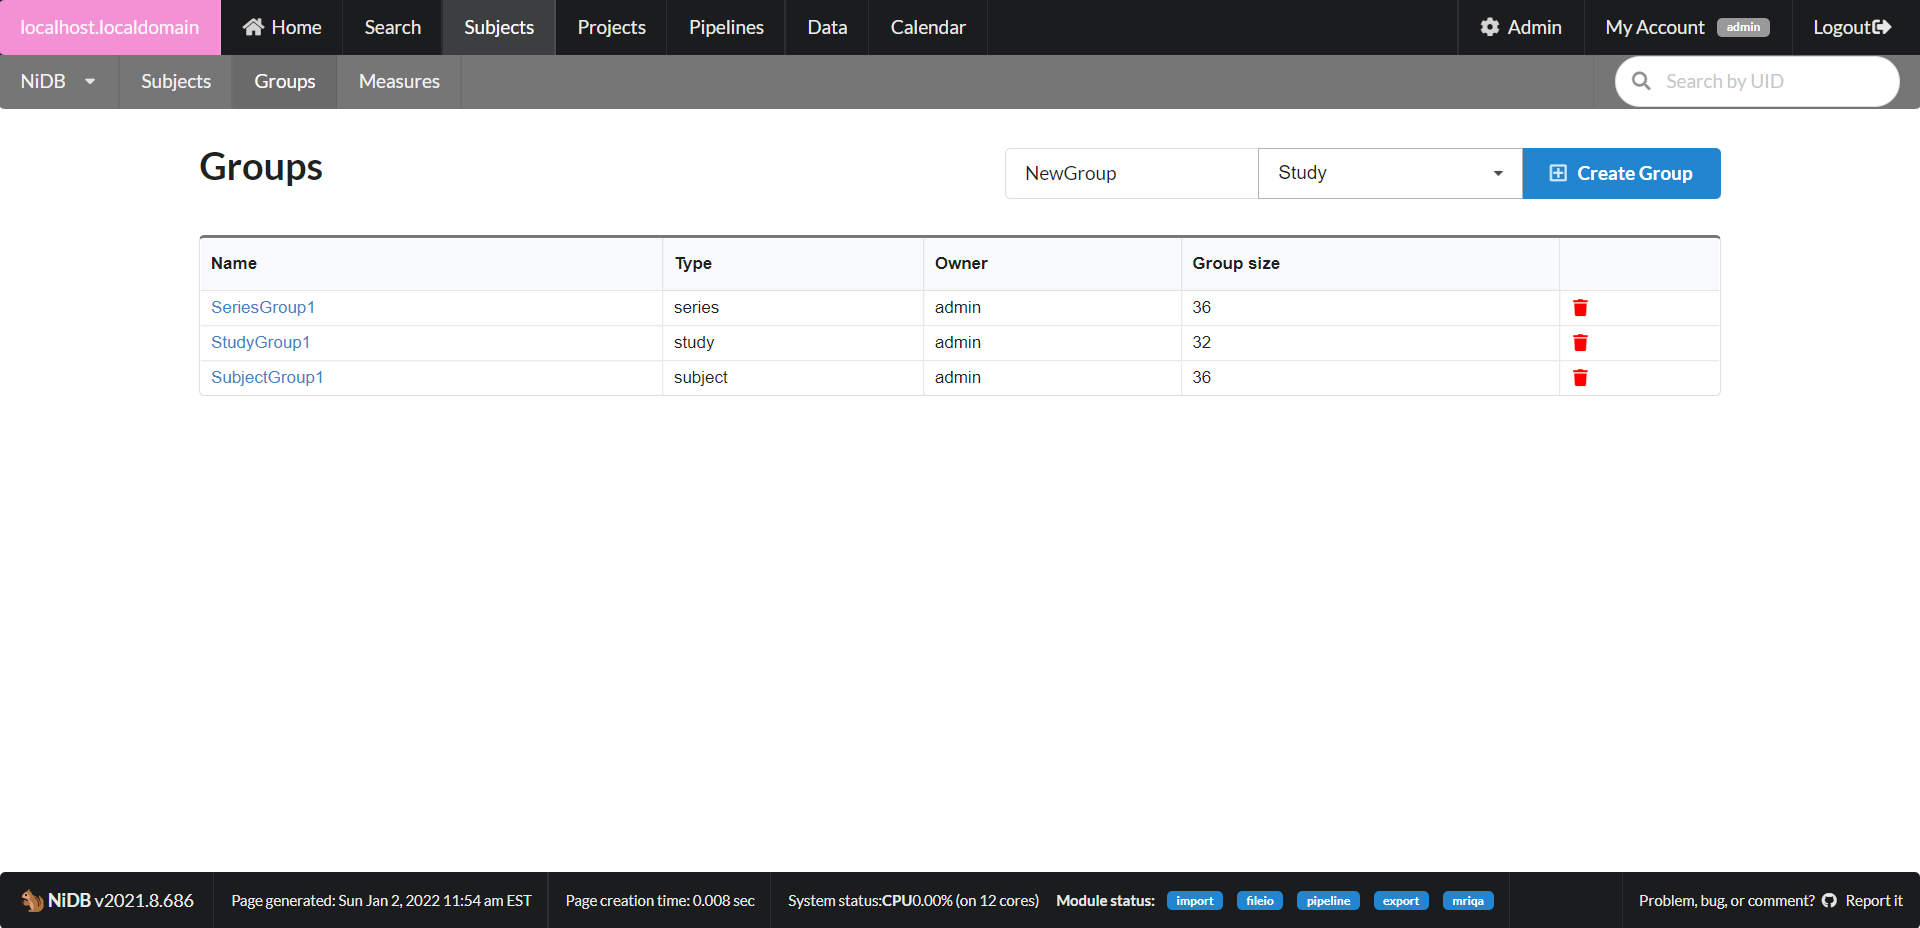
Under the Subjects menu item, click the Groups menu item. A list of existing groups will be displayed, and a small form to create a new group. To create a new group, enter a group name, select the group type (subject, study, series) and click Create Group.
Click on a group name to edit the group members, or add or delete group members.
The search page helps to find the imaging data. The following are the parts of the search page that can be used to define and refine the search.
Subject
There are various subsections on the search screen, those are self-explanatory. The first section is “Subject” as shown in the following figure. A search in this section can be defined based on:
Subject Ids (UIDs or Alternate UIDs)
Name (First or Last)
Range on date of birth
Range on age
Sex-based
Subject group
Enrollment
The next section is enrollment where a search can be restricted based on projects. One can choose a single project or a list of projects from the drop down menu. Also a sub-group if defined can be specified.
Study
In this part search parameters / variables in a project / study can be defined to refine the search. A search can be restricted based on, study Ids, Alternative study IDs, range of study date, modality (MRI,EEG, etc.), Institution (In case of multiple institutions), equipment, Physician name, Operator name, visit type, and study group
Series
A more specific search based on protocol, MR sequence, image type. MR TR value, series number (if a specific series of images is needed) and series group can be defined.
Output
In this section, the structure of the search output can be defined. The output can be grouped based on study or all the series together. The output can be stored in “.csv” file using the summary tab. The Analysis tab is used to structure the pipeline analysis results.
Other than imaging data can also be quried using the similar way as mentioned above for the imaging data above. However the required non-imaging data modality can be selected from the modality dropdown menu in the study section as shown below
The Ids can be mapped using the "Data" menu from the main menu. One can go to the Id-maper page by clicking on the "ID mapper" link as shown below or by selection the ID mapper sub-menu.
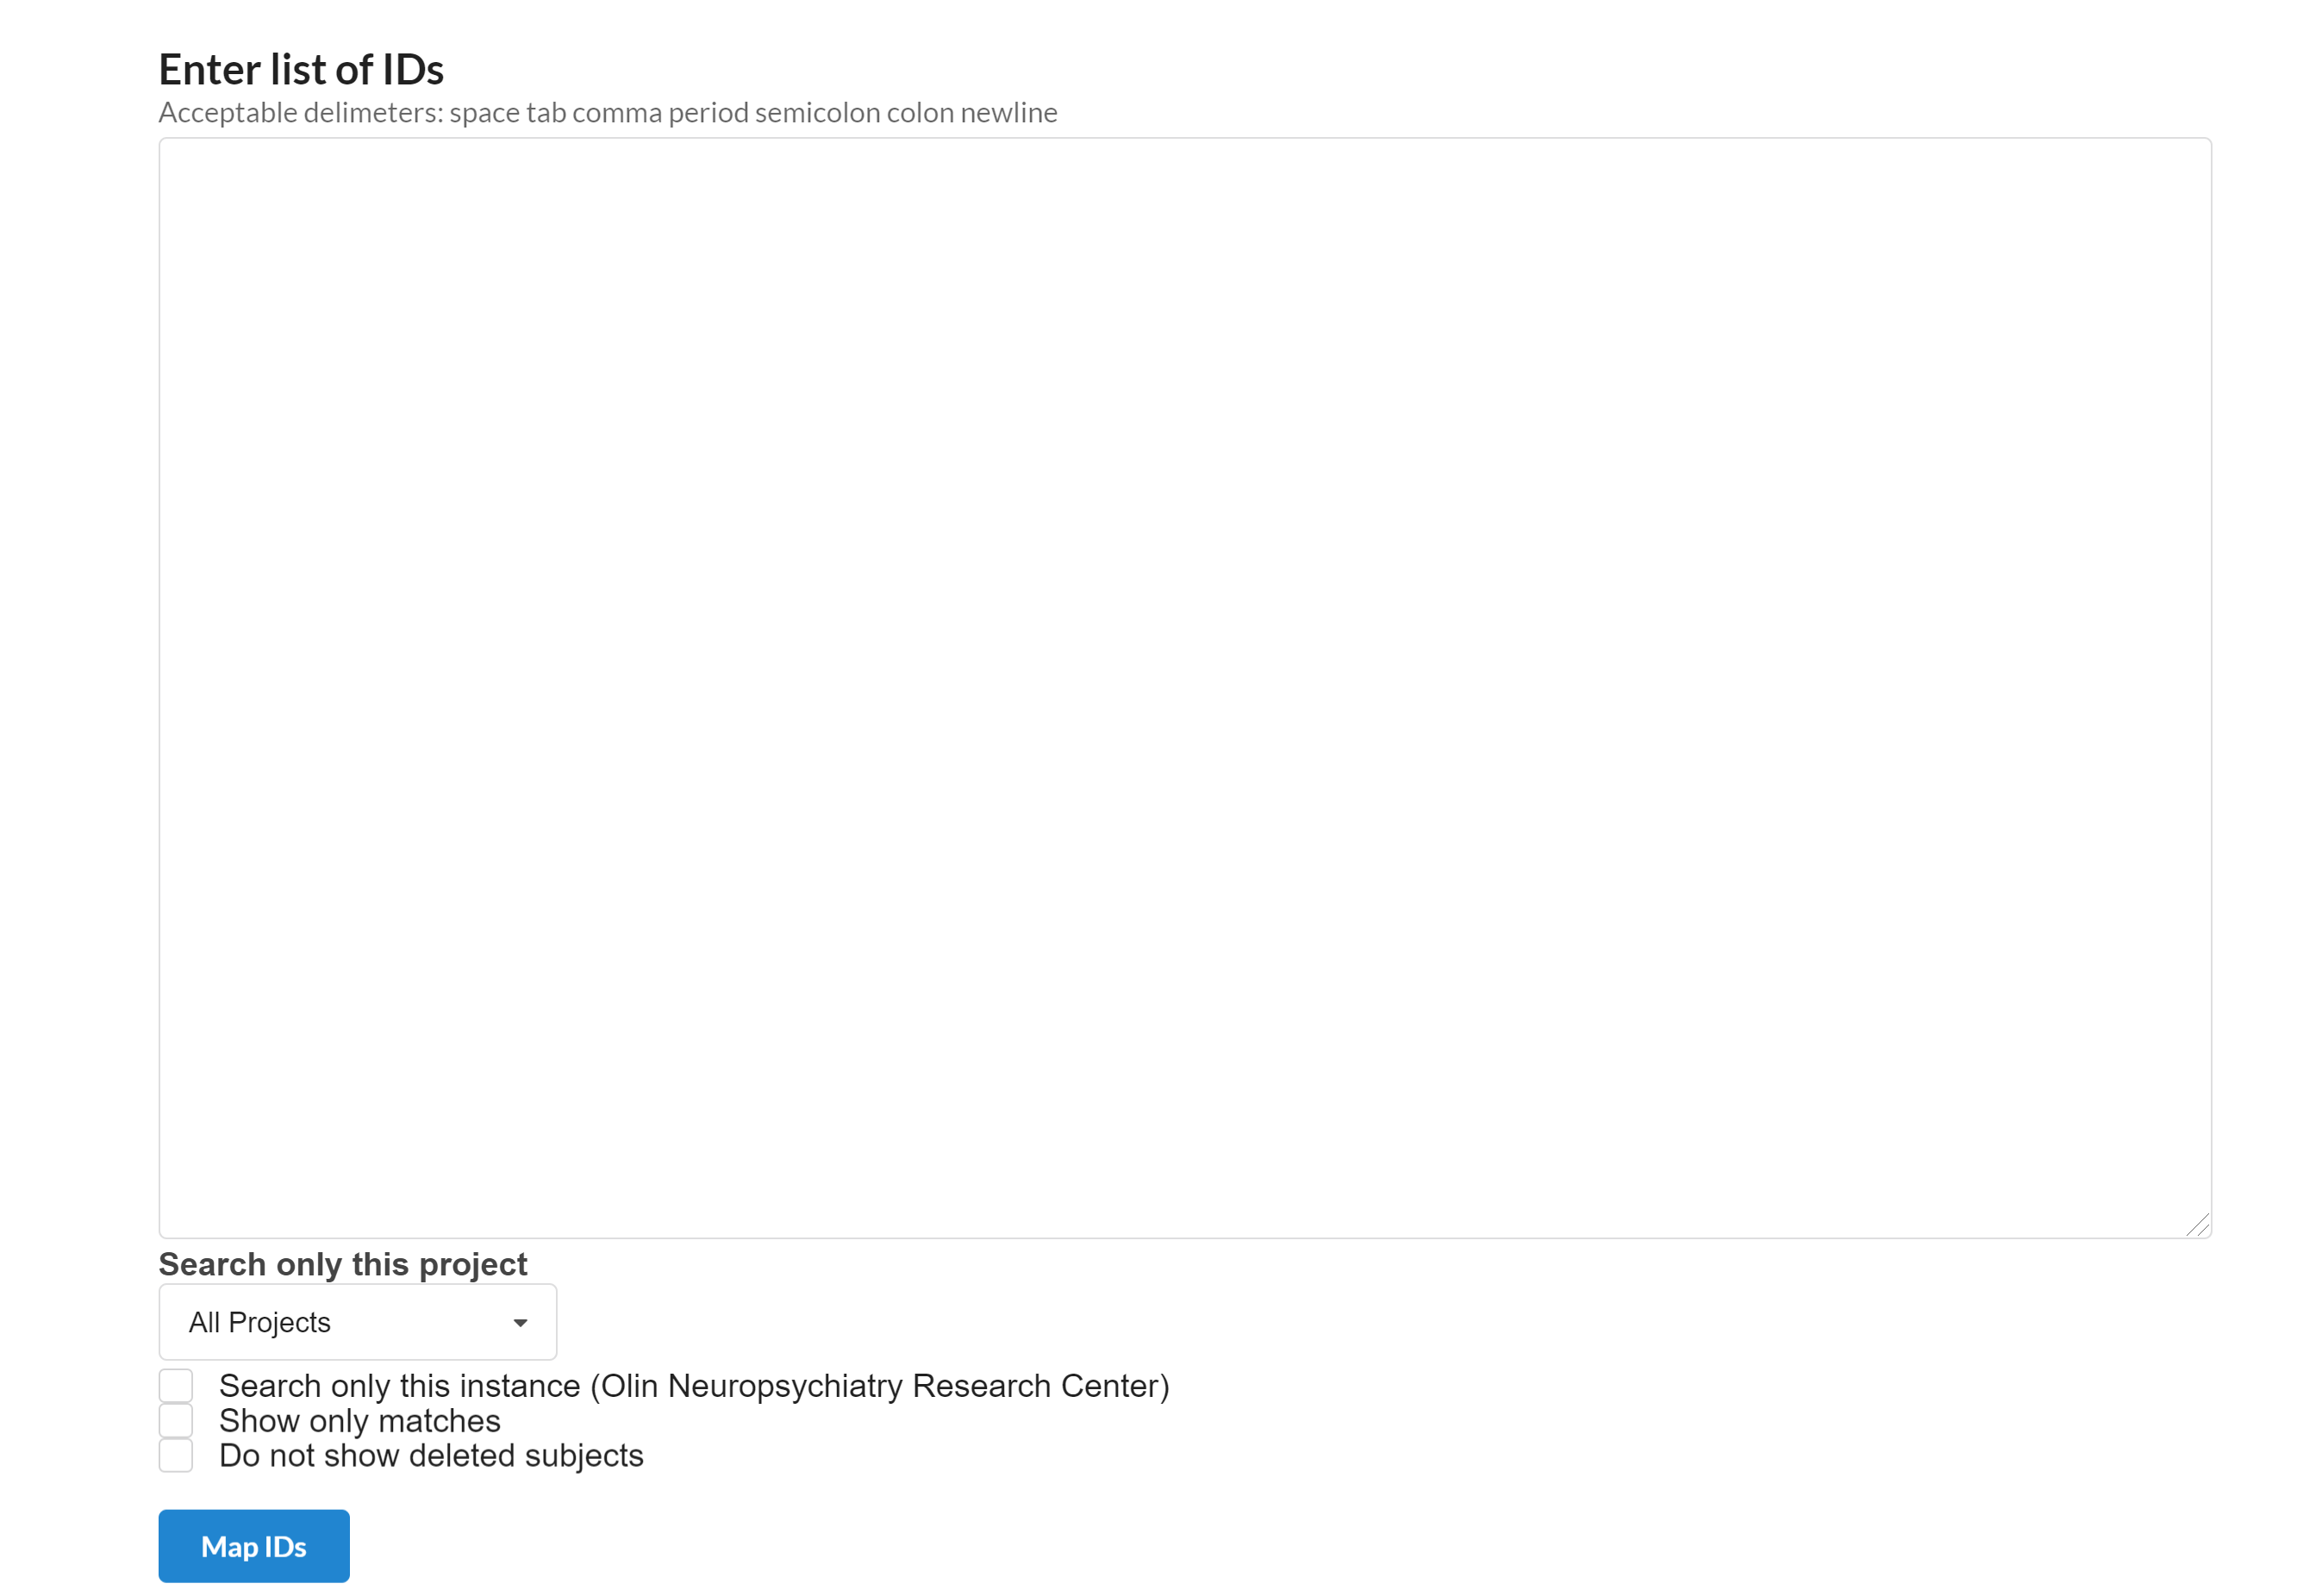
The following page will appear that is used to map various Ids.
A list of Ids to be mapped separated by space, tab, period, semicolon, colon, comma and newline can be typed in the box above. the mapping can be restricted to a certain project by selecting the project name from the dropdown menu. The search can only be restricted to the current instance, undeleted subjects and exact matches by selecting the approprriate selection box shown above.
After searching the required data, it can be exported to various destinations.
For this purpose a section named "Transfer & Export Data" will appear at the end of a search as shown in a fiigure below.
Following are some destinations where the searched data can be exported:
To export the data to a NFS location, you can select the "Linux NFS Mount" option and type the NFS path where you want to download the data.
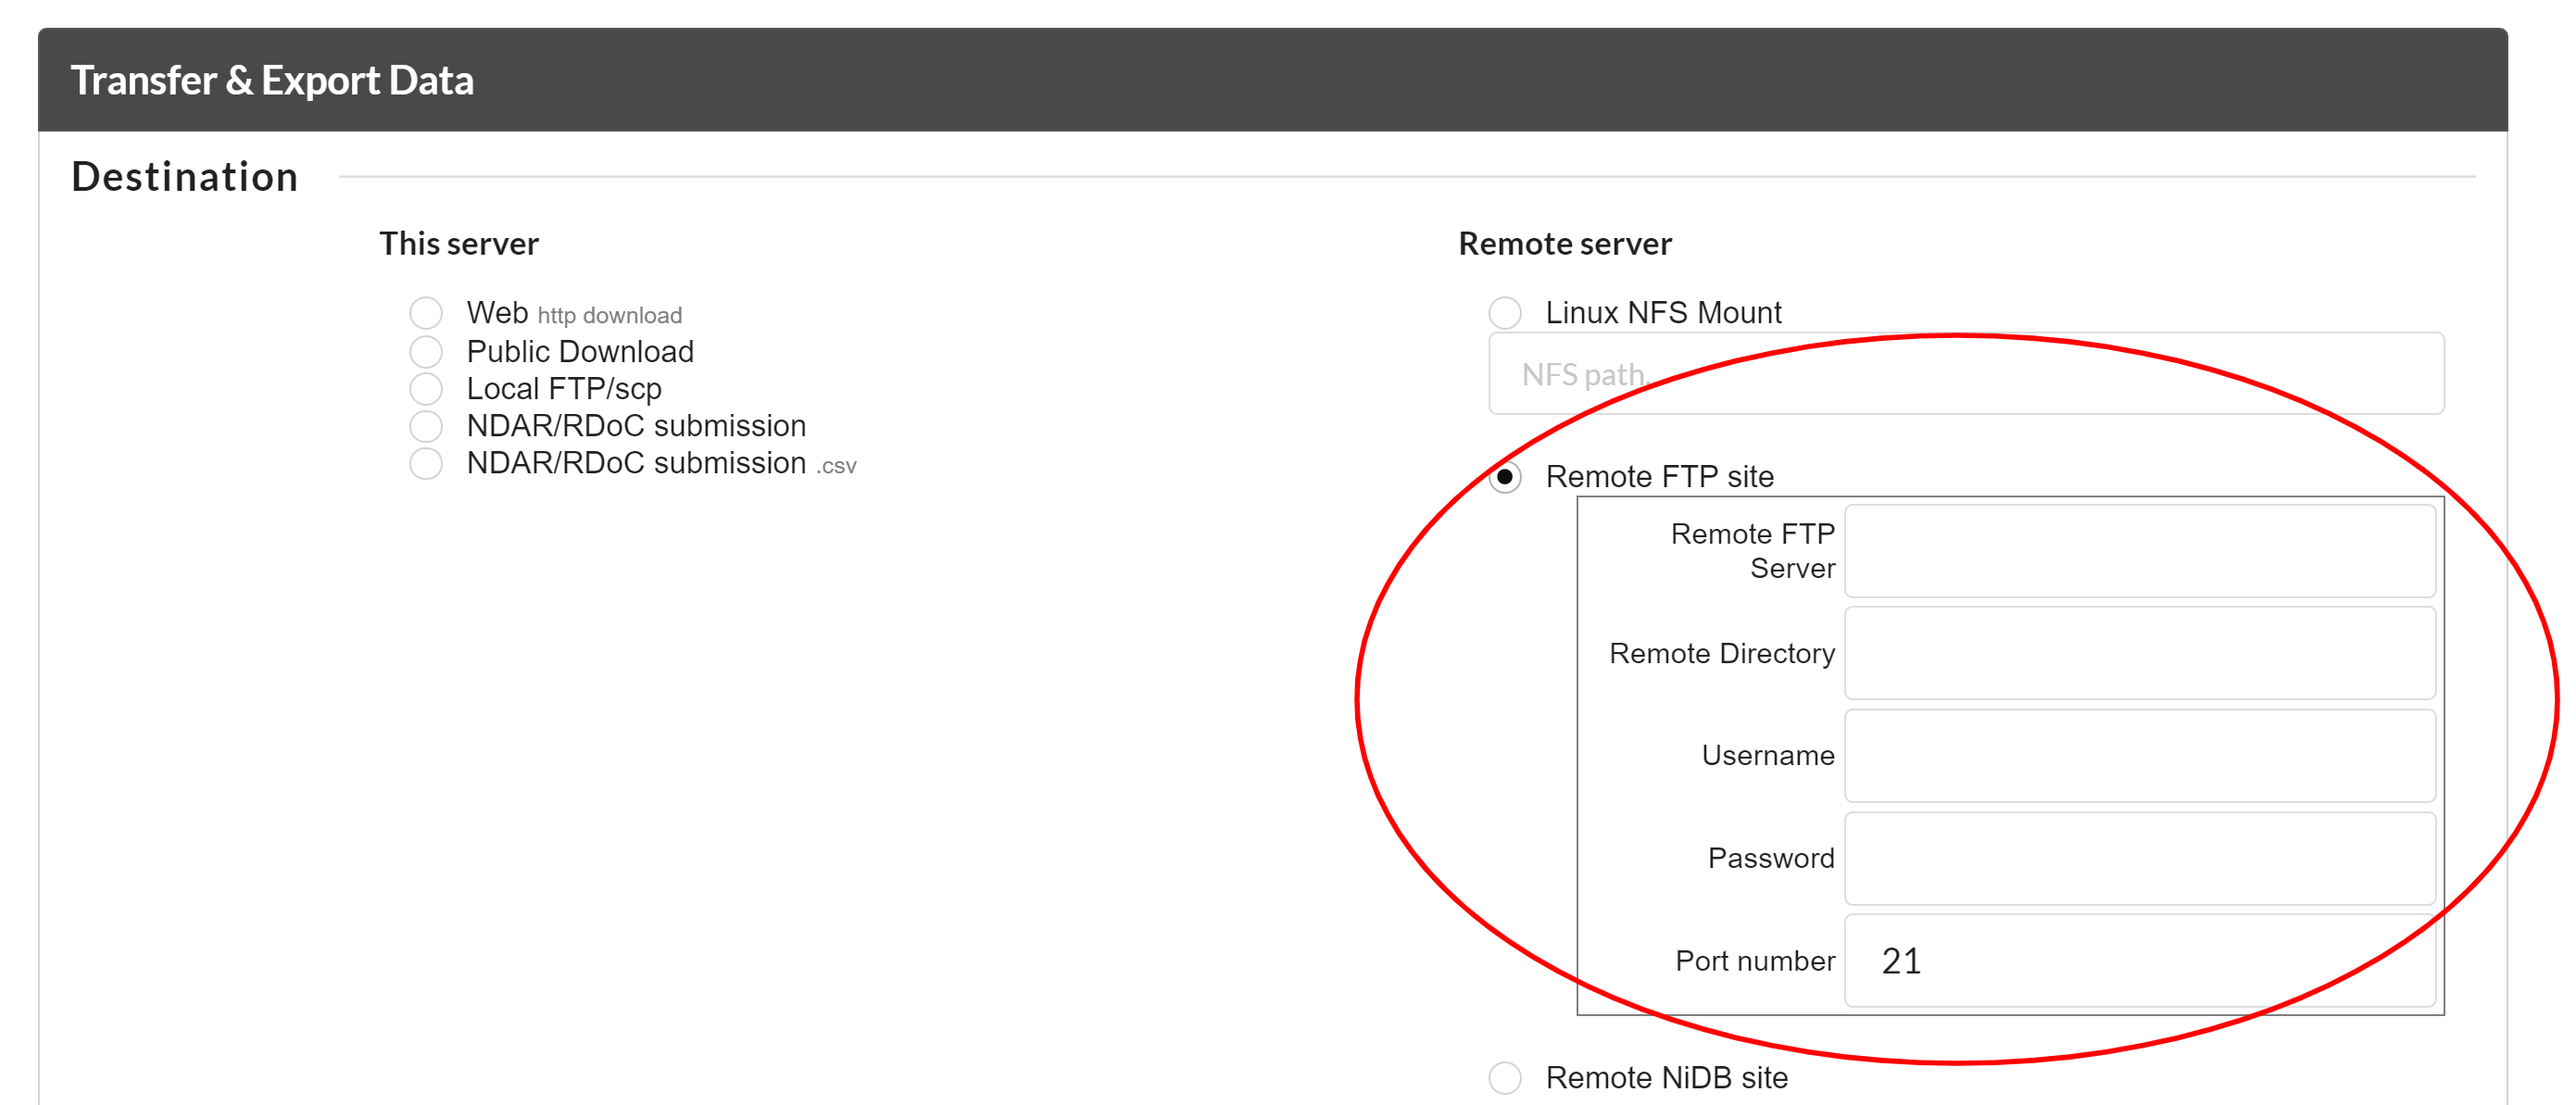
To export the data to a remote FTP location, you can select the "Remote FTP Site" option and type the FTP information where you want to download the data.
To export the data to a remote NiDB site, you can select the "Remote NiDB Site" option and select the NiDB site from a drop down menue where you want to download the data.
You can select the data to be downloased to the local http location. you can select "Web http download" option for this purpose as shown below.
NiDB has a unique ability to download the data that is required to submit to NDAR/RDoC/NDA. It automatically prepares the data according to the NDAR submission requirnments. Also one can download the data inforamation in terms of .csv that is required to submit NDAR data. The following the the two options to download the data accordigly.
After starting the transfer by clicking the transfer button at the end of the search, a transfer request will be send to NiDB. The status of a request can be seen via Search-->Export Status page as shown below. The status of 30 most recent serches will be shown by default. All the previoius searches can be seen by clicking on the "Show all" button on the left corner of the screen as shown below.
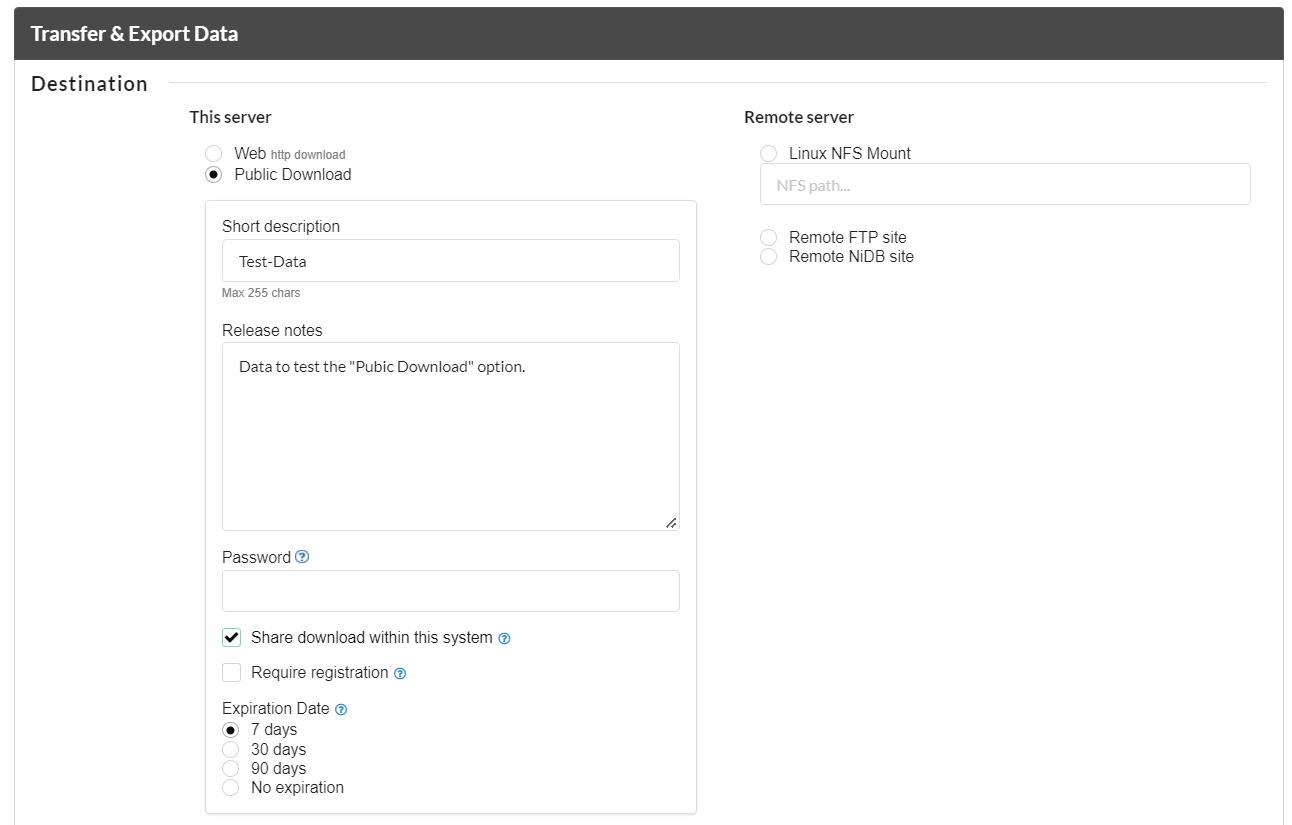
This is another option in the "Transfer and Export" section to transfer "searched data" and to make it as public downloadable. There are options to describe briefly about the dataset, setting up a passowrd for secure tranmitability and making the public download updateable to the users having rights on the data. One can select "Required Registration" option to restrict the dowload to NiDB users only. An expiration date for the download can be set to 7, 30 and 90 days. One should select "No Expiration" if the public data should be available for longer than 90 days or for indefinite period.
The "public Download" will be created after pressing the "Transfer" button at the end of search page. The public downloads can be accessed via Data --> Public Download menue. The following is a a page with Public download information:
Sometimes you as a user have no idea how the data is stored for a particular project, or you don't have permissions to the project. If you are lucky enough to have a data manager, you can send a request for data to a data manager who can then follow your instructions to find the data and send it to them.
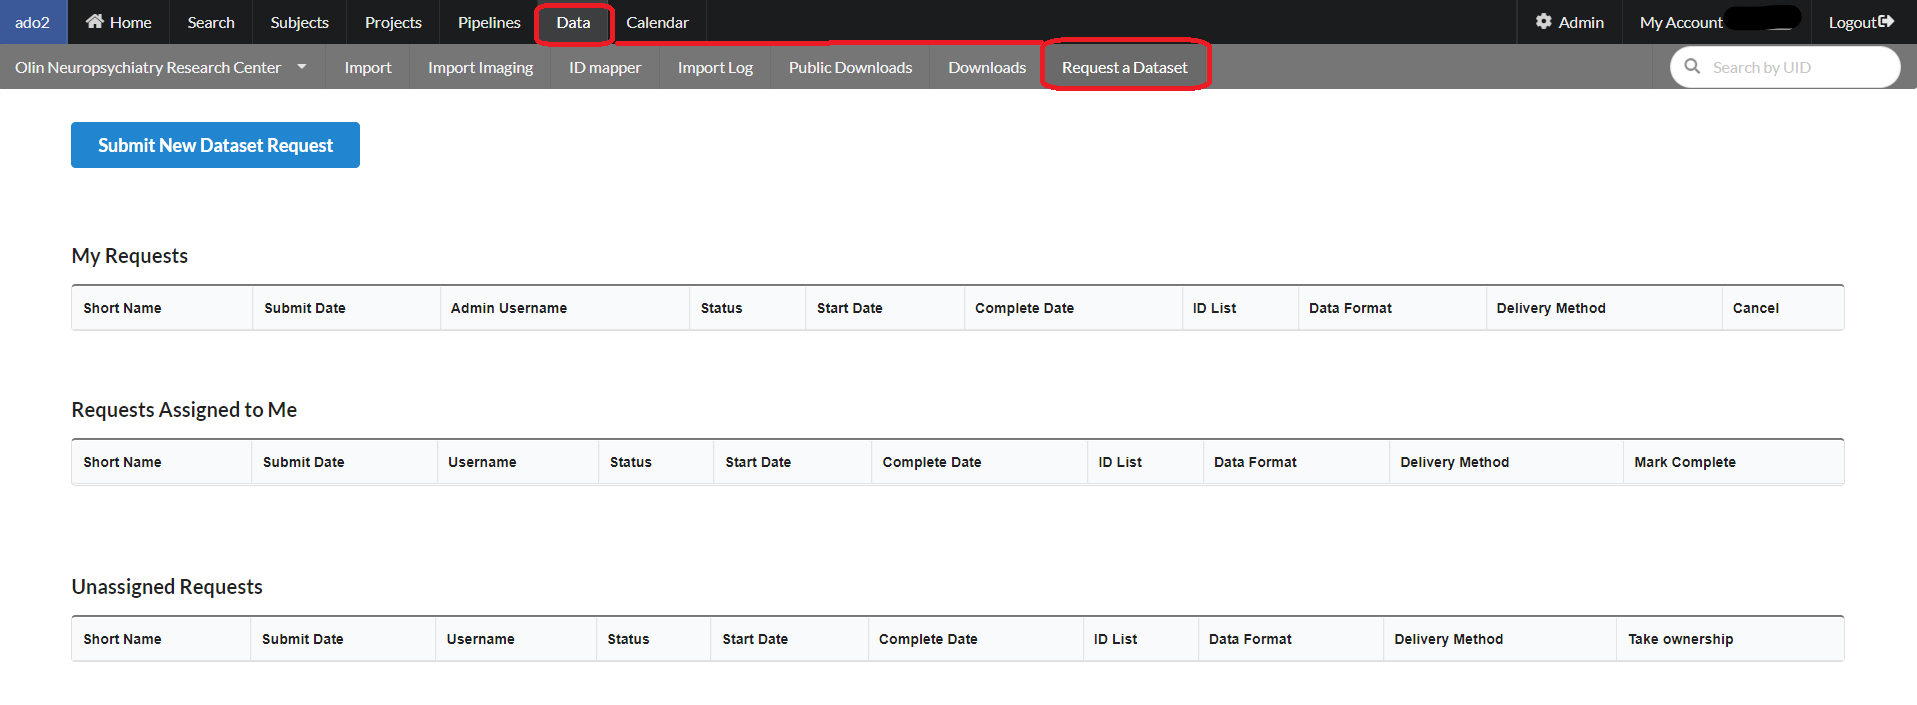
To request a dataset from NiDB-based database, select Data --> Request a Dataset. The following page will appear.
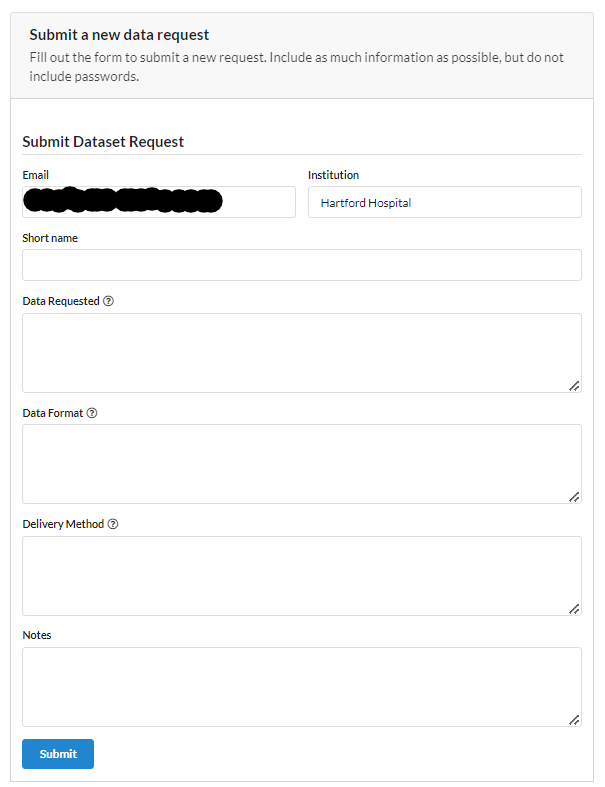
Click Submit New Dataset Request button, and fill the following form to request a dataset from the NiDB-databse.
Analysis builder is a report generating tool that can be used to generate various types of reports using the stored data in NiDB. This report generating tool builds on the base of various types of data variables that is being stored in the NiDB. This is different than the search tool where you can search different types of data and download it. In this tool you can search the variables those are generated and stored / imported in the NiDB (Example: You can query the variables generated from a task using MRI / EEG data, but not the actual EEG and MRI data). Analysis builder can be reached via Search --> Analysis Builder or you can go to a specific project front page and select the option (Analysis Builder) on the right from "Project tool and settings" and you will land on the following screen.
Analysis builder is designed to create reports based on various types of parameters from different types of measures. It has been categorized in the various types of measures like MR, EEG, ET, etc. as shown below.
After selecting the project from the drop down menu "Select Project", click "Use Project" button. Now the project just selected will be the current project for data retrieval.
Calendar for appointments, scheduling of equipment time, etc
If the calendar is enabled in your NiDB installation, a link on the top menu will be available. The default view is the current week. Click Day, Week, or Month to change view. Click arrows to go forward or backward in the calendar. Click the dropdown list of calendars to change the current calendar. Information about what you are viewing will be displayed at the top of each page.
If you are an admin, you can click the Manage link on the second row of the menu. This will show a list of calendars. Click the Add Calendar button to create a new calendar. Click the calendar name to edit the calendar.
On the Day, Week, or Month views, click the + button to add an appointment. Fill out the information, and click Add. Appointments can regular, or can be an all day event or time request, the latter special types do not block overlapping appointments from being created. For example, if a regular appointment is scheduled from 2:00pm-3:00pm, another appointment could not be scheduled from 2:30-3:30pm. But both appointments can be created if either one is a time request or all day event.
If you try to create an appointment and it says it conflicts with an existing appointment, but you can't see the offending appointment on the calendar, check if there is an appointment that spans more than one day. For example, if an appointment runs from 3pm Monday to 3pm Wednesday, you will not be able to create any appointments on Tuesday. This can be fixed by setting the multi-day appointment to be all day.
Click on the appointment to show appointment form. Make any changes and click Update. You can also modify a repeating appointment, or delete appointment.
Data within NiDB is stored in a hierarchy:
The top level data item is a subject.
Subjects are enrolled in projects
Each subject has imaging studies, associated with an enrollment
Each study has series
Each series has files
See diagrams and examples of the hierarchy .
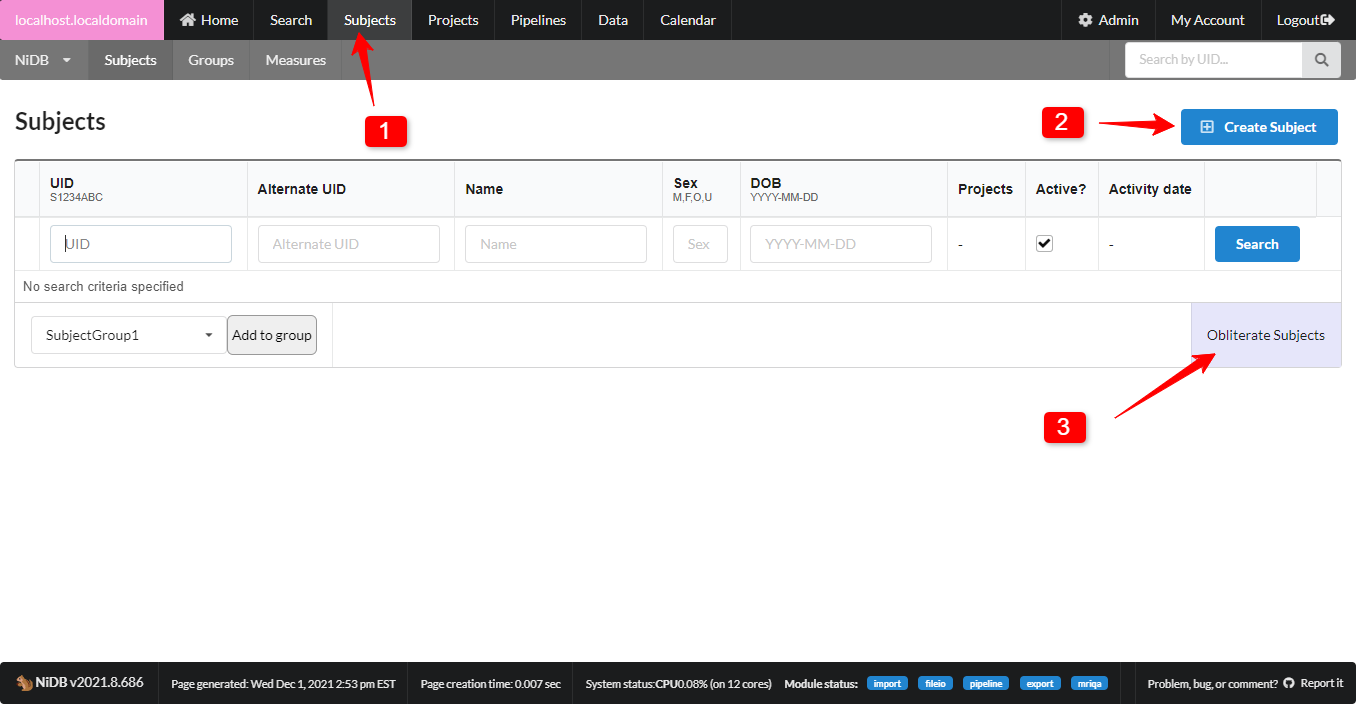
On the main menu, find the Subjects tab. A page will be displayed in which you can search for existing subjects, and a button to create a new subject
Subjects page menu item
Create Subject button
Obliterate subjects button: an intimidating sounding button that only appears for NiDB admins
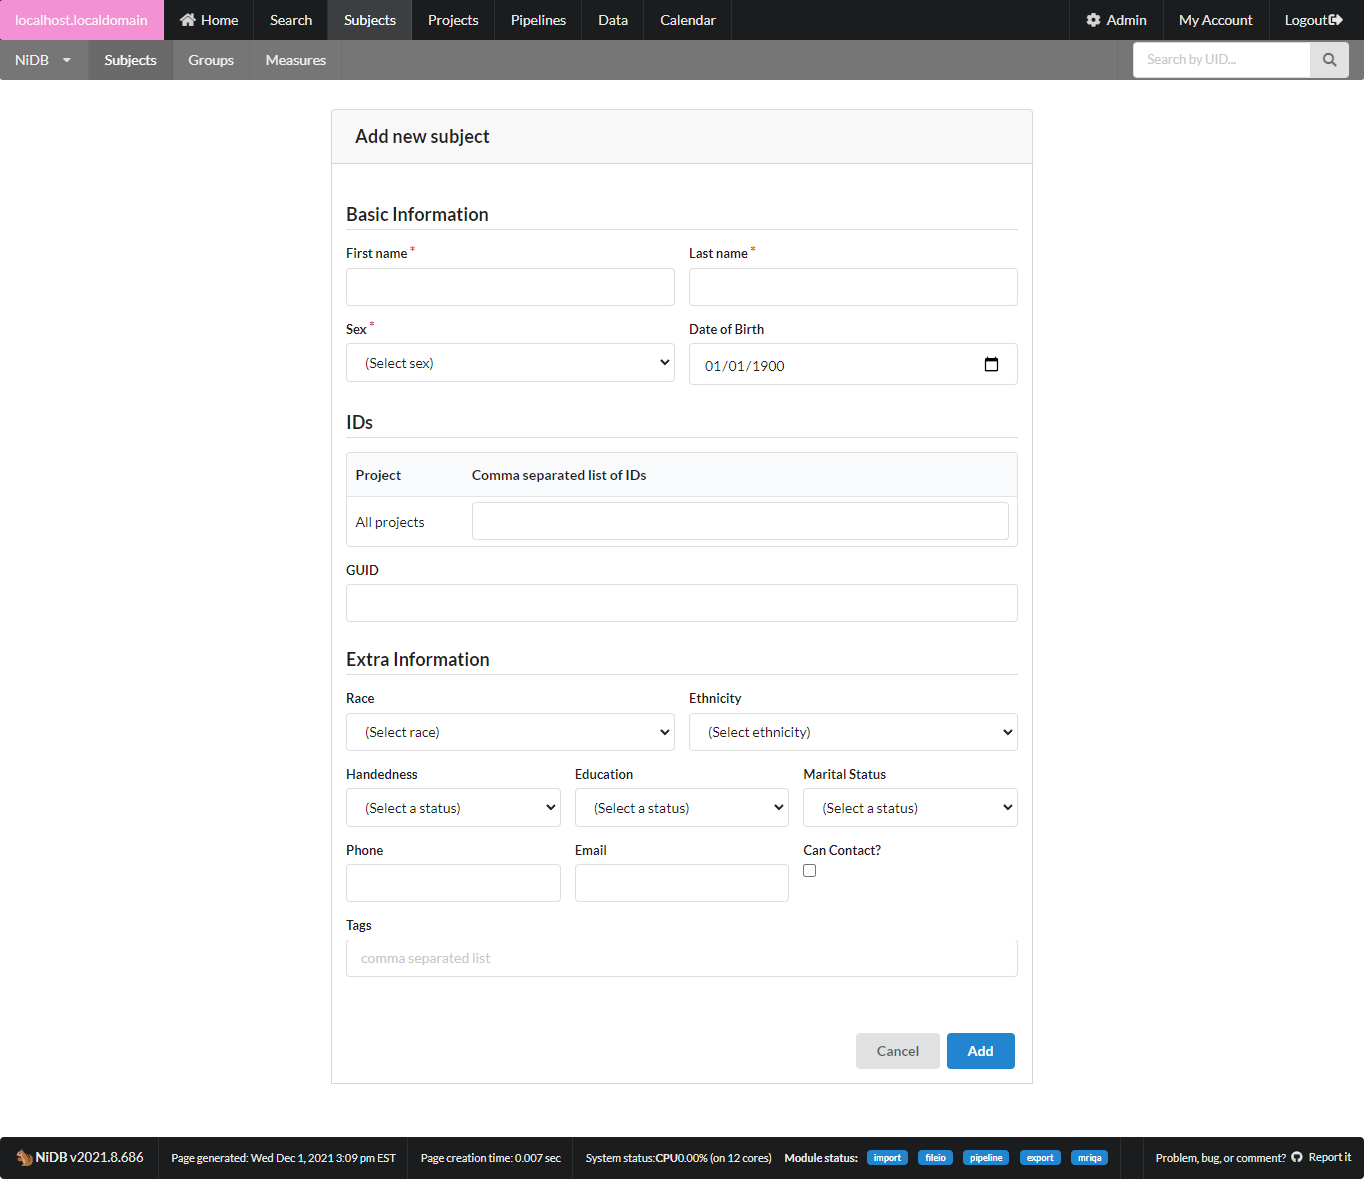
Fill out as much information as you need. Name, Sex, DOB are required to ensure a unique subject. Most other information is optional. While fields for contact information are available, be mindful and consider whether you really need to fill those out. Chances are that contact information for research participants is already stored in a more temporary location and does not need to exist for as long as the imaging data does.
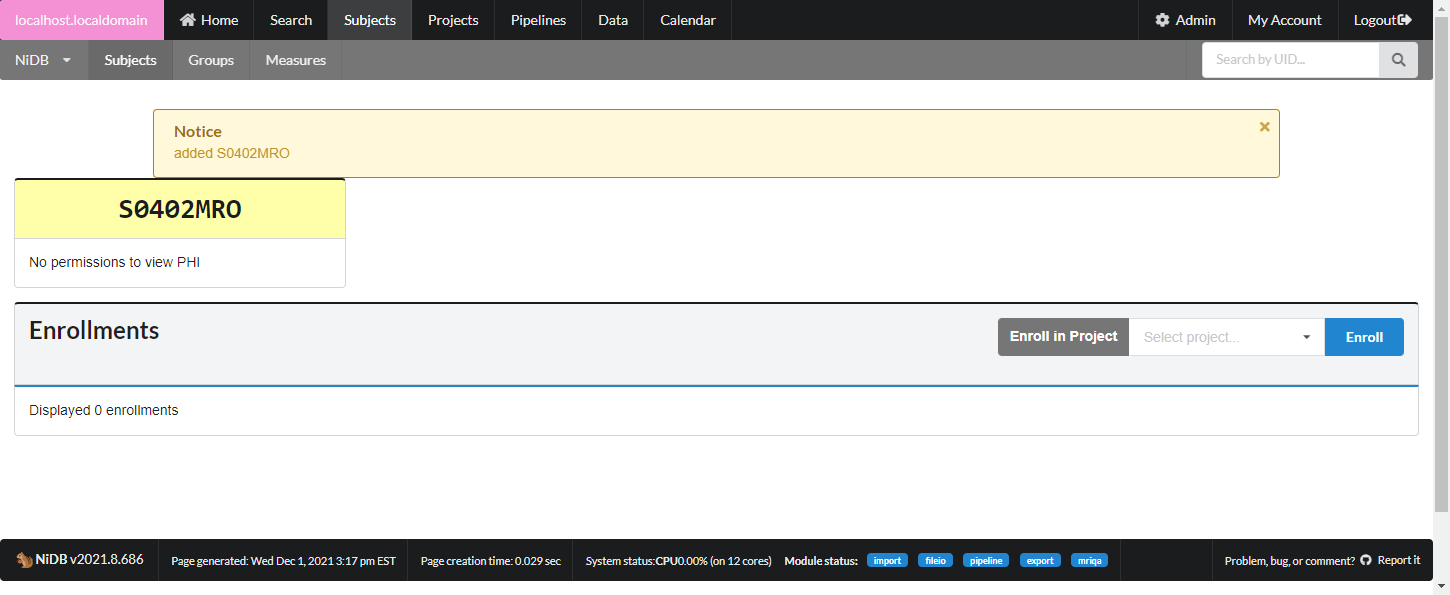
The subject will now be assigned a UID, but will not be enrolled in any projects. Enroll the subject in the next section.
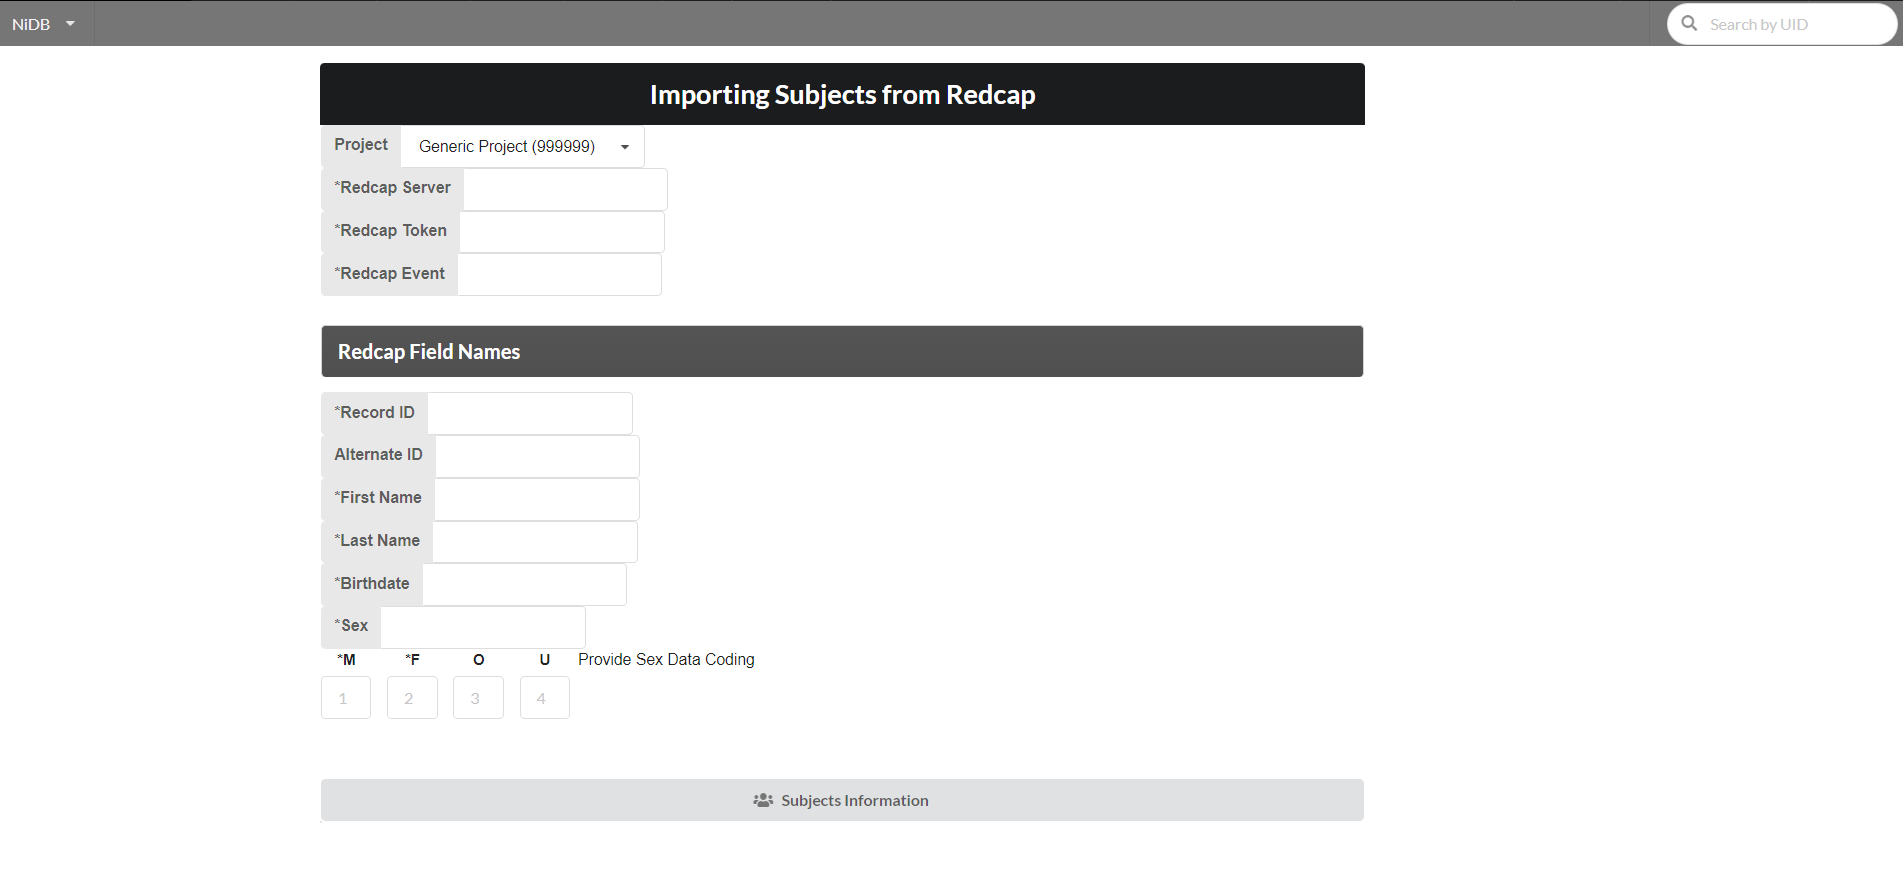
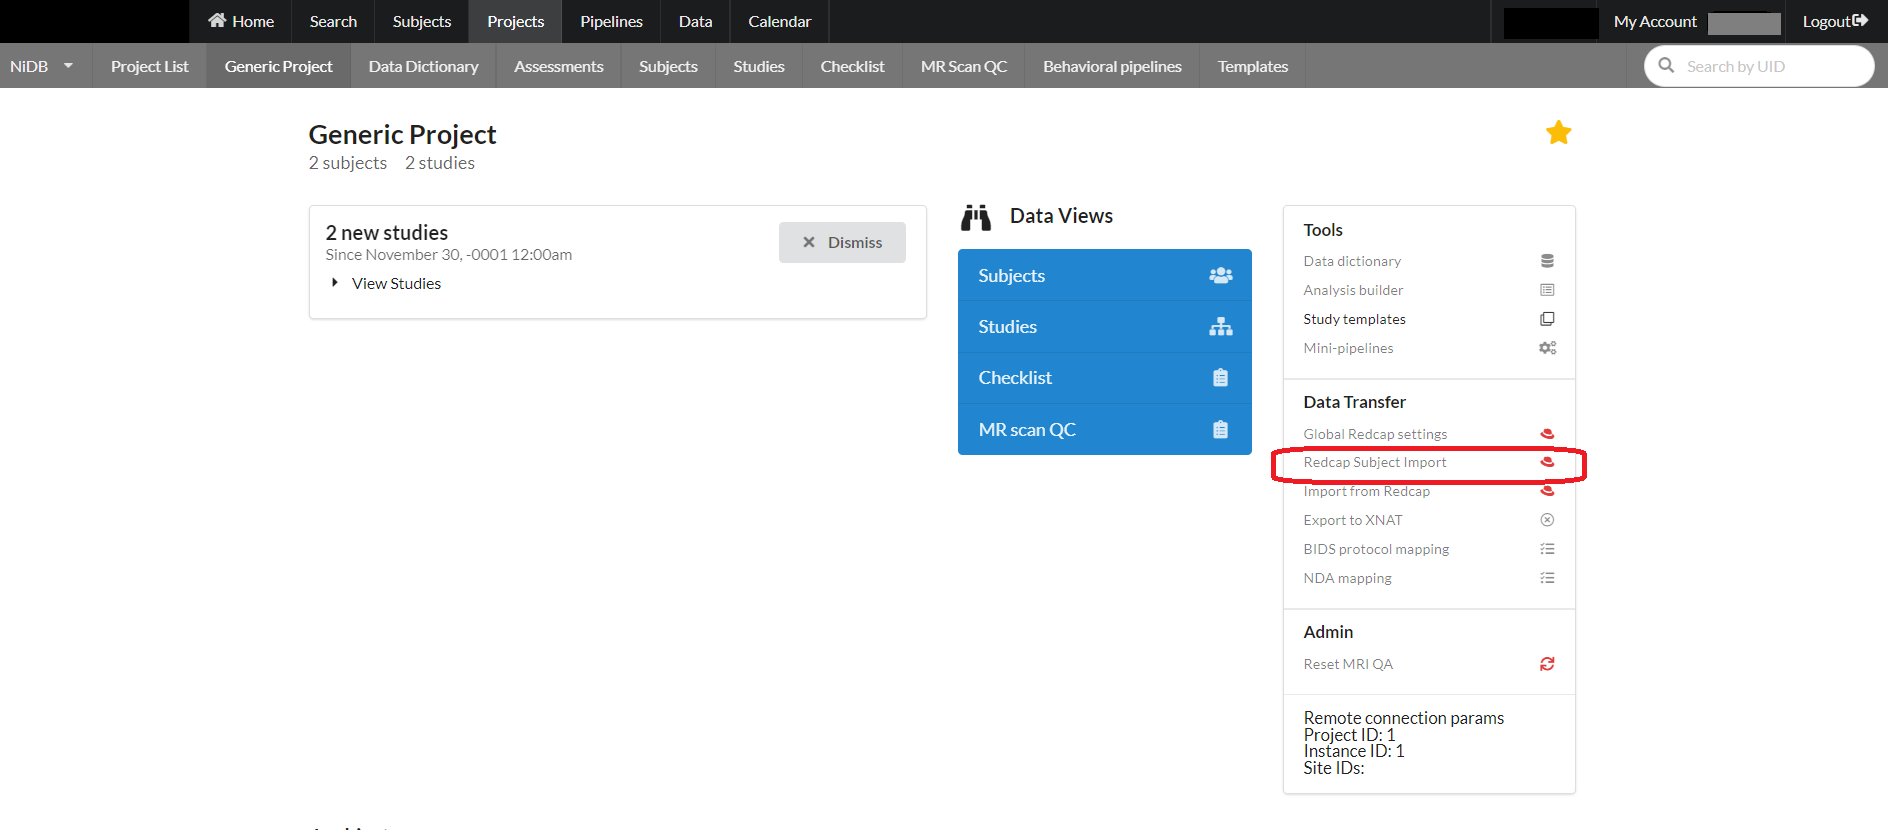
For a project, subjects can be imported from redcap using an option on the project page as shown below:
Fill the following form requiring information for API connection to redcap and required redcap field names. After providing the required fields click "Subjects Information" button.
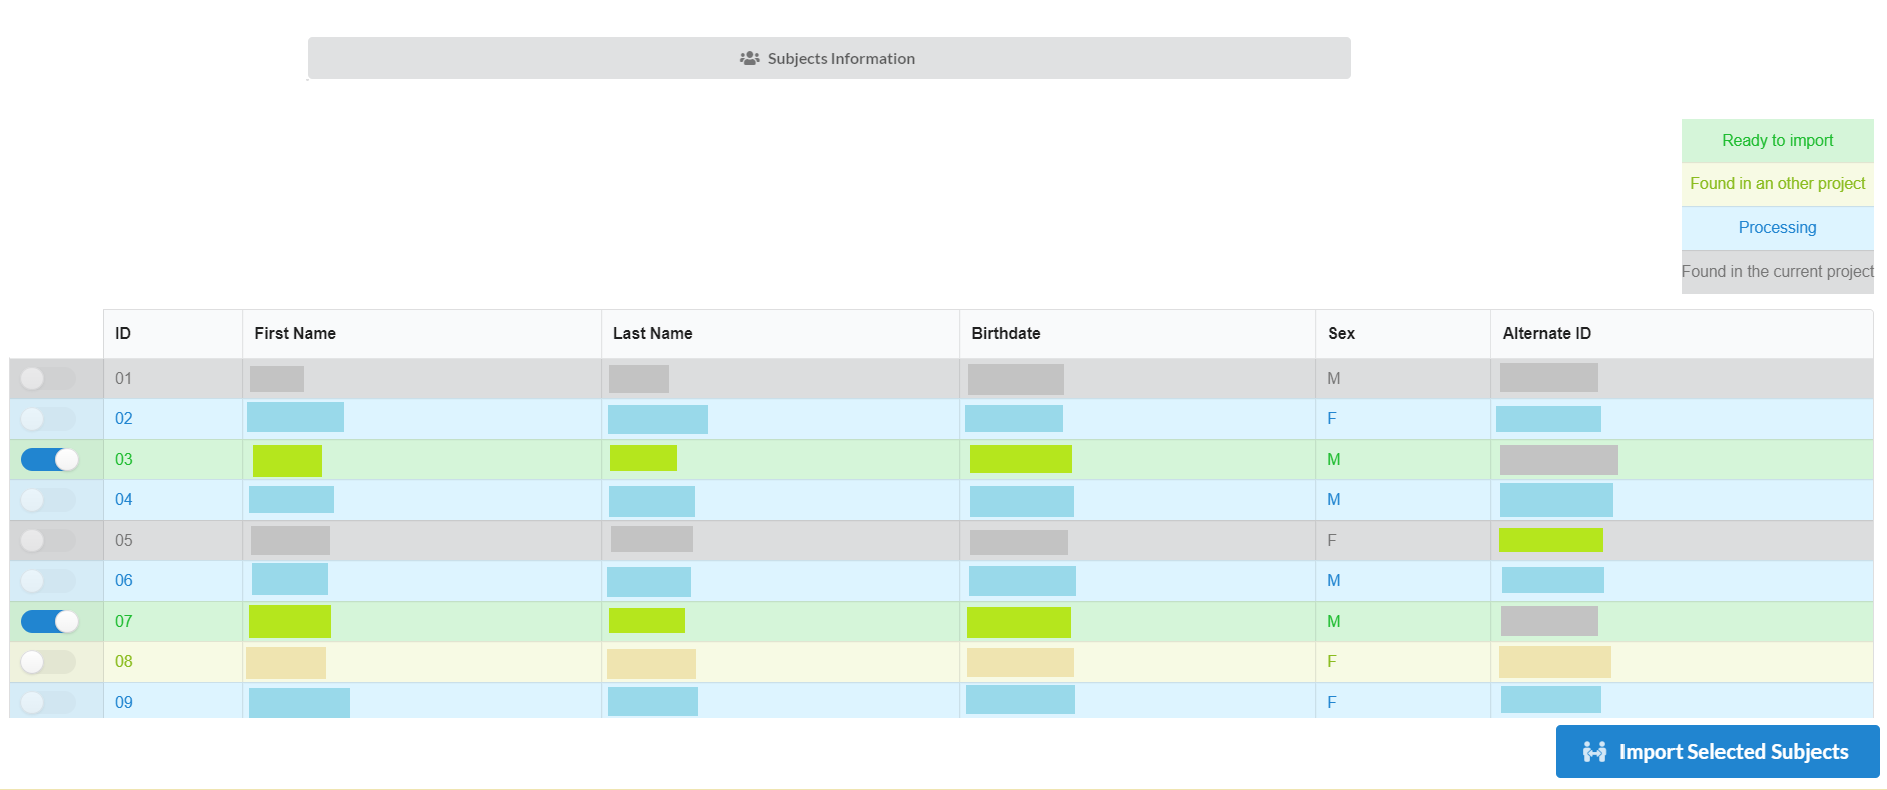
If all the above information is correct, then the list of the subjects from redcap will be shown as follows:
There can be four types of subjects in the list. Those are:
Ready to Import: are the one those are in redcap and can be imported.
Found in an other project: these are present in another project under inthe NiDB database. They can also be imported, but need to be selected to get import.
Processing: these are already in the process of being imported and cannot be selected to import.
Already exist in the project: these already exist in the current project and cannot be duplicated.
After selecting the required subjects click "Import Selected Subjects" to start the import process.
In the enrollments section, select the project you want to enroll in, and click Enroll. The subject will now be enrolled in the project. Permissions within NiDB are determined by the project, which is in theory associated with an IRB approved protocol. If a subject is not enrolled in a project, the default is to have no permissions to view or edit the subject. Now that the subject is part of a project, you will have permissions to edit the subject's details. Once enrolled, you can edit the enrollment details and create studies.
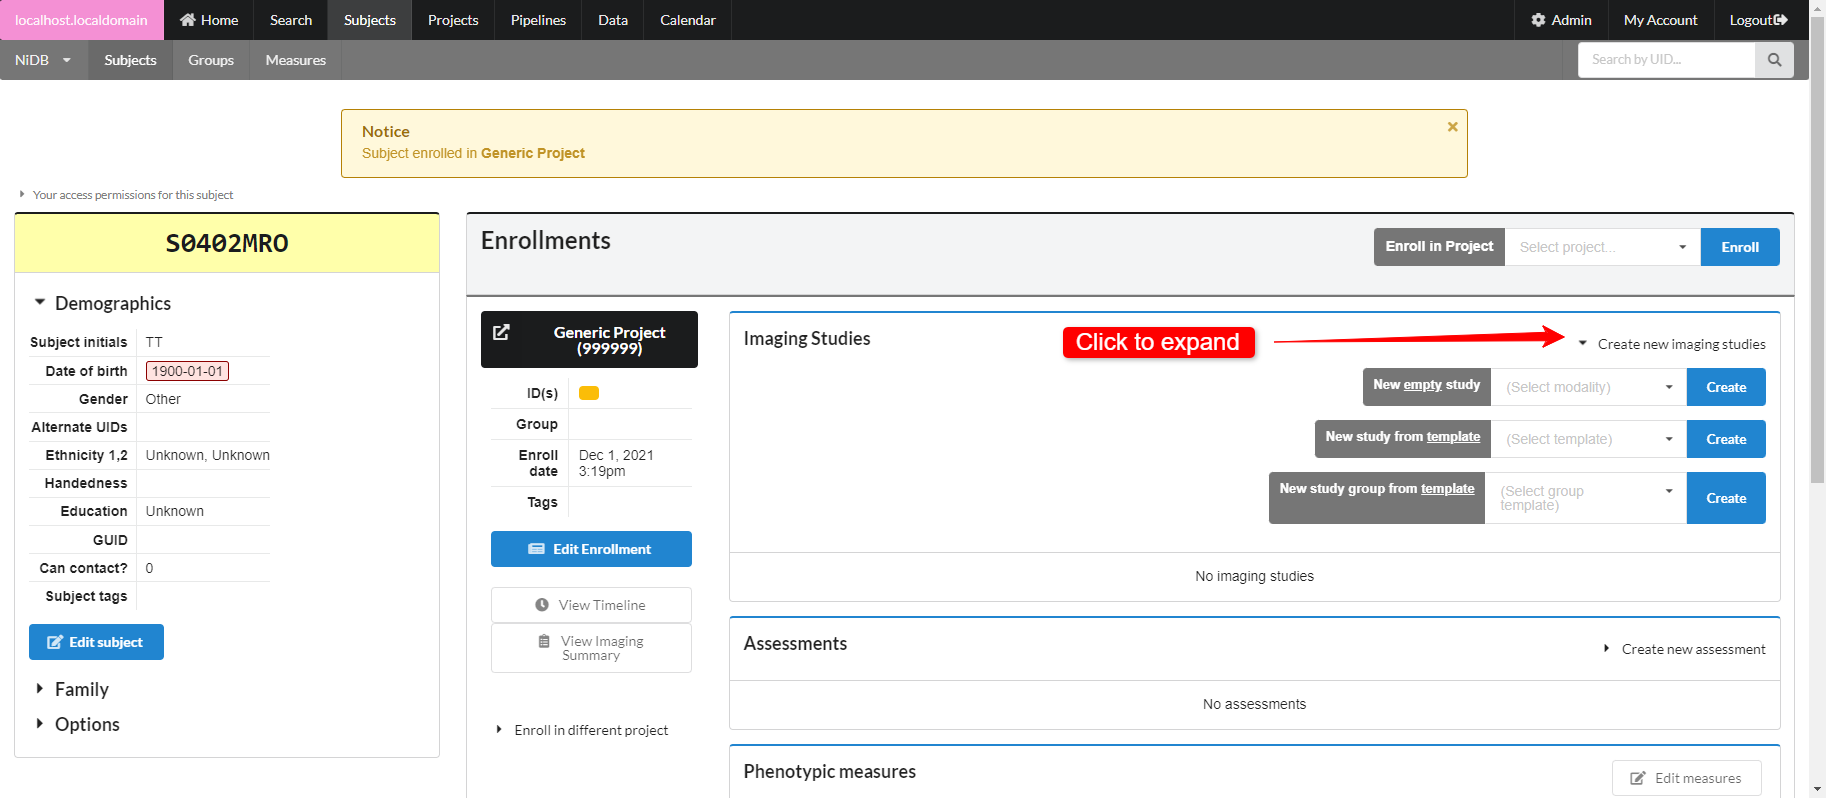
There are three options for creating studies
Create a single empty study for a specific modality
Create a single study prefilled with empty series, from a template
Create a group of studies with empty series, from a template
Click Create new imaging studies to see these options. To create study templates or project templates, see Study Templates.
Once the study is created, it will appear in the list of imaging studies. Studies are given a unique number starting at 1 in order in which they are created. The studies are sorted by date in this list. While studies will often appear sequential by date and study number, this is because study numbers are incremented by each new study date added, and each new study often occurs at a later date. However, studies may be numbered in any order, regardless of date. If you create several studies for previous dates, if importing older data, if deleting or merging studies, this will cause study numbers to appear random. This is the normal behavior.
MRI and non-MRI data are handled differently, because of the substantial amount of information contained in MRI headers. MRI series are created automatically during import, while all other imaging data can be imported automatically or manually.
MRI series cannot be created manually, they must be imported as part of a dataset. See Bulk Import of Large Datasets or Automatic Import via DICOM receiver. MRI series can be managed individually after automatic importing has occured.
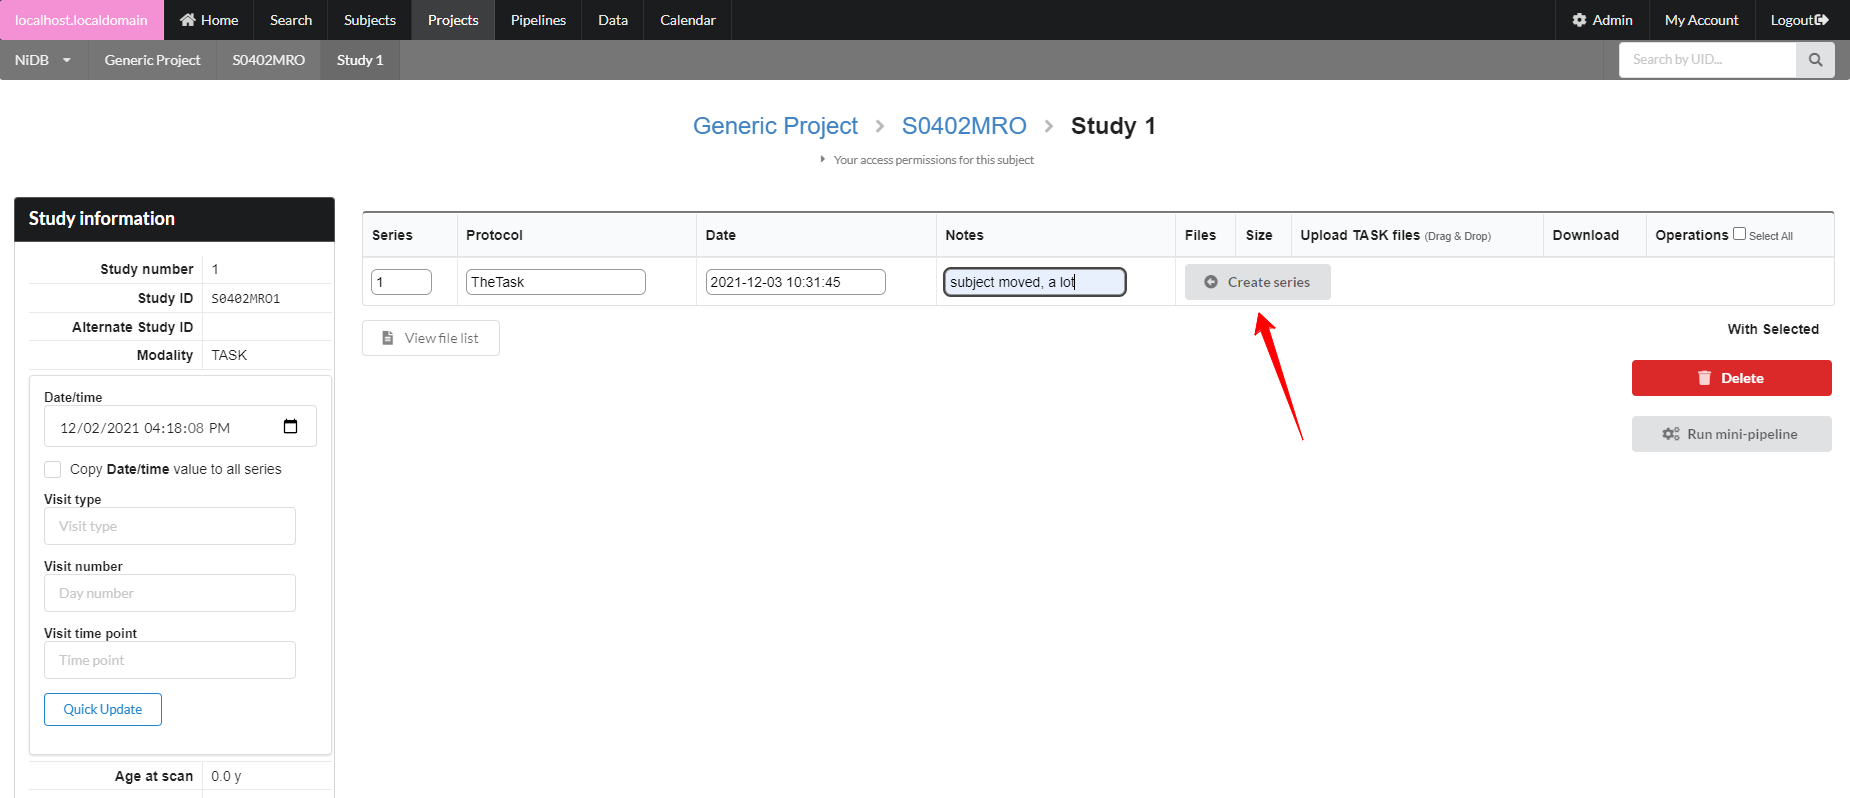
Non-MRI data be imported automatically or manually. To manually import non-MRI data, first go into the imaging study. Then fill out the series number, protocol, date, notes. Series number and date are automatically filled, so change these if you need to. When done filling out the fields, click Create Series.
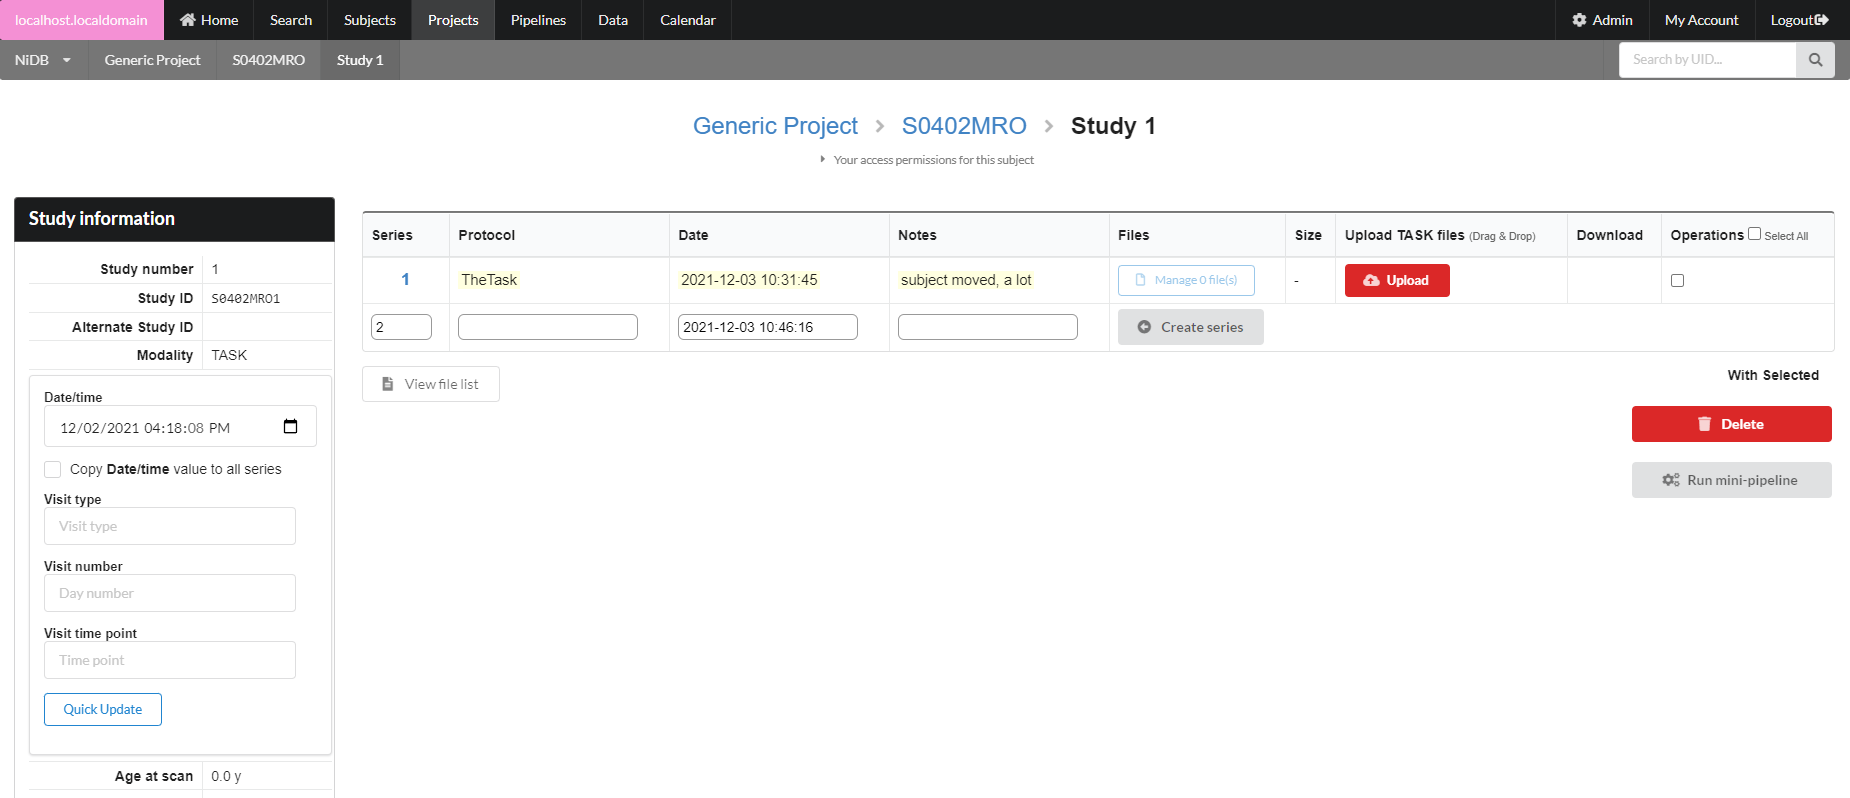
The series will be created, with an option to create another series below it. Upload files by clicking the Upload button, or by dragging and dropping onto the Upload button. If you need to delete or rename files, click the Manage files button. This will display a list of files in that series, and you can rename the file by typing in the filename box.
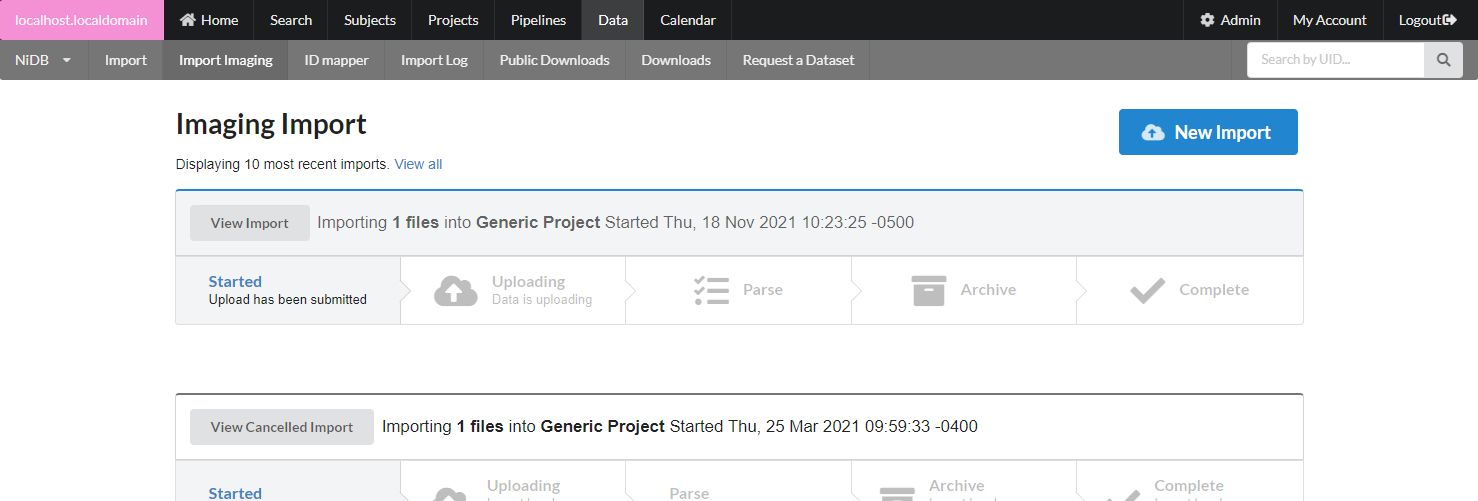
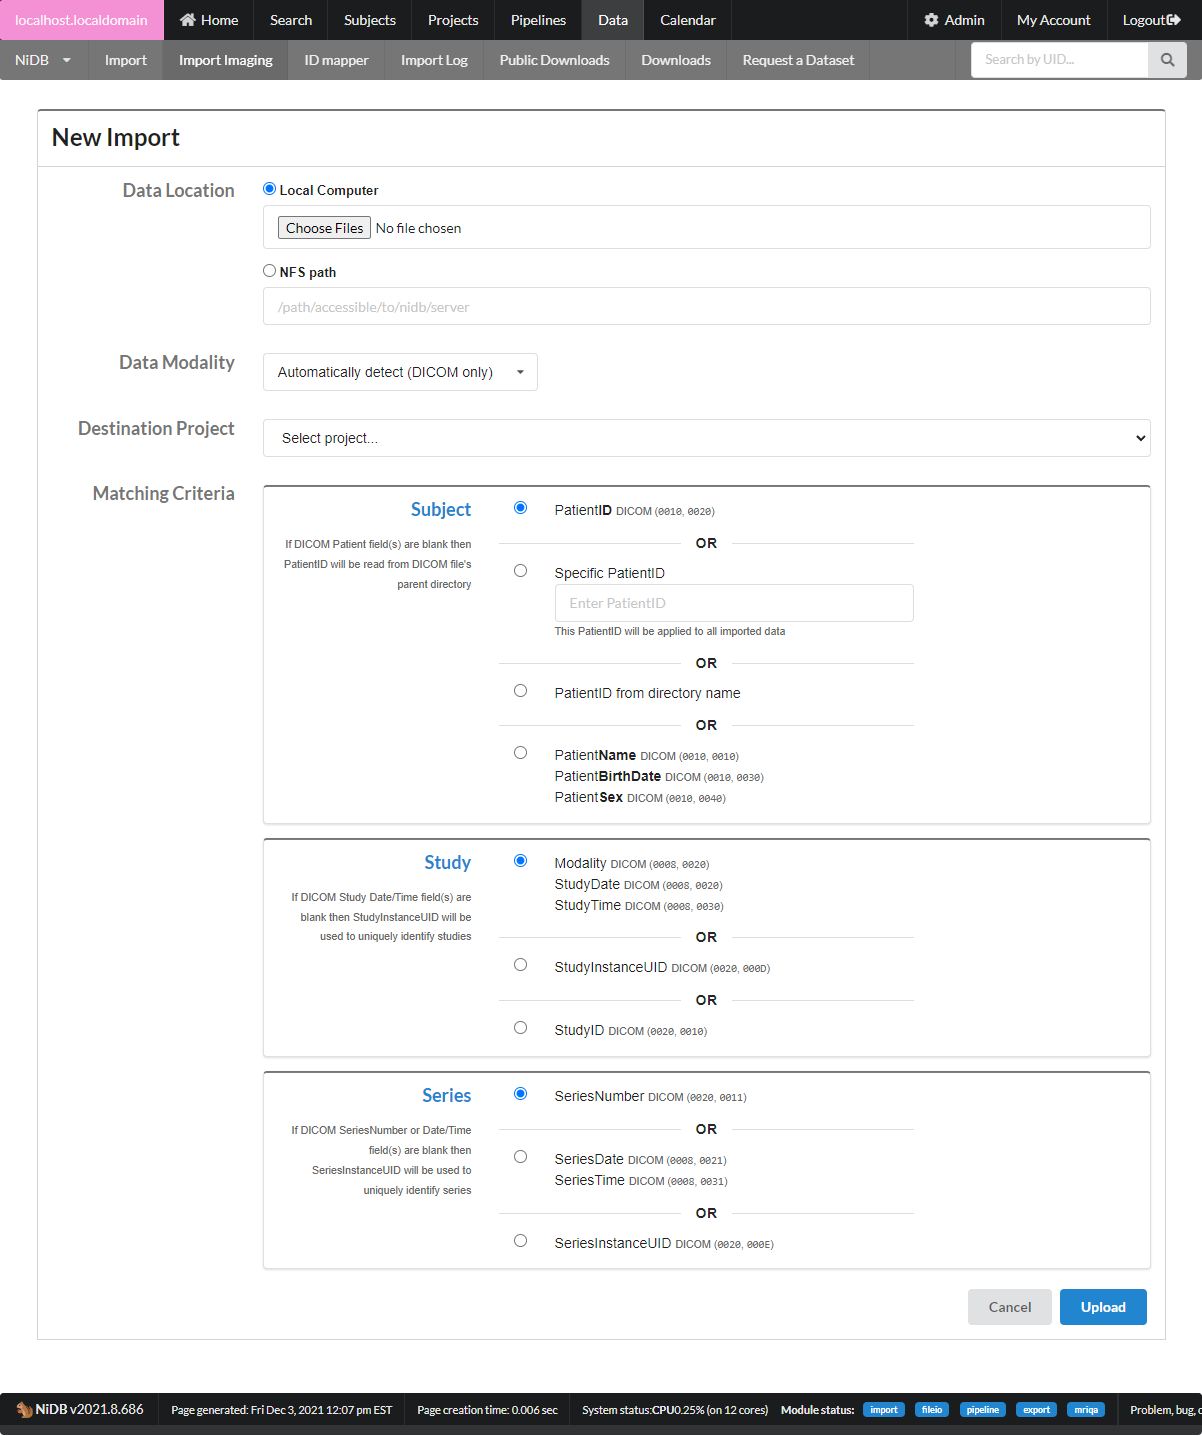
The imaging import page can be accessed by the Data → Import Imaging menu. Because datasets can be large and take hours to days to completely import and archive, they are queued in import jobs. To import a dataset, click the New Import button.
This will bring up the new import page.
Data Location
Data Modality
Destination Project - Data must be imported into an existing project.
Matching Criteria - DICOM data only
After all of the import information is filled out, click Upload. You can view the import by clicking on it. The import has 5 stages, described below.
Once the parsing stage is complete, you will need to select which series you want to import. This step gives you the opportunity to see exactly what datasets were identified in the import. If you were expecting a dataset to be in the import, but it wasn't found, this is a chance to find out why. Parsing issues such as missing data or duplicate datasets are often related to the matching criteria options. Sometimes the uniquely identifying information is not contained in the DICOM field it is supposed to be. That can lead to all series being put into one subject, or a new subject/study created for each series. There are so many ways in which data is organized and uniquely identified, so careful inspection of your data headers is important to select the right options.
If you find that none of the available matching options work for your data, contact the NiDB development team because we want to cover all import formats!
After you've selected the series you want to archive, click the Archive button. This will move the import to the next stage and queue the data to be archived.
At the end of archiving, the import should have a complete status. If there are any errors, the import will be marked error and you can view the error messages.
NiDB was originally designed to automatically import MRI data as it is collected on the scanner, so this method of import is the most robust. After each series is reconstructed on the MRI, it is automatically sent to a DICOM node (DICOM receiver running on NiDB). From there, NiDB parses incoming data and will automatically create the subject/enrollment/study/series for each DICOM file it receives.
How to make DICOM imports more efficient
Write mosaic images - Depending on the MRI scanner, the option to write one DICOM file per slice or per volume may be available. On Siemens MRIs, there should be an option for EPI data to write mosaic images. For example, if your EPI volume has 36 slices, the scanner would normally write out 36 separate files, each with an entire DICOM header. If you select write mosaic images, it will write one DICOM file with one header for all 36 slices. If you have 1000 BOLD reps in a timeseries, this time savings can be significant.
Ignore phase encoding direction - To read the phase encoding direction information from a Siemens DICOM file can require 3 passes to read the file, using 3 different parsers. Siemens contain a special section called the CSA header which contains information about phase encoding direction, and an ASCII text section which includes another phase encoding element, and the regular DICOM header information. Disabling the parsing of phase encoding direction can significantly speed up the archiving of DICOM files.
For non-MRI data, you can upload data in bulk to existing series. For example, if you have a directory full of task files, but each file belongs to a different subject. Rather than go into each subject/study and upload the file individually, you can upload the files as a batch. This method is best when used in conjunction with study templates.
This upload method assumes that you have already created all of the subjects, studies, and series. The series can be empty, or not. To create empty studies by template, see the Create Imaging Study section on use of templates.
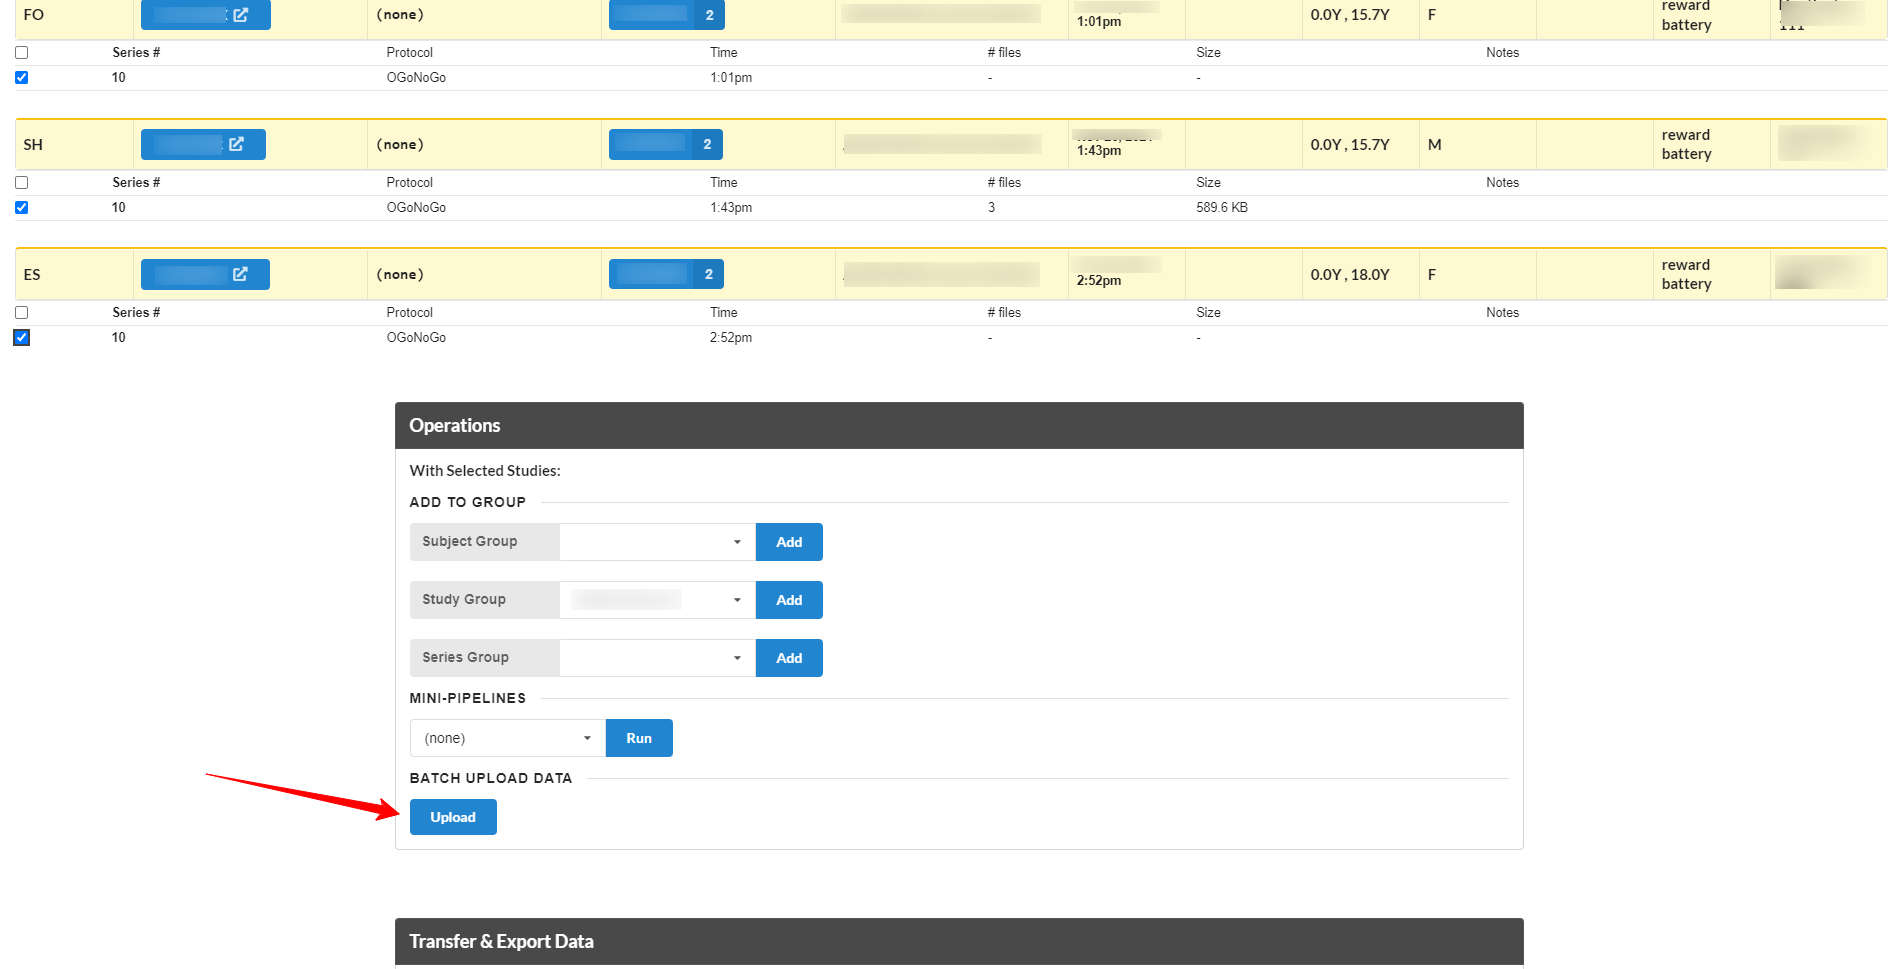
Start by searching on the Search page for the series you are interested in uploading data into. For example, search for all 'GoNoGo' TASKs in a particular project. This will show a list of just the series from that project, from the TASK modality, and for existing GoNoGo series. Select the series you want, and go toward the bottom of the page, in the Operations section, click the Batch Upload button.
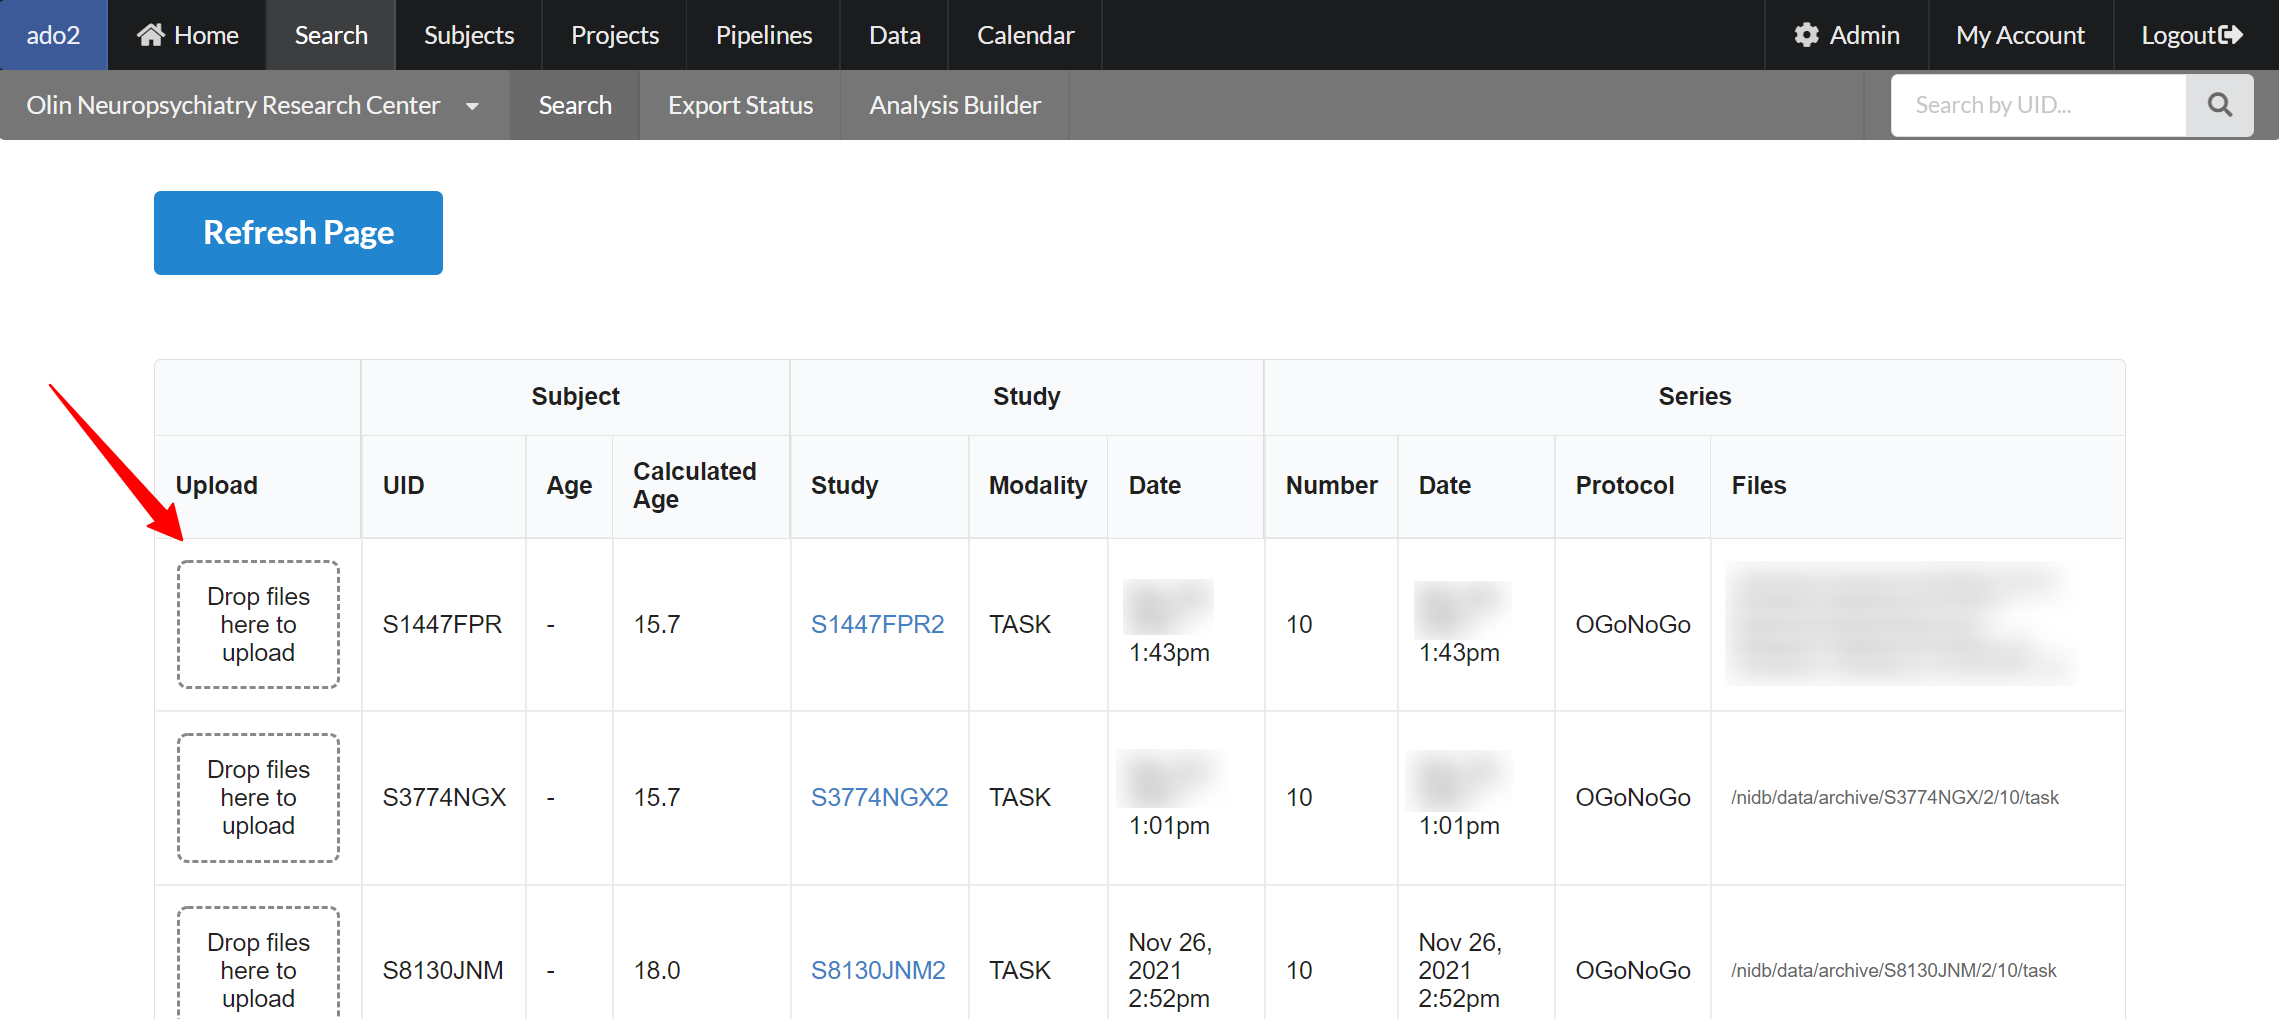
This will display a list of just those series, with an area to drag&drop files onto. Existing files for each series are displayed on the right side of the page.
Drag and drop files onto those series, and click Refresh Page to view the newly uploaded files.
| Term | Definition |
|---|---|
| Operation | Description |
|---|---|
| Data Location Criteria | Notes |
|---|
| Data Modality Criteria | Notes |
|---|
| Matching Field | Notes |
|---|
| Import Stage | Possible Status & Description |
|---|
UID
Unique ID, assigned by the system. This ID is unique to this installation of NiDB. If this subject is transferred to another NiDB installation, this ID will change
Alternate IDs
Comma separated list of IDs that are associated with this subject
Primary alternate ID
This is an alternate ID, which should be unique within the project.
For example, if the project uses IDs in the format 2xxx and the subject ID is 2382, then their ID should be labeled as *2382
Study Num
The unique number assigned by the system for each of a subject's studies. This number is unique within a subject, regardless of enrollment. For example, if a subject is enrolled in multiple projects, they may have studies 1,2,3 in project A and studies 5,6 in project B
StudyID
This ID basically concatenates the UID and the study num: for example S1234ABC8
Alternate StudyID
Sometimes an individual imaging session (study) has it's own unique ID. For example, some imaging centers will give a subject a new ID every time they go into the scanner. This is a place to store that ID
Rename
Renames the protocol name of the series
Edit Notes
Edits the notes displayed on the study page for that series
Move to new study
This is useful if you need to move series out of this study into a new study. For example if multiple series were grouped as a single study, but some of those series should actually be separate, this is a good option to use to separate them. This is basically the opposite of merging studies
Hide
Hides the series from searches and summary displays. The series will still be visible in the study page
Un-hide
Does the opposite of hiding the series
Reset QC
This will delete all of the QC information and will requeue the series to have QC information calculated
Delete
Deletes the series. Completely remove the series from the database. The series files will not be deleted from disk, instead the series directory will be renamed on disk
Local computer | Upload files via the web browser. 'Local computer' is basically the computer from which the browser is being run, so this may be a Windows PC, Mac, or other browser based computer |
NFS path | This is a path accessible from NiDB. The NiDB admin will need to configure access to NFS shares |
Automatically detect | This option will detect data modality based on the DICOM header. If you are importing DICOM data, use this option |
Specific modality | If you definitely know the data being imported is all of one modality, chose this. Non-DICOM files are not guaranteed to have any identifying information, so the imported files must be named to encode the information in the name. |
Unknown | This is a last ditch option to attempt to figure out the modality of the data by filename extension. It probably won't work |
Subject | PatientID - match the DICOM PatientID field to an existing UID or alternate UID
Specific PatientID - this ID will be applied to all imported data, ex |
Study | Default is to match studies by the DICOM fields Modality/StudyDate/StudyTime. Sometimes anonymized DICOM files have these fields blank, so StudyInstanceUID or StudyID must be used instead. If data is not importing as expected, check your DICOM tags and see if these study tags are valid |
Series | The default is to match series by the DICOM field SeriesNumber. But sometimes this field is blank, and SeriesDate/SeriesTime or SeriesUID must be used instead. If data is not importing as expected, check your DICOM tags to see if these series tags are valid |
Started | The upload has been submitted. You will likely see this status if you are importing data via NFS, rather than through local web upload |
Upload | Uploading - The data is being uploaded Uploaded - Data has finished uploading |
Parsing | Parsing - The data is being parsed. Depending on the size of the dataset, this could be minutes, hours, or days Parsed - The data has been parsed, meaning the IDs, series, and other information have been read and the data organized into a Subject→Study→Series heirarchy. Once parsing is complete, you must select the data to be archived |
Archive | Archiving - The data is being archived. Depending on the size of the dataset, this could be minutes, hours, or days Archived - The data is finished archiving |
Complete | The entire import process has finished |


